. -->

4.12.2013

More Faux Food Fun!

 the sweet little cottage that i once lived in had a 'greenhouse' window over the kitchen sink.
it was deep and not easily accessible, and the exposure was all wrong for plants.
so i turned it into a decorating opportunity!

each month, i'd create some kind of scene up there in the window
[so that i wouldn't have to look across the yard at the ugly side of my neighbors' house... which you can still see in the photo below]


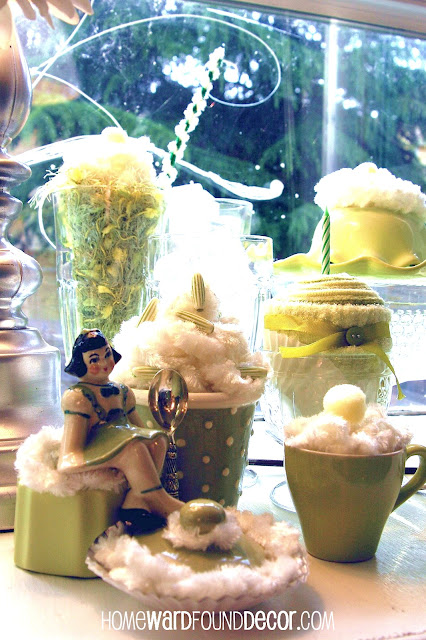
one particular scene was designed using my own 'FooFooFauxFood' creations.
i decided on an 'Ice Cream Social' theme...

all kinds of dishes and bowls and plates and cups were the starting point,
then i 'foofed them up' with fuzzy yarn and pom poms and beads to look like ice cream ;) 

NOTE: nothing is permanent here.  no glue was used. it's just assembled.

my sweet little shelf-sitter Miss Ami (named for a friend) is perched on a 'cupcake'  - 
which is a mound of fuzzy yarn 'whipped cream' on top of a tiny upside-down ceramic baking dish.

the 'pie' that  Miss Ami is using as a footrest
is the ceramic lid of a scented candle pot sitting in a glass bowl, 
with fuzzy 'caterpillar' yarn wound around the top knob and the edges to look like 'whipped cream'.

the 'espresso' and 'ice cream sundae' next to her are simply cups filled with tissue paper,
then topped with more yarn 'whipped cream'. 
a pompom and some bead 'sprinkles' are finishing touches.

the 'cupcake' is made from sweater pieces, wound into a shape and tied with a bow.
it sits in a cupcake paper inside a footed glass sugar bowl.
i was inspired to create that cupcake years ago by Miss Betz White,
the felted cupcake queen!
the 'milkshake' in the background
is a tall footed glass filled with nubby yarn in shades of green and a chenille stem 'straw'.
yarn swirled on top as whipped cream and a pompom are the finishing touches.

the 'ice cream cake/bombe' on the far right
is the ceramic scented candle pot (mentioned above) flipped upside down on a saucer.
more yarn serves as 'whipped cream' on top and around the edges.

the smaller 'bombe' above it is a scallop-edged bowl sitting on a scallop-edged plate.
more of those are on the other side of the window, nestled in glass bowls as shown below.

i also used some clear glass soda pop bottles to hold green & white flowers in the scene,
and filled a glass pedestal candy dish with green pompom 'mints' in the background.
 _______________________________________________
this certainly isn't rocket science, just a fun way to create decor using everyday items!
we all love looking at things in a new way and discovering new ways to use them...
why not turn your kids loose with some dishes or tupperware and craft supplies, 
and see what they come up with!

 find more of my fun 'FooFooFauxFood' ideas 
in these past HOMEWARDfound posts:

tiered cakes made from stacked dishes


tiered cakes made from stacked tins

4.07.2013

How to Make a FREE Moss Terrarium

i'm beginning to think that there truly is a huge universal creative consciousness.

there have been many times that i've prepared a project and post for HOMEWARDfound
and then have seen something in a similar theme pop up out there.

case in point:
MOSS

i SWEAR to you that i had this project planned to complete this weekend, 
and post about on Monday.
then on Friday, i saw posts everywhere [blogs, fb, and hometalk] of projects using MOSS!
after the momentary frustration of thinking that i was going to be 'late to the party', i laughed.
it's just one BIG HAPPY CREATIVE PARTY, after all!

so, a day (or two) late (and decidedly NOT a dollar short)
here is my 'Fast, Cheap, & Easy' TM take on creating something with MOSS -
a very FREE floral supply in the spring!

let's make terrariums, shall we?

first, you're going to need a clear glass container with a wide opening.

i am REUSING this vase that my BFF sent filled with orchids on my birthday. <3
i also grabbed a small brandy snifter on hand, just because i thought the pairing was cute.
cost? ZERO.
you can always find clear glass vases at thrift stores, dollar stores, and garage sales,
or use a large pickle or olive jar - or a GLASS LAMP GLOBE!
[just make sure your hand can fit down inside the opening]

next you will need some moss and tiny plants.
of course you can BUY them at the garden center, but WHY?
head out into the yard, or to an empty field or lot -
unless you live in the southwest, there will be moss somewhere nearby.
i'm in Southern California and there is moss in the shady corner of the front yard!

my tips for harvesting moss:
* use a metal kitchen spatula to scoop the moss up off of the ground. keeps it from breaking.
* try to find several different textures of moss for interest. 
[i found fuzzy moss, flat moss, and some miniature clovers (dichondra) to use - 
all within one square foot of my yard]
* when you harvest 'fuzzy' moss, shake it out a bit to remove BUGS.
* also: check for worms!
[a seven-inch earthworm crawled out of the dirt under some moss on my tray, and onto my hand - nearly made me scream. EEW]

i use cookie sheets and metal trays to hold the moss clumps and the small plants as i harvest -
the plants are basically just offshoots and seedlings sprouting up where they shouldn't be in the yard.
[this way, i got some weeding done, too!]

you'll also need a handful of small rocks or gravel for the bottom of the vase - 
just grab those from the yard or driveway, too. i washed mine, but you don't have to.
carefully place those in the bottom of your clean vase.

then add enough potting soil (or really good soil from your garden if you have it) to the vase.
you'll want the soil to fill one third of the container.

after this step, i use a paper towel to brush loose soil off of the inside of the glass.

now it's time to add the plants and moss!
first, select clumps of the moss and use the spatula to place them inside the vase - 
they'll just slide right off and into place that way. no breaking.
if needed, use the spatula to cut the clumps so they will fit together in a circular pattern.

a wooden kitchen skewer helps to press the edges of the moss clumps down into the soil,
and also to create a small hole for the plants.
set the plants in place, and then use the skewer to push a little bit of soil in around them.
[it tends to crush the moss less than fingers do]

in the large vase, i added a few white rocks around the base of the largest plant to stabilize it.
in the small vase, there's one little white rock - just to coordinate the look.
you can also add a small statue or figure,
or make it a 'fairy garden' by creating a whole garden scene in miniature
[with details like tiny pebbles as a walkway, itsy bitsy flowering mosses, a dollhouse chair or bench...]

in these overhead shots, you can see the varied types of moss used, 
and how they help to create a miniature 'landscape' look.

in a side-view shot, you can see how the plant matter all remains below the top edge of the container...
not only does it look better, but it helps them retain more moisture. water with a mist or a few drops daily.


btw, i spied a little glass container on a shelf and grabbed the lid...
it fit the tiny brandy snifter PERFECTLY!
 a lidded container is a great way to keep the terrarium environment moist

i spent absolutely NOTHING to make these, and the project took just an hour - including the photos.
that, my friends, is my idea of 'Fast, Cheap, & EASY!'TM

and for more MOSS-Y inspiration, check out THESE posts on other blogs:


...and if you are in the southwest and can't find moss anywhere near you, 
here's a one-stop solution:
 _______________________

4.04.2013

Photo Finish: 3 Spring Tables

 in my last post, i shared the process of cleaning up and decorating a garden house
(more than a shed, but not quite a greenhouse)
that was lovingly built in the backyard of a house i rented in Seattle.
[the owner is my sweet friend Todd Waddell, a VERY talented garden & visual designer
who also owns the lovely shop Bountiful Home in Edmonds, WA]

after the two day, no cost garden house makeover project was done,
i took the third day to do a few exterior improvements
(also shown in my last post
and then i just PLAYED, taking hundreds of photos.

i gathered up some props from the yard and my studio,
which all combined with my basic white dinnerware and clear glassware
to create several different tablescapes for spring.
some the images you see in my new banner and other graphics
were all shot inside that greenhouse on a cold, cloudy winter Seattle day...
 the natural light in this space was AH-mazing!

i hope you find decorating & entertaining inspiration in these
three very different table settings with Spring-fresh style:

 in this previous post, i shared my idea for using stemless wine glasses as miniature 'domes'.

this pink tablescape for spring shows one version of them:
miniature pink ranuculus blossoms inside a mini terra cotta pot, under a glass dome,
which is set off by vintage Coke bottles holding pink roses
and vintage linens with a pink border.

revelation: the roses are fakes. GOOD ones. so are the ranuculus. 
it was about 38 degrees when i shot these photos,
but you'd never know it from the flowers!

then i switched things up, and shot it this way:


 moss [scavenged from the yard] fills up terra cotta pots of various sizes, 
including miniature pots under the glass 'domes' - 
one dome fits over the tiniest pot, another dome sits up IN a small pot.
a tiny leaf on a twig and the sprouts of a bulb add interest to each.
[those bulbs with the green sprouts? onions.]

a quick switchup, and i had this setting:
 clear glass, white ceramic pieces, white tulips, and some wood eggs [found at a thrift shop]
create a simple, farm-fresh look - that can also be very contemporary. 

 the wood eggs sit on top of antique cut glass salt cellars, under the stemless wineglass 'domes'.

then it was time for some 'garden' photos -
and amazingly, the sun came out just as i was shooting them!

 those fabulous white tulips show up a lot in my photos. pretty, huh?
they're fake. 
i pulled them out of floral wreaths that i found on a clearance rack at Restoration Hardware Outlet.

the leaves sprouting up out of terra cotta pots?
fake!

being a visual stylist is like being the biggest liar on the planet sometimes -
we have to create spring in winter, Christmas during a summer heat wave, and summer in the snow,
and make it as realistic as possible! 
when i find products that work as well as these tulips do, i use them. often.

a few shots of of some collections... staged on a miniature chair.

it was a really fun day for me, 
enjoying the fruits of my labor and a space that was all my own to work in.

and do you know what happened the NEXT day?

yeah. it snowed.
gotta' love Seattle!

shared online:

funky junk interiors

4.02.2013

Garden House Makeover!

Yes, i REALLY did do this makeover in two days!
i think if that you see it and realize how absolutely possible it IS,
then you can take on a Spring Cleanup Project like this one, too!

here's what happened last winter (2012):
it was january. in seattle. COLD. rainy. gray. depressing.
i was ACHING for spring.
 and when i looked out into the backyard of the sweet little cottage i was renting,
there was a little garden house (potting shed, she shed, garden shed)
that the talented owner had made from salvage.
and it was full of junk. 
some of the junk was the house owners, and had been there for years.

some of the junk was mine, and had been dumped there the month before when i moved in.
the space was totally unusable.
but i knew that with a good cleaning job,
it could be a FABULOUSly usable space - and a stylist's DREAM!

so i asked myself these questions:
* what junk that is thrown in there can be used in a new way for storage or decor?
* what junk/stuff that i have in storage or in the garage can be used in there?
[and let me tell you, i had a LOT]

on Friday, i gathered up all the stuff i was going to use, and sat it outside the garden house.
i was ready to begin the project on Saturday morning
and DETERMINED to have it done by Sunday afternoon.

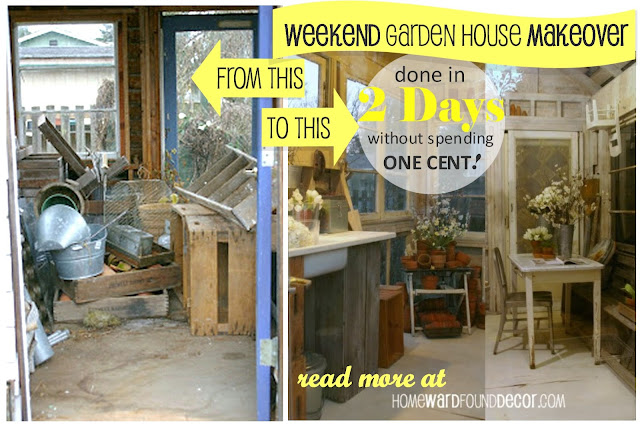
a lofty goal, especially considering that it looked like THIS inside on Friday:
Saturday morning, i began by emptying out the garden house...
which made it look a LITTLE bit less awful:

the old screen door that i had was hung on the INSIDE of the back doorway
[with the glass door swinging open to the right, outside of the garden house,
this was the only way to make a screen door work there.
and i had one, so i wanted to use it.]

after that, i grabbed two partial gallon cans of white paint left from painting furniture,
and watered them down to a 50/50 mix.
i used that to paint all of the window edges and door trim and doors, and floor.
there was about a half can of the whitewash left, so i added more water
and used that really thin mix to wash all of the walls and beams.
the wood was SO dry that it literally sucked up all of the paint/whitewash!
i sat one small heater inside the garden house, just to be sure it would dry.
and left the heater on overnight with the doors closed.
[NOTE: this was a very safe contractor's heater on a sturdy base, not a household heater.]

on Sunday morning, i started moving in the furniture...
on the left side of the entry door:
one tall old crate [that had been in the garden house] and
two of my own large wood crates, stacked on their sides
formed the supports for my enamel kitchen sink
[been hauling that around for about ten years...]
there was no running water, but the sink and it's attached counters worked great for potting plants.
had i stayed there, i would have run the garden hose through the wall and into the sink.

a pegrack made from old fence boards and ceramic pegs for electric fences
was hung over the sink for storage.
and an old aluminum light pendant was hung above it all
[attached to a heavy-duty construction extension cord, that ran to an exterior plug on the house]
in the back corner, an old wooden chair that i 'rescued' from a dumpster
[and have subsequently used for years in retail store & seminar stage displays]
holds my medium and large terra cotta plant pots in unusual ways:
there's a metal industrial bread pan on the floor holding pots,
and there's a metal industrial muffin-top pan sitting across the arms of the chair holding pots.
a few others sit on the chair seat under the muffin-top pan.

all of the tiniest pots sit up on a beam between the studs.
[i saw that idea at Christiansen's, one of my fave nurseries]

on the right side of the entry door:
there had been a long wood park bench inside the garden house (the owner's),
and i placed it under the large window. over the window, i hung another one of the pegracks.
it's not shown in the photo below, but i later hung a large white lace bedspread from those hooks
to block out the VERY ugly view of the neighbor's yard. it still let the light in, which was perfect.

i sat an old enamel-top table (roadside find!) in front of the bench,
and added one of my metal chairs to the other side.
(the other four matching metal chairs were at a patio table in the backyard)

 above the table, a metal floral chandelier that i have used for YEARS was hung from the rafters.
[you've seen it painted bright green in a past office post!]
the chandy's electrical cord was connected to another heavy-duty contractor's extension cord 
that ran to an exterior plug on the back of the house.
[the cord ran down the fence line to the house]

with all of the major pieces in place, it was time for the details...

here's a photo of the finished interior on Sunday afternoon:
everything that had already been inside the garden house was used.
i added a LOT of my own stuff - furniture, lighting, decor & garden elements.
but i did not spend one single cent on this project!

 here's what i did a day later:

the garden house's exterior didn't really need much work - 
nothing more than a removal of some old hops vines that had grown up the side
and the addition of a 'porch light' under the existing glass window 'awning' over the door.
[the light was a plain metal worklight from Home Depot that i had on hand,
and the cord ran under a board into the extension cord already inside]

i also hung two small metal 'shelves' from IKEA, one under each window,
and loaded them up with some terra cotta pots.
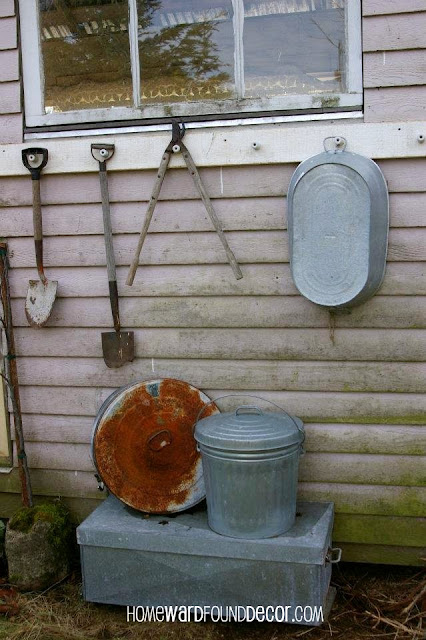
around the side of the garden house, another one of my original peg racks was hung outside
to hold large galvanized buckets and old garden tools.

and later that same day
i got busy shooting photos for upcoming magazine and blog projects:
 ...and more that i'll share in an upcoming post!

Then the NEXT day, THIS happened:

yup... it SNOWED!(pretty, isn't it?)
i don't live in that little cottage in Seattle anymore, 
but i sure have fond memories of this project and the photo session.
thank you, Todd, for the freedom to do this to your place!

so what are YOU doing this coming weekend?
maybe it's time to look at that garden shed or back porch in a new way...
there's a LOT you can accomplish in just two days!

shared online:

cupcakes & crinoline

green willow pond 

jennifer rizzo's fabulously creative fridays