. -->

2.06.2014

Tin Can 'Painted Pails'

Last fall, I shared a project that was a 'flashback' to something I had made long ago:
[ like, ah, WAY back in the NINETIES! LOL ]
Painted tin cans - I call them little 'Painted Pails'. 

I just found more photos of that product that I created for different seasons ;)
and since 'tin can crafts' seem to be THE hot trend right now,  
I figure why not share more inspiration?!

The photo above shows the Valentine version,
where the wire handles were bent into a heart shape.

The labels evolved from the very first Painted Pails I made in the Spring of 1995,
which looked like garden seed packets and fruit pie filling labels:

I also made versions of Painted Pails for Holiday | Winter:


The Happy Snowman versions had wire handles bent into 'top hat' shapes,
and also stackable snowmen made from several sizes of cans.

I made Painted Pails in Spring, for Easter:

... and the wire handles were bent into 'floppy ear' shapes.

and of course, there were the Pumpkin Painted Pails
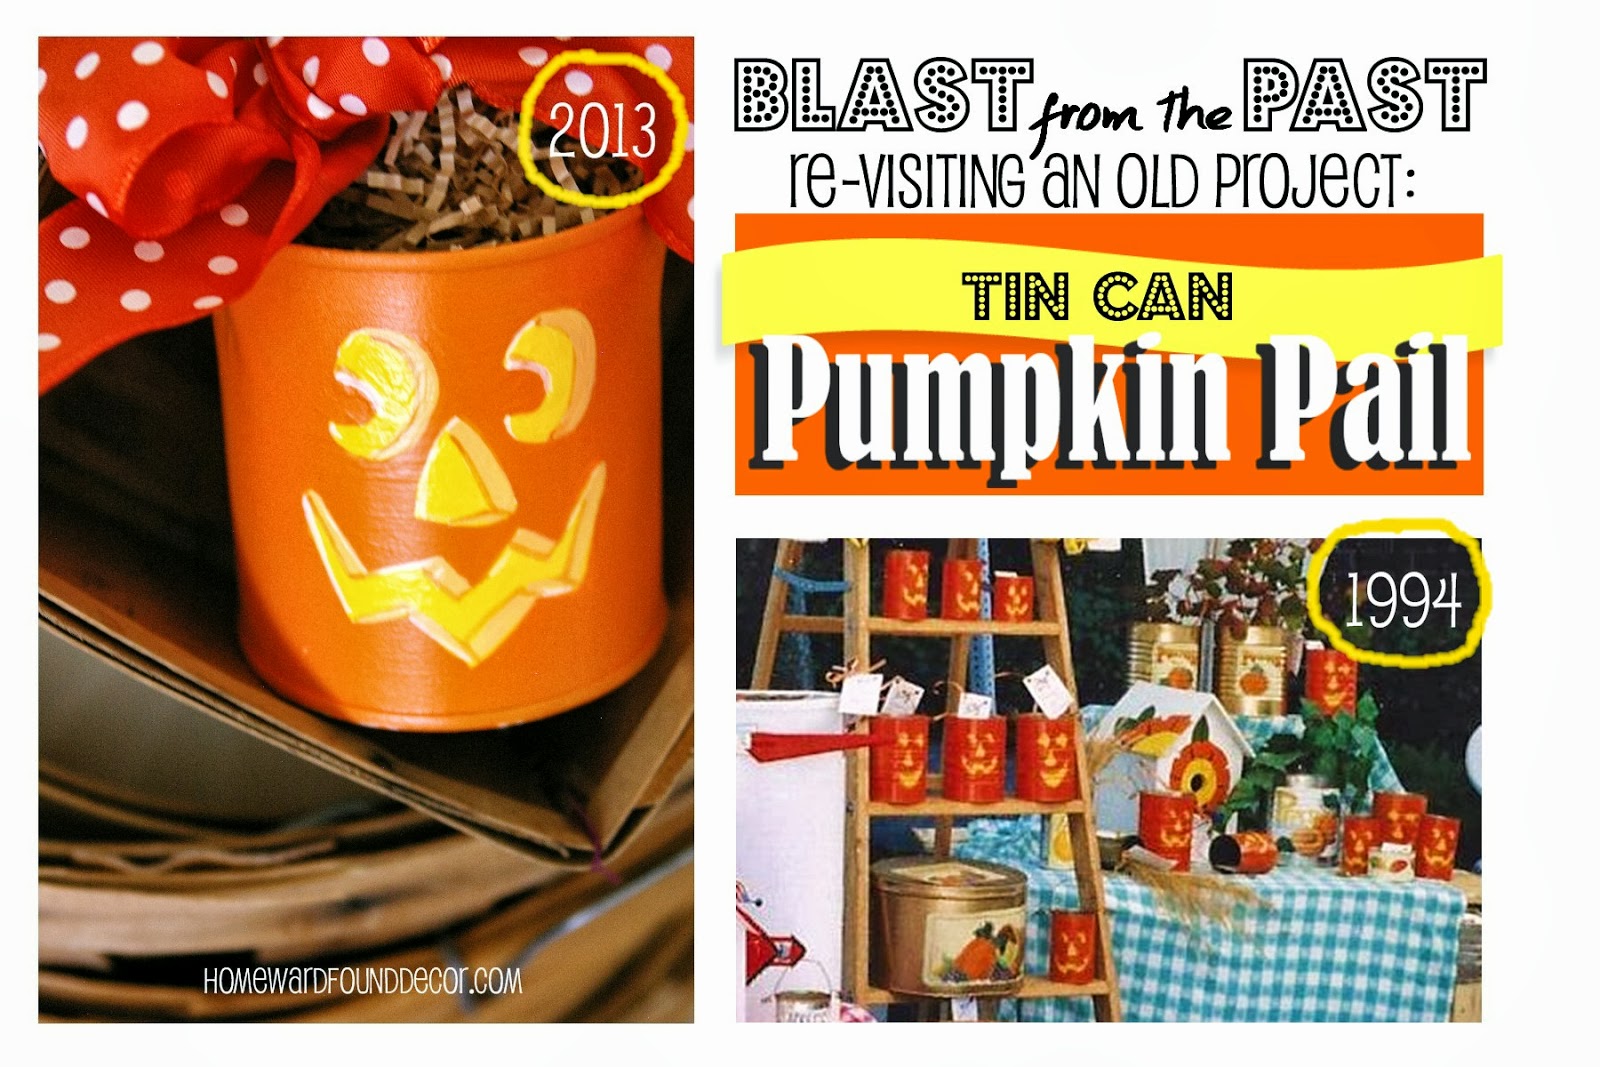
 that I shared last fall in my Tin Can Painted Pail Post
 click for my TUTORIAL!...

I also made Painted Pails that looked like crayons. And Leprechauns. And Firecrackers.
But I really don't think more photos are needed for you to get the general idea.
If I were to guess as to how many tin cans I painted back then,
over a five year period that I was selling them at street fairs and in my tiny store,
I'd have to say it was about 50 cans a week. Yes, really!

I tell ya', I was pretty sick of painted tin cans by the time I was done!!!

The various holiday versions of these came about because every holiday,
I would go overboard to create a fun breakfast table setting for my four young children...

Balloons, streamers, napkins, and centerpiece would decorate the dining room.
The food would even match the holiday: 
pink milk and pancakes for Valentine's Day, green for St. Patrick's Day, orange for Halloween.
 I didn't spend a lot (I bought most of the stuff at thrift shops)
but it was so much fun to decorate the table after they had gone to bed,
and then watch them get all excited the next morning!

And at each place setting, they'd find a Painted Pail -
filled to the brim with art supplies and candy and a little stuffed animal.
It was just a simple thing I could do to make them happy.
For me, that is always the best part of crafting & decorating...

shared online:

One Project Closer | Creativity Unleashed
 

Cupcakes & Crinoline | Project Inspire{d}

2.04.2014

I'm Stuck On You, Valentine!

I have a PRIZED collection of Mary Engelbreit Home Companion Magazines
[EVERY issue!] and turn to them often for seasonal inspiration.
Mary is such a champion for independent artists, small businesses, and creative spirits,
filling the pages of her lovely publication with color, fun, and 'Breit Ideas'...
Like so many others, I miss this magazine - but I do understand why she discontinued it.

Recently, I was thumbing through past winter issues of MEHC,
and saw a really cute and simple craft idea on the pages.
Since it's something I have already done myself, I thought I'd share it with you.


Before I drafted this post, I messaged Miss Mary on facebook,
and asked her permission to show a few pages of her marvelous magazine in my blog post -
and she replied 'That would be great, Deb! Thanks for asking first!'
SO.... with permission from 'The Queen of Everything', I shall proceed!

Here are the pages I saw in the February/March 2005 issue of MEHC Magazine
... when I saw them, I immediately thought of THIS little creation of mine:
I made this tiny 'foofoo faux food'TM ice cream sundae pincushion a long time ago.
I MAY have even been inspired back then by this very article in Mary's magazine!
.
Inspired all over again, I made use of some stuff that I had on hand:
red sweater scraps, leftover trimming, polyfil stuffing, and some miscellaneous containers,
and created a few MORE pincushions:

An errant cupcake wrapper and an ironstone creamer are perfect pincushion bases,
and my Original Sweet Sweater Snowmen are pulling double-duty as happy pincushions!
[PS: I still have a FEW of them left - for sale now in the HWf SHOP ]
I unearthed several of those 'tomato' ('strawberry'????) pincushions, too,
and popped them into other containers just for fun.

How 'Fast, Cheap & EASY'TM is this?!!!

As the article in Mary's magazine suggests,
this would be a simple craft project and great gift idea for Valentine's Day!

My quick collection of pincushions now populates the wall shelves in my office...
Joined by a pair of sweater-covered pillows and a cableknit throw on the sofa,
it's a happy corner with easily changed Seasonal Style!

[oh, and that 'D' on the shelf? It's a lil' something I just whipped up, using
a pressboard letter, some old giftwrap, and two round pieces from a place card kit.]
Does it look like something specific? Like maybe MOUSE EARS? IT IS!
I'm celebrating... because my lifelong dream came true last Friday afternoon...

I now work for the Walt Disney Company!!! 
____________________________________________

I'd like to offer my deepest thanks and gratitude to Mary Engelbreit,
for her permission to show the pages from her treasured MEHC Magazine!
This woman has a heart of gold, and I admire her so...
Connect with Miss Mary on her 
website, blog, and facebook page!

OhMiGosh...have MERCY!

Miss Mary shared my blog post on her own facebook page today!


shared online:
 
Cupcakes & Crinoline | Project Inspire{d}


1.29.2014

Fabric Hearts Tutorial

 Many years ago, I used up some small scraps of fabrics left in my 'stash',
making little stuffed fabric hearts for my winter / Valentine's Day decor.

Created from remnants of a chenille bedspread, a matlasse' bedspread, and burlap,
I've displayed them in many ways over the years...
As my seasonal decor contribution to two lovely publications,
Creating Vintage Charm Magazine and JOYful Home & Life online,
 I'm sharing a simple tutorial for making stuffed fabric hearts for the month of February
Because the tutorial is so photo-heavy,
I am hosting it here on my blog instead of at the other locations...
Enjoy this 'fast, cheap & easy'TM craft project!

continue reading for tutorial...

1.27.2014

A 5 Minute Project to Love

 I found a hidden-away stash of miniature metal frames!
I snagged one and did a quick project with it,  just for me.
True to form, I utilized a 'Fast, Cheap & Easy'TM method:
I grabbed a white paint pen and scribbled all over the metal!
That changed the frame from silver to white  - in a matter of three minutes.
Now the details of the carving really stand out.

I turned the photo print around, stuck a heart on it, added the word 'love',
then I sat it in the back of my miniature 'Grandpa's Truck' in my office:
This took me all of five minutes to make, my friends...
and it's a really sweet little vignette on my shelf that I see dozens of times a day.
It's not only about Valentine's Day coming soon,
but about that truck and the memories of my Grandpa's truck that I love.

I'm sharing this to remind you that
seasonal decorating doesn't have to be a huge undertaking.
It can be something you do in five minutes
just to brighten up a corner or a shelf, or a gift-wrapped present - and your day!


1.24.2014

WhiteWashed

 In my many years of decorating homes, styling retail displays, 
and selling vintage & re-purposed items,
my favorite 'tool' has always been PAINT...
it's inexpensive, it's easy to work with,
and it can completely transform an old or salvaged object easier than anything else. 

Paint is also a handy tool for us girls who like to change up our decor a lot...
Case in point: the metal floral chandelier shown below.

I bought it in 1996, when it was the original multi-color painted finish = UGLEEEEEE!
Over the years that I owned it, I painted and RE-painted it MANY colors:
green, pink, black, green again, white, yellow, gold, black again, silver, and white again.

And WHITE paint is the one simple color that seems to have the most magical powers!

Taking an old, ugly, dated brass chandelier / light fixture and turning it into something beautiful
is really easy with white paint:
Those chandeliers were originally, from left to right: brass . black metal . brass
[and the one shown at the top of this post was muddy brown/beige]

White paint, used with a light hand, can also bring an old wood finish back to life,
lightening it up without covering the lovely details...
using a simple 'dry brush' whitewashing paint technique, 
an old plank table and pine country chairs are ready for their new starring roles:
[the new burlap seat cover helps update the chairs, too...]
Another example of 'dry-brush' painting is shown on this old front door...
The salvaged front door had a horribly damaged wood finish, with peeling clear lacquer.
Sanding the worn finish down and dry-brushing white in several coats all over the door
caused the relief carving of a sailing ship to really pop.

The door was then re-fashioned into a hall bench and coatrack,
by using an end table and chair arms for the seat, 
a piece of crown molding on the top of the door,
and three perfectly-placed ceramic knobs as coat hooks.
[piece created by my late husband for our former business]

A coat of white paint can transform the mood and style of a piece of furniture:
This giant bench was made from a salvaged king-sized black headboard and footboard,
along with a seat from a church pew.
 [ piece created by my late husband for our former business].
It looked very contemporary and masculine in the original black color - 
but was completely changed when  repainted in a warm white.  
It embraced a soft, feminine Shabby Chic style!

Small items can be reborn with a spray of white paint, too -
this gathering of old and new glass bottles went from dingy to hip!

... and sometimes, a whole BUILDING can be revitalized with a wash of white paint:
My weekend garden house makeover project 
was featured on HOMEWARDfound last spring...
see it HERE

If you don't already know about this paint trick, I'll clue you in:
Head to the paint store or paint department at the hardware store.
Ask them for 'mis-tints'. 
These are the colors that turned out WRONG.
You can pick up those babies for pennies on the dollar! 
 ...and yes, you CAN find whites!

I highly recommend Habitat for Humanity ReStore as a source for inexpensive paint!

shared online:
Funky Junk Interiors | Salvaged Whites

1.22.2014

Charmed, I'm Sure!

This blog is, for the most part, about seasonal home decor.
But once in awhile, we girls just need to decorate OURSELVES, don'tcha' think???

Well, I do! And when I found something today that fits right in with
my 'found object' obsession and my 'fast, cheap & easy' decor style,
I wanted to share it - to hopefully inspire you to create something similar: 
a charm bracelet
This is a really easy, inexpensive and quick project made from stuff you already have.

And I'd bet that like me,
you don't even KNOW what kinda' stuff you already have...
start looking around the house, and you'll come up with a lot!

continue reading for the how-to!