. -->
Showing posts with label simple solutions. Show all posts

1.19.2018

How a Toolbox Helped Me Get Organized!

rusty metal toolbox upcycle home decor
 i just purchased this very usable rusty big ol' metal toolbox
from Kara at LuLu Belle's Junk Trunk at Needful Things Addiction - 
the store where my homewardFOUND shop is located.
(hazard of the vintage industry... we buy each other's stuff!)

admittedly, i bought it because of the patina and color. it's my thing!
but i knew that with all the compartments and shelves inside, 
it would come in handy in my studio/office.
so i brought it home, sat it down on the floor, snapped a few photos... and saw THIS:
i see faces in inanimate objects
lord, i need help. i'm so Disney that i see animated faces in everything.

ANYWAY....
as i was sitting at my desk on the computer, i needed something.
and when i went to get it, i couldn't find it. frustrating, right?
well, it was office supplies. and my office supplies are all over the place - 
as in, not in one place but in many drawers and buckets and shelves.

talk about an AHA moment!
continue reading to see what i did:

12.31.2017

Take the Party With You Tonight!

it's New Years' Eve!
time to pop the corks, pour the bubbly, and start celebrating!

 i've just got to share this nifty way to transport sparkling wine and glasses to an event -
whether you are heading to the roof to watch fireworks or the ball drop at midnight,
or to the neighbor's place for some revelry,
it's a perfect way to take the party with you!

Click 'Continue Reading' for the tutorial...

8.04.2016

'pretty up' the pantry

The other day I went to the pantry to grab a snack, and just stood there staring. 
It was ugly. And disorganized. And did I say ugly? I was tired of looking at it.


It was TIME to DO something about it.


But there's no money to just go buy a bunch of containers and jars. Nope. 
So I did that thing I DO: I went foraging around the house looking for things to use!

PRETTY things. Things like baskets and trays and containers that would corral items
while bringing some style to the pantry - without spending a CENT.


What I found was baskets. Lord, does my Mom love baskets!

I found an entire wardrobe packing box and two other large moving boxes FULL of baskets out in the garage.
Up on the top of some shelves, I spied the wood harvest baskets
that I used to stage photos of my Sweet Sweater Pumpkins TM over the years 
along with a wood fruit crate.

I grabbed them ALL and got busy....


Here's how it went
(which is par for the course on anything relating to this house, I swear...):
I took a 'before' pic of the messy pantry. Then I emptied it, and took another photo.
THAT photo has disappeared. It's just....GONE. 
So the only 'empty' photo I have to show you is from earlier in the building process.
It took two tries to get the pantry the way I wanted it...
I ran out of containers the first time around, so I used the white plastic bins. HATE them.
Went into the guest room, the linen closet, the party supply boxes 
and found a few more baskets holding other things.
Swapped them out for the plastic bins, and was much happier with the result here.
There were items that I consider to be 'messes waiting to happen': molasses, syrup, honey.
To head off a disaster, I searched around for trays that I could put them in...

and I found some metal baking pans that don't get used very often. So I used them!
(why NOT? they are just gonna' sit in the cabinet doing nothing....)

On the top shelf, which has a TON of space, I wanted something really pretty...
So I arranged the crate, two large baskets, a few kitchen pots,
and a funky branch in a wood bowl up there to add some interest.
This isn't one of those high-style pantry photos you see staged to within an inch of its life
on Pinterest, or in a glossy magazine photo.
It's not the result of a bank-balance-breaking shopping trip at The Container Store.

It's just a pantry prettied up by using what was on hand... baskets. crates. baking pans. 

I'm not decanting the pasta into jars with chalkboard labels. 

I'm not covering the cake boxes with paper to match my color scheme.

I'm just opening those doors and smiling my head off 

at the order, organization, and style that I was able to add in about an hour
without spending a single cent.

11.22.2014

Pretty Potluck Presentation

'Tis the Season for parties - and potlucks!
It seems most gatherings now include everyone pitching in and bringing a dish to share -
so deliver your goodies with style using a few simple elements from your kitchen!
( I know Tupperware and Pyrex work well, but they aren't exactly pretty!)
Whether you are contributing a salad, a dessert, or a hot casserole,
this simple wrap & carry method will secure the food
AND look great when it comes time to serve!

All you have to do is cover the bowl with a plate or platter,
then tie it on securely using a plain muslin dishcloth or sturdy twill ribbon:
* Lay a dishtowel on the counter, and sit the bowl of food on top.
* To insulate the bowl, add a second dishtowel as a wrap around the bowl itself.
* Place the plate/platter (depending on the size of the bowl) on top. 
 *  Lift the two opposite corners and tie them on top of the bowl.
* Repeat with the other two opposite corners.
* Finally, pop the serving utensil into the bow, and tie it one more time to secure.
You can also fold the dishtowel into a long strip,
and wrap it once around the bowl & plate to secure.
Add the serving utensil and tie again.

Ramekins and casserole dishes work, too - just find a plate or platter that fits the top,
and use heavy twill ribbon to secure.

Use brand new, thrifted, or vintage ceramics and linens - it's up to you!
( PS: The dishtowel comes in handy for drying off the dishes after the party, too!!!
)

11.19.2014

A Rather Shady Project!

 In my last post, I focused on the dried roses in my office...
but right next to them is one of my trademark 'Fast, Cheap & Easy' TM ideas
for updating your decor each season:
Slipcover your lampshades!
That lovely vintage alabaster lamp from a thrift store
has a plain ol' white drum shade that cost me all of three bucks at the IKEA 'as is' department.
It has one lil' dent in the back ;)
But no one sees it, because I am constantly covering the lampshade with all kinds of things - 
like this slipcover, which was made from
A RUFFLED TANK TOP!

I can just hear you now... yes, yes, I can....

"OK, Deb is certifiable now. She's gone over the edge with this one.
Cutting up CLOTHES to decorate with?"
Oh, wait, there was that sweater thing..... ;)


No sewing, no gluing - nothing but a cut with scissors.
 Maybe a straight pin or two to make sure it stays tight on the shade, that's IT.
Five minutes TOPS.

Perfect for the holiday season, when you want to freshen up the decor in your rooms!
The 'How To':

*Slip the shirt over the lampshade BEFORE YOU CUT IT.
*Move it around to to find the best 'fit' and the correct amount of shirt to cut off.
*Remove the shirt from the shade, lay it flat, and cut it in half.
* Slip the cut portion of the shirt (lower half) back onto the shade.
* Tuck the top edge of the shirt section over the top edge of the shade.

* Use a few straight pins to hold it tight if the shirt is a lot bigger AROUND than the shade.
I use women's small size shirts, and they always fit perfectly on basic lampshades.

Just think about doing this using a sparkly glittery tank top :)
Or... just maybe.... a SWEATER!

Want MORE lampshade inspiration? Click HERE!


shared online:

Yesterday On Tuesday | Project Inspire{d}


5.06.2014

Jewelry Makeovers: Bling It On!

Mother's Day is on the way, and it's time to show Mom the LOVE!
 

But let's get real here, shall we?
Not everyone can afford to head to a jewelry store and buy a sparkling gem for Mom.
It's not about how much you love her, it's about your bank balance
and being the responsible person she raised you to be.

So, how about some ideas for re-imagining baubles from the thrift store or flea market?

A few easy steps to make the old NEW again?
I mean, Mom loved those macaroni noodle necklaces we made in kindergarten, right?
So if she's into jewelry, and hip to vintage and reclaimed style, 
let's make her something with a BIT more sparkle and shine!

This past week, I took some of the stuff that's been cluttering up my jewelry box
and took a good look at it all.
As I did, I started laying various pieces together, thinking about how they could be changed,
and came up with some new jewelry without spending a cent...

[unfortunately, I didn't photograph the 'befores' because it wasn't until I was DONE
that I decided to make this a blog post!]
Project 1: a multistrand necklace.
I had three various-sized and length silver metal chain necklaces (dollar tree, years ago)
one ultra-long chain with multi-colored resin beads (thrift store, $2.00)
and one chain with big loops and pink plastic beads. Yes, plastic.  
I don't know why I held onto that pink one - but I am glad I did!
It became the base for the new piece....

I just opened a few of the large links, and slipped a link from the other necklaces into them:
The bejeweled chain was folded in thirds, then attached,
and the silver chains were spiral-wrapped around the others, then attached.
It's chunky, it's fun, 
and it perfectly matches one of the bright graphic Mickey Mouse tee shirts I wear to work!

[ I have five strands of pearls that I am going to do something similar with, too]
 Project 2: a pieced necklace
This one came about because I truly love the vintage pieces...
I had them listed here in the HOMEWARDfound shop, and they didn't sell.
Which is GOOD, because I really didn't want to part with them!!!

I started by deconstructing the clip-on earrings, removing the backs and clips, 
and also the pin from the back of the brooch.
Then I took another cheap chain I had, one with metallic resin beads, 
and took out the center chain link and removed the bead that had been on it.
Then I connected each of those 'ends' to the floral elements, 
and attached that one bead to the bottom petal of the large flower.
The warm gold-silver tone of the chain picks up the gold accents on the vintage flowers, 
and the beads make it fresh and fun.
It reminds me of stuff from Anthro - without the price tag!

Confession: I cussed a lot while making this one. A LOT.
This was tiny, tiny work.... I made a lot of boo-boos, and it took FOREVER!
But I finally got it, and I LOVE this piece.
Project 3: a found object bracelet
A delicate bracelet (flea market, $5.00) is the perfect place to add miscellaneous charms.
I used what I had, and added some vintage buttons with gold filigree centers,
a leaf from an old earring, a vintage rose charm, 
and what I think is a charm from a school sorority or club.

You could do this with orphaned earrings, special buttons, even rings,
saved by Mom because they are reminders of the past!

[ This piece is for sale in the HOMEWARDfound SHOP. ]

And finally, an idea that I had so much fun with...
It's so SIMPLE and EASY and INEXPENSIVE... you just won't believe it!

Project 4: a magical transformation
No, it's not buying earrings that match your nail polish.
IT'S BETTER!
It's PAINT your jewelry with Nail Polish!!!
The stones in these earrings were originally red.
But as nice as they were (sterling silver, from Sundance) I haven't worn red for a very long time.
But I DO wear PINK!

I grabbed this new bottle of 'Enchanted Kiss' nail polish 
from the Beautifully Disney makeup line
and blobbed some hot pink polish over the red stone in the earrings.

It was like..... MAGIC! ;)
These perfectly match the pink logo on several of my work tee shirts,
along with a hot pink dress that I bought myself for my birthday.

Those earrings I never wore? I wear them every week now!
What are you waiting for?
Go take a peek into your own or Mom's jewelry box,
 hit the thrift stores or a flea market on Saturday,
and you can BLING IT ON for Mother's Day!

shared online:


 Yesterday on Tuesday | Project Inspire{d}

 One Project Closer | Creativity Unleashed

4.29.2014

Sweet Simple Nests

Years ago, I was bent on cleaning up some flower beds near my front entry.
I had endured the garish orange day lilies blooming there (planted by the owner of the house),
and now that they had finished, I was ready to eradicate them from my yard. 
I wielded cutters and rake, bringing them to their proverbial knees...

and quite by accident, I discovered a new material to create with:
DEAD foliage.

Deb has not gone 'round the bend here, I swear....

The dried, browned stringy leaves of the daylilies had landed in piles as I trimmed.
And those piles looked like something to me,
so I picked up a hunk of foliage and twisted it around in my palm, 
and Lo and Behold, a NEST emerged!

I created a whole bunch more, and decorated my home with them.
Then I made even  more, and sold them at vintage shows.
When those ran out, I found pots of dead daffodils at the nursery, 
and they GAVE THEM TO ME!
So I made more nests. With FREE STUFF. We ALL like that, right?!

So in case you'd like to try this, here's my SUPER SIMPLE method to
 turn dead leaves into nests in just three simple steps!


Prep:  Get a pair of scissors and some cotton string or hemp twine,
and cut it into a three-inch length for each nest you want to make.

Step 1:
If the foliage is still attached to the plant, in the ground or in a pot, make this easy on yourself...
grab the foliage just above the bulb area, and cut there.

Step 2:
Bunch the foliage into a long strip, and begin twirling it into a circle shape in your hand
by curling the cut ends around toward the strip. 
Twirl it once or twice or three times around, depending on the length of the foliage.

The uneven ends of the foliage should be on the outside of the nest,
giving a more natural appearance to it when done.

OPTIONAL STEP:
Add pieces of thread, ribbon, twine, etc. to the strip of foliage before creating the nest
to make it look more like a real one made by a bird.


Step 3:
Tie a piece of the string / twine around the foliage on the side where the cut ends of the foliage are -
just like threading a needle, feed one end of the string into the hole - and then tie a knot.
This will hold the nest together and keep it from unwinding.
Then cut the string ends off.

Add any charming little details you'd like to...
a tuft of moss, a fading gardenia bloom, rose petals, a precious found object.
I just sit mine in there because I like to change them,
but you can attach yours with glue if you'd like.

Then display your sweet nest as part of your Spring decor!
Here are two ways I displayed the nests I made:

An aqua glass candle holder lifts the nest up like sculpture,
while the galvanized lantern functions like a tiny house for a bird nest.

You can see more of my nest creations on HOMEWARDfound
 Here . Here . Here . Here

shared online:

Yesterday on Tuesday | Project Inspire{d}
(Malia Featured my sweet nests!)


8.27.2013

Oh, Lighten Up!

Several years back, I happened upon a small thrift store's 'going out of business sale'.
And found these lamps sitting in the parking lot for $5 each:
Shown as found.
Dear Lord in Heaven.... someone thought this was a good idea....

You DO realize that the white parts in this 'before' image used to be BRASS, right?
So some manufacturer somewhere, sometime, actually gave the OK for these to be made and sold.
In the seventies, no doubt. ugh.

Then someone else took the time to tape the glass off and paint the brass parts white -
but left the hideous gold-orange glass with black felt pen-embellished raised scrollwork.
ACK!
And yet.... I see the possibilities even in the hideous ugliness:
If I could just neutralize the color and visual hot mess, these could actually be quite charming.
And so that's exactly what I did...

continue reading to see the amazing AFTER shot!

7.13.2013

FREE Weekend Makeover: Part 3

Welcome to Part 3 of my FREE Weekend Makeover!

How to refresh, restyle, and redecorate 
without spending a CENT -
by using what you already have!

We're at the halfway point!
You've seen the deck and patio, and the living room in previous posts,
and now it's time for
The Dining Room!
Before:
The dining room is located to the right as you view the house from the front entry,
but it's actually part of the main living space.
That large modular sofa was blocking it off from being used to all of its potential, though.
[You saw in this post how I rearranged the sofa sections to open up the living area...
and you were probably wondering 'Where's the other sofa section?']

After:
Here's the other sofa section!
The armless unit [from the center of the old 'U'-shaped sofa] has been moved to the dining area.
Why? Because it helped open up the living room to get it out of there.
And because this wall was screaming for something on it.

And because this piece of furniture here gives the dining room more uses:
*You can still see the television from here, so it's a great lounge space.
[Ask my brother. He loves it!]
*You can participate in conversations in the living room.
*You can move the table over and this section creates two extra seats -
so the table seats six instead of just four -
which also works well for working on home work or a laptop.

And  because by putting it here, I've created another area
where one of two preteen girls can sit with a book, a Kindle, or an iPad
and not be sitting right on top of her sister all summer long
[one on the chaise in the living room, one here -
WAY better than fighting over corners of the old 'U'-shaped sofa!]

That's a LOT of value added 
by simply scooting one four-foot sofa section across a room!
Remember, you have to SEE THINGS DIFFERENTLY!

continue reading to see MORE of the dining room - and kitchen!

7.11.2013

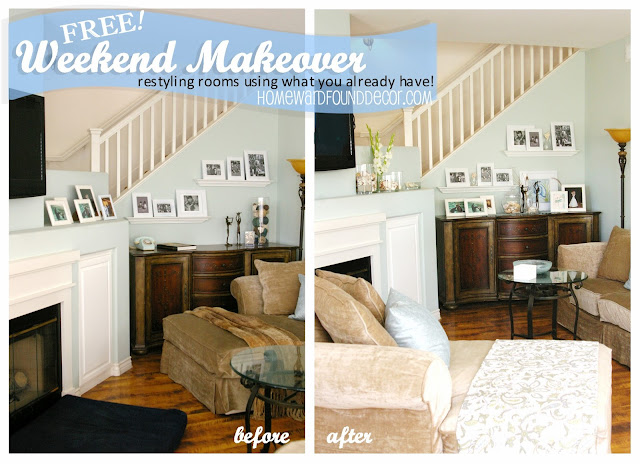
FREE Weekend Makeover Part 2


Welcome to Part 2 of my FREE Weekend Makeover!

How to refresh, restyle, and redecorate 
without spending a CENT -
by using what you already have!

You know those 'BIG REVEALS'
that all of the home improvement & decor shows do on HGTV?

I don't have a bus. Or a bullhorn.
[I smile at that reference to Ty Pennington,
 because I was lucky enough to be a part of Extreme Makeover Home Edition
when it filmed in Washington state years ago - at the Dore Family House in Kingston]

So in lieu of being able to swing the front door open wide, and say
"WELCOME HOME!",
like I did for my brother, sister in law, and nieces when they returned from their vacation,
I am going to welcome you via photos!
In the MANY photos to come, 
the 'Before' shot is on the left, and the 'After' shot is on the right...

continue reading to start your tour...