. -->
Showing posts with label FREE. Show all posts

3.27.2013

Nesting


i'm going to share a little secret with you:
accidentally discovered a 'Fast, Cheap, & Easy' TM way to make realistic bird nests!

one day while weeding some flowerbeds,
i grabbed a handful of [dead] daylily foliage right outta' the ground. just yanked it up.
it was in my hand and i looked at it, and then...
 i held onto one end, and wrapped the length of it around my hand a few times.
when i got to the other end, i tucked it into the wound-up stuff.
[don't you love the technical terms i use?!]
and even though it sort of looked like a donut,
i thought 'yep, it looks like a nest!'
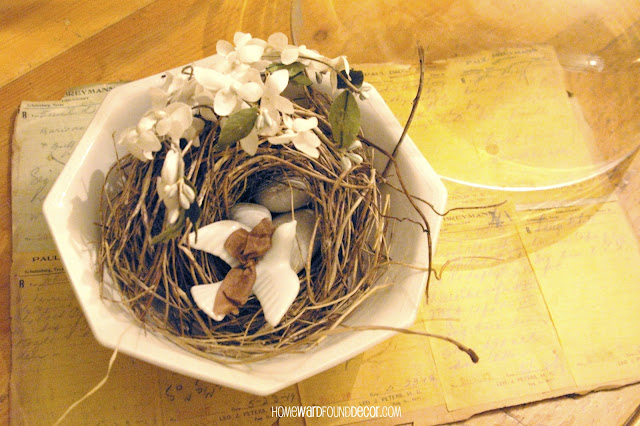
... and i carried it inside and sat it in the bowl you see in the photo above.

i added some vintage fabric flowers and a ceramic bird, and three white stones as 'eggs'.
nothin' fancy. i liked the way it looked.
 so i went outside and i made more!
[my flowerbeds were SO clean when i was done...]

and when i later decided to make these nests to SELL, i added stuff to the nests:
 * papier mache' eggs sit on a bit of moss glued to the nest as a bottom,
accented by a strip of vintage sheet music and a tiny dried stock blossom.

* a bed of moss holds a nest and a faux bird inside an armillary sphere lamp base
*a small nest sits atop a pedestal bowl, topped with another faux bird and a clear glass lamp globe

* miniscule nests sit inside glass salt cellars, adorned with vintage fabric millinery flowers and book clippings
[these would be fabulous place markers at an Easter table!]

* i've also used the bitsy ones as adornments on packages
[as seen in holiday issues of 
Creating Vintage Charm & FOLK Magazines]


* a HUGE nest in a display at a vintage show holds pretty lemons from the nearby trees,
covered with a rusted wire garden planter as a 'dome'
[this nest started out much neater.. it was handled a LOT that day!]

you can do this! 
try it using raffia. or field grass. or beach grass.
or daylily foliage. i've even used daffodil foliage.
 and my flowerbeds? they have never looked better! ;)

3.06.2013

Looking For a Sign?

old signs are a hot decor item - always have been, really
and there are so many ways to make them.
one easy way to get a lot of detail in your signs is to use old wood headboards!

there are many shapes and sizes to be found, some very detailed with carved edges,
and the detailed posts add even more charm.

the sign above is made from a twin-size headboard.
it was stripped and sanded down, then hand painted with simple acrylic paints. 
hooks were added to the tops of the posts for hanging.

another headboard was found with peeling wood veneer..
the veneer was removed and the wood sanded down to its raw state.
washes of thinned-down white house paint were used on the ogee-routed edge and for the letters.
the letters have a translucent shadow that allows the wood grain to come through.
[this method makes the sign look older and worn]

another sign was made in much the same way,
with lettering creating a seed company logo:

i do my own freehand lettering, 
but stencils or decals could certainly be used!


as i was preparing this post, a serendipitous 'meeting of the minds' occurred:
this past weekend, i attended The Vintage Marketplace antique & vintage show in Rainbow, California.
show hosts/producers Rita Reade and Christie Repasy 
used an old wood headboard to create a new sign for the entrance to their show...

Christie added her famous painterly touches to the piece
once put into place at the entry to the show, 
propped with spring accessories and flowering plants,
the sign becomes a perfect harbinger of Spring...

even the smallest bed pieces can be re-purposed: 
here, twin-sized footboards are transformed into vintage signs

and even the bed posts can be re-used as sculptural pieces:
many thanks to Rita Reade and Christie Repasy, 
for granting permission to use their photos of their Vintage Marketplace sign

shared online:


Saturday Night Special #178 | Funky Junk Interiors

9.17.2012

'Fast, Cheap & Easy' Idea: Fall in Focus

In a companion post to this one on Saturday,
here is another 'Fast, Cheap & Easy'TM idea for decorating with FREE natural elements:
 use your camera!
 head outside, in search of natural elements that reflect the beauty of the season.

you might come across some gorgeous grasses, waving in the breeze, like these...
which are located in a median strip next to the parking lot of a car dealership!
[art class #101 tip:
by focusing in closely on the grass in these images and making it fill the entire photo, 
everything around it disappears. even the car lot. ]

even if you live in the heart of a city, 
you can find natural elements to photograph:
*head to a local park, museum, library, or even indoor courtyard at a hotel for great landscaping
*go to the farmer's market or green grocer to find fresh local food and flowers
*visit a local home + garden center or nursery for beautiful foliage and flowering plants 

snap photos to your heart's content (don't we LOVE digital cameras for just this reason?!)
and then head home to print them out - 
in full color for a blaze of fall, or artfully subtle black & white -
and frame them 
 [cheap frames available at dollar stores, thrift shops, and target dollar bins]

hang your finished work on your walls, lean them on the mantel or bookshelf, 
clip them with binder clips to a wire or ribbon strung across a wall or window,
or take them into your office for a lovely seasonal change at work.

in small spaces, this is a perfect solution to 'too much stuff'
and
it's an easy way to personalize your rooms each season.

while you are editing them, here's another idea:
add a quote about nature or fall right over the top of your image. 
[adding a layer of text is an option in almost every graphic/photo editing program. 
OR you can print out a quote on a piece of clear acetate, 
then place that OVER your photo when you are framing it.]

if you don't have a favorite verse or quote to use,
finding them is easy - a simple Google search gave me dozens to chose from.
check out my 'fall quotes' search results here

9.15.2012

Back to Nature

the best thing i learned as a display designer & stylist is this:
there is a LOT of FREE STUFF out there waiting to be found in the world!
it's just waiting to be reinvented into something else.

it's free for the taking (sometimes it takes WORK, but it's worth it) 
and once you get into the habit of looking for it,
you'll be picking up stuff everywhere.
i am NOT talking about dumpster diving this time, either!
nope. i'm thinking about your yardthe alley behind your house.
the vacant lot at the end of the street. the park, the office complex, the schoolyard.
the ditch next to the country road on the other side of town.
i'm thinking of all the trees that drop leaves and pinecones and seed pods
of all of the weeds and grasses that grow in clumps and through cracks in sidewalks
of all of the ivy vines that climb over fences into schoolyards
tumbleweeds that blow across deserted parking lots 
thistles and cattails that grow in ditches by the side of the road
and of all of the dead branches on old trees laying in piles next to dumpsters.
all of those elements of nature are out there, waiting to be discovered.
waiting to be gathered, brought inside, and arranged with purpose on a mantel, table, or shelf
so that the gorgeous colors and delicate details can be seen up close
every photo here shows simple grasses used in various settings
all of the grass was free for the picking practically everywhere i looked...
all i had to do was cut it with a pair of scissors
or pull it out of the ground, shake off the dirt, and use it.

it really doesn't get much easier than that!
so when you head out on a drive this weekend, look on the side of the road -
and see if you can't discover some really amazing feather grass
or maple leaves or seed pods in a eucalyptus tree to add to your Fall Decor!

all photos by debkennedyimages [for retreat, 2009-11]