. -->
Showing posts with label TOP TIPS. Show all posts

11.19.2012

Front Porch Holiday Decor: Raid the Garden Shed AGAIN!

when you drag out the holiday decorations, what area do you decorate FIRST?
i'm a front door / front porch kinda' person. 
i figure if you begin by creating a warm seasonal welcome at the door,
everything else you do looks that much better!

OK, i'll fess up...
i also think that if your front door / porch is decorated the day after Thanksgiving, 
you blow your neighbors away. 
you win the neighborhood 'who gets their lights and wreath up first' contest.
even if the inside of your house looks like a tornado hit, you look like superwoman!
so, let's start at the front door!

in THIS POST back in August,
i shared photos of my fall front porch: 
well, the decor you see in the photos in today's post is based on the SAME elements used back then:
stuff from the garden shed!
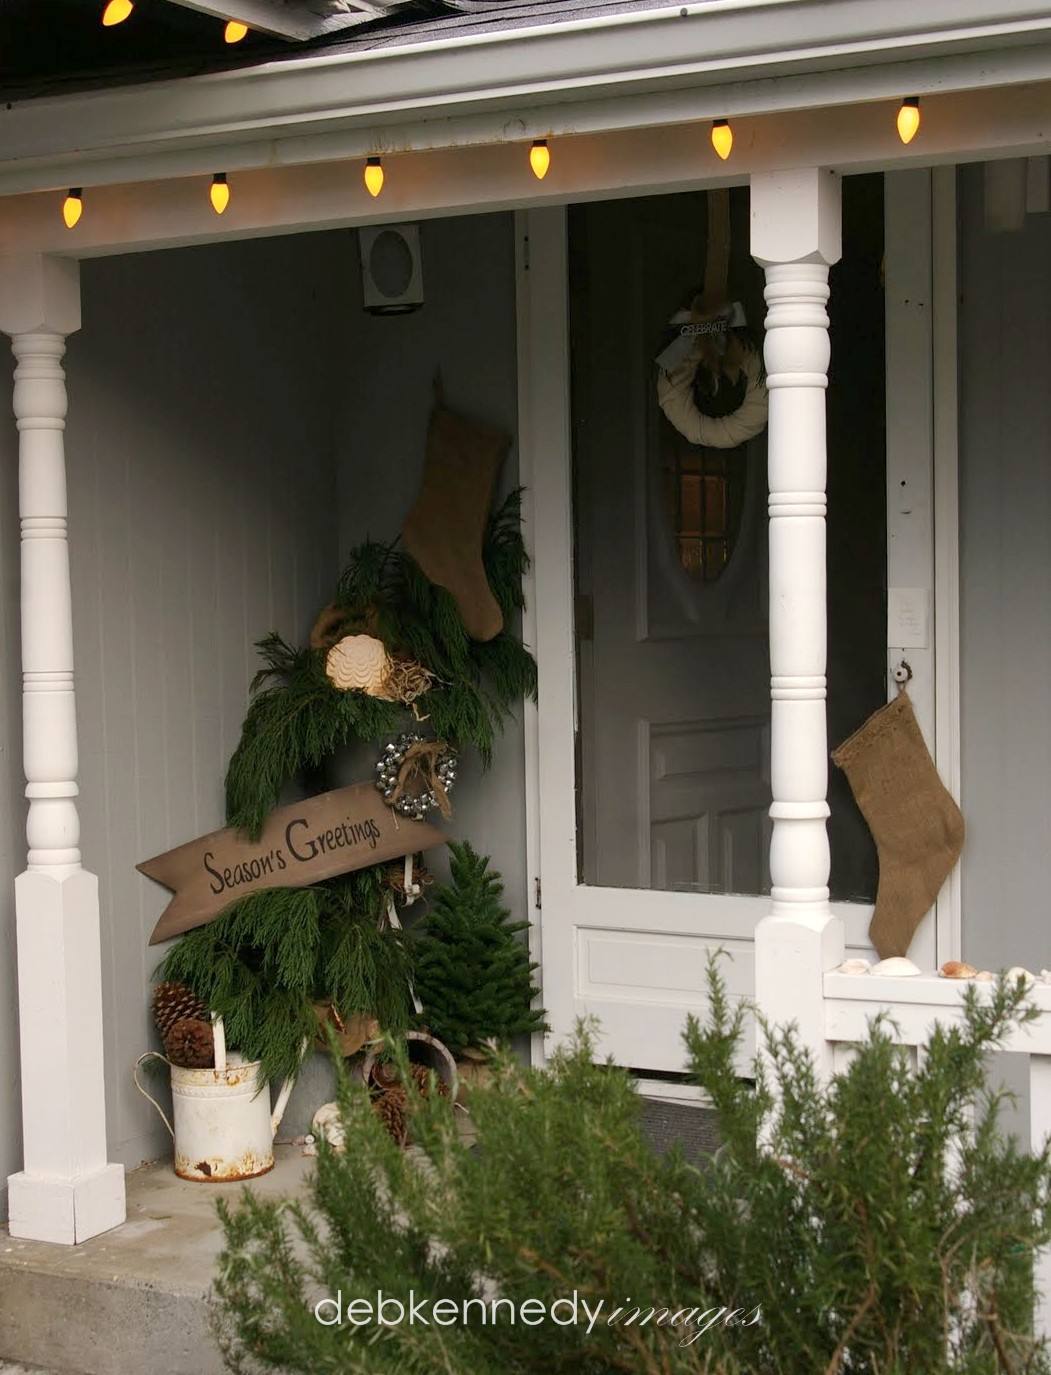
 the galvanized buckets, watering can, and plant stand all stayed in place for the Holidays.

after removing the fall grasses, leaves and pumpkins,
i flipped over the bottom bucket, and then filled all of them up with greens
that i cut from our trees.
the details include a little miniature tree [fake],
pinecones, a birdnest, a banner & burlap stocking that i made
 and
one very cool vintage light globe nestled into the top bucket of greens
is lit from within [night light bulb] to add a soft glow at night.
it looked like a glowing white snowball
and regarding those greens....
you're going to want to pay close attention here, 
because this is my NUMBER ONE 'TOP TIP' for Holiday decorating on the cheap!

HOW TO GET FREE GREENERY:
stalk the landscapers in your neighborhood. 
know when they come - not just to do YOUR yardwork,  but the neighbors. and the common areas.
take them a plate of cookies
[why, yes, i AM suggesting that you SCHMOOZE them!]
and then ask them for some cuttings...
evergreens, pine, fir, cedar, boxwood, magnolias, bay laurel, cypress -
no matter where you live, there are always bushes, trees, and hedges being trimmed.
FREE MATERIALS!

just ask them for the greens before they load it all into their chippers or trucks.
 you will be saving them money when they go to the landfill, so they usually always hand over the goods.

if you live in a rural area, always make sure you have permission to be on the property to cut boughs.
and don't steal them from your neighbor's yard at midnight ;0)

i have been known to pillage greenery from abandoned warehouse complex parking lots
but i am not recommending that YOU do that!

ok, back to the porch...
there was also a very long wood bench (made from an old headboard)
that i cozied up with a huge burlap pillow and a bagful of 'gifts' - 
really just simple boxes tied with burlap & ribbon.
between the bench and the door, there's one of my old folding wire shopping carts,
filled with greenery.
an old snowsled leans against the wall behind the cart, 
and an old brown umbrella is a fitting final touch for the Washington winter weather. 

i didn't buy anything to decorate with -
i just combined things i already had to create a mood.
the white, brown, green, and gray color palette
made for a serene setting that coordinated with the beach house,
and it welcomed neighbors, friends, and family well into January, too...

9.22.2012

Get Warm & Cozy Fall Decor in 5 EASY steps!

It really is possible to change up the look of your home each season without going to a lot of trouble. 

This former client's home is a perfect example of some simple ways to update your decor seasonally, 
and pull a warm and cozy look together...fast!

1. Use Your Existing Artwork

The painting on the wall in her dining room, above, was moved here from its 'regular' spot in a hallway.
I just had to use it here because the colors are so warm and inviting, and perfectly coordinate with the hues of the centerpiece. The painting that is usually hangs in the dining room has cooler tones in it, and looks lovely in the hallway now.

Moving your art around seasonally not only helps you to get a fresh new look in your rooms, but also provides you an opportunity to notice and appreciate your art more. It's easy to speed past this lovely work of art when it's in the hallway - but in the dining room, one can sit and enjoy the scene during a leisurely meal.

2. Freshen Up the 'Everyday' Accents

Those big urns with arrangements of silk hydrangeas on the buffet stay here year-round as 'base pieces'.
Seasonal changes are achieved by simply tucking additional flowers & foliage in there to change it up a bit each season. It's really not necessary to get something completely new - just a bit of restyling makes a huge difference. What look like leaves in the photo are actually huge velvet poinsettias in a gorgeous rust color - I nestled them into the sides of the arrangements so that they don't really look like poinsettias.  

[Be open to using things in ways other than how they are intended to be used: My client got these at 75% off at an after-Christmas sale. Because of their color and shape, they are the perfect addition to her fall decor.]
3. Life Happens - Keep Decor Flexible

The tablescape is oh so simple - which is important, because my client could remove it easily for entertaining. She had a toddler and TWIN infants at the time, so a lot of activity was happening around this table. When she wanted it to look beautiful, she could easily re-create this simple arrangement on her own.

The runner is a really inexpensive roll of spun cocoa fiber that my design partner Karen picked up at the local craft store - it comes doubled up, but we liked the look of just one layer because it's almost like the delicate veining in fall leaves. We unrolled it and let the ends just curl under the table sides. Then a collection of ceramic pumpkins was placed very causally on the runner.
In this close-up you see yet another way to use a wreath! Here, one made of wheat & various seed pods surrounds the ivory cake plate. If she wants, my client can remove the candles and leaves on the cake plate to display a fancy dessert there during her dinner party. Like I said - EASY!

ok, I am going to share something here that still baffles me.....

This woman had EXCELLENT taste. She hired an interior designer to help her furnish and decorate this beautiful executive home. She hired me to come with my design partner and decorate her rooms for every season. But she, herself, would never EVER buy a new thing for the house or move anything that was already there. Not on the mantel, not on the table, nothing. She felt we were the 'professionals', the 'experts', and knew more than she did - so she just waited around for us to come and decorate. For the five years that I decorated for her, we encouraged her to change up the entry table or the mantel or the dining room table centerpiece - nope. Wasn't going to happen. I loved working for her, but I just wanted to shake her and say 
"It's YOUR HOME. Live in it!!"


No one is more an 'expert' on your home than YOU are! I hope all of you out there in blogland feel 'at home' enough in your rooms that this is not a problem for you!

4. Coordinate the Elements

In the entry, I used the same trick of adding faux stems to an existing 'everyday' arrangement - a swath of bright leaves and berries tucked into this urn of magnolias adds a pop of color. A few funny little faux pumpkins add whimsy but still work with the more formal nature of the home. A snippet of the same leaf & berry garland tops the mirror on the wall, coordinating the look. The moral is: When you see a seasonal garland or bunches of leaves/flowers that you love, buy a few of them. You can cut them apart or use them whole in many different ways around your home - but the whole look stays coordinated and 'designed' because some of the elements repeat themselves from room to room.
This close-up of the mirror shows the OH SO SIMPLE garland just bent over the top edge of the frame.

And though I added the beautiful autumn quote to this photo in my editing program (as suggested in this post), it would be SO easy to use a transfer to put a quote on your mirror for the season. When the seasons change, grab a credit card and scrape the transfer ink off of the mirror.
[you can pick up beautiful 'wall words' and similar transfers for pennies on the dollar at discount stores like Ross, Marshalls, and Big Lots!]

Even if you have real, live, growing plants in your home, you can easily add some fake flowers and leaves to them for seasonal interest. Which brings me to myfinal tip of the day:

TOP TIP:
5. when your indoor flowering plants stop blooming, 
you can FAKE IT!

I know I am usually all about cheap solutions, 
but here's where you want to spend a bit more:

go to a local craft store or fine garden center, and get a few stems of the same flower that grows on the plant naturally. (Orchids, Calla Lilies, Poinsettias, Mini Roses, for example) and then insert the FAUX STEM right next to the real stem of the plant. Nestle the faux flowers into the real foliage, and your refreshed plant is ready for the season!

 shared online:


Cupcakes & Crinoline | Project Inspire{d}

9.20.2012

$5 Fall Wreath Makeover

You know I love 'making do' with what's already on hand... 
here's another 'Fast, Cheap & Easy' TM project that does exactly that!
Follow along and I'll show you how to take an old wreath from flab to FAB
[and remember, these tips would work for ANY season]

 my mom had this fall wreath stored in the garage. she's used it for years, and it's okay.
she bought it on clearance at Target
[yeah, the nut doesn't fall far from the frugal tree around here!!!]
but i knew i could make it better, and look exactly like the ones we saw over at that swanky store. 
she was eyeballing those wreaths over there and i could tell she wanted one...
so i simply MADE one for her instead by making over the wreath she already had.

 i enlisted one of my TOP TIPS as a stylist: cheap fake foliage. 
 yep. i went to the Dollar Tree and bought some stems of colorful fall fabric leaves for a buck each. 
mom had a few larger branches of dull-colored leaves that i mixed in, too.
here's what you need for this project:
scissors and wire cutters [scissors cut through the plastic stem, then wire cutters snap the wire inside]
branches/bunches of fabric leaves, flowers, whatever you want to use
an existing wreath

you can start with a new bare wreath or strip a wreath completely down and start over, of course, 
but i'm just showing you how to 'pump up the volume' of something you already have on hand.
spread the branches of leaves out on the Dollar store bunches, 
and slide the leaves up toward the ends of each branch.
cut all of the small branches of leaves off of the larger branches, as shown here.
leave @5 to 6 inch stems on them.

you'll end up with a large supply of short-stemmed leaf bunches.
choose one type of leaf to start with - i selected the dull brown leaves to use first, 
because i wanted them to be in the 'background' of the arrangement.

simply begin inserting the stems right into the existing wreath at regular intervals
[think of it like a clock, and insert them at 12,3,6, and 9...etc.]
by pushing the stems into the wreath structure, they should stay in place with no problem.
[you can always add a drop of hot glue if you are worried about windy conditions, etc.]

when you tuck them in, nestle them behind the existing foliage as shown here.
continue around the wreath until you have used all of that type of leaf. 
you'll have a balanced arrangement working with one type at a time.
this first step has already filled out the wreath, making it more lush and abundant

now take the brighter, more vibrantly-colored leaves and insert them into the wreath
place them closer to the front of the arrangement, right next to the existing flowers, etc.

again, place them evenly around the wreath
[at 2,4,6,8,10, and 12 on the clock, for instance]
this helps to keep the wreath's rounded shape intact as you work.
after adding the additional leaves, the wreath looks three times its original size!
 for just a few dollars, we've revamped an old wreath and made it fresh and new
(and just like something that costs $125 at a swanky garden shop)
i love that!
 that's a pretty big improvement over the sparse twiggy 'before' shot, don't you think?
and yes, you CAN do this with REAL leaves, too! [read that as FREE LEAVES]

here are some great ideas for using wreaths in fresh new ways:

* lay them on a table as a centerpiece -

with a candle, cloche, bowl, or pedestal in the center.

* sit them on top of an urn or planter, then nestle a flowering plant in the center.
makes a beautiful 'collar'.


* use them as a 'tree skirt' for a small holiday tree.

* loop them over the bracket of a wall-mounted lamp

* hang them in multiples - connect wreaths together with beautiful ribbons

and hang vertically or horizontally


shared online:

chic and crafty thursdays @ the frugal girls

9.15.2012

Back to Nature

the best thing i learned as a display designer & stylist is this:
there is a LOT of FREE STUFF out there waiting to be found in the world!
it's just waiting to be reinvented into something else.

it's free for the taking (sometimes it takes WORK, but it's worth it) 
and once you get into the habit of looking for it,
you'll be picking up stuff everywhere.
i am NOT talking about dumpster diving this time, either!
nope. i'm thinking about your yardthe alley behind your house.
the vacant lot at the end of the street. the park, the office complex, the schoolyard.
the ditch next to the country road on the other side of town.
i'm thinking of all the trees that drop leaves and pinecones and seed pods
of all of the weeds and grasses that grow in clumps and through cracks in sidewalks
of all of the ivy vines that climb over fences into schoolyards
tumbleweeds that blow across deserted parking lots 
thistles and cattails that grow in ditches by the side of the road
and of all of the dead branches on old trees laying in piles next to dumpsters.
all of those elements of nature are out there, waiting to be discovered.
waiting to be gathered, brought inside, and arranged with purpose on a mantel, table, or shelf
so that the gorgeous colors and delicate details can be seen up close
every photo here shows simple grasses used in various settings
all of the grass was free for the picking practically everywhere i looked...
all i had to do was cut it with a pair of scissors
or pull it out of the ground, shake off the dirt, and use it.

it really doesn't get much easier than that!
so when you head out on a drive this weekend, look on the side of the road -
and see if you can't discover some really amazing feather grass
or maple leaves or seed pods in a eucalyptus tree to add to your Fall Decor!

all photos by debkennedyimages [for retreat, 2009-11]

9.06.2012

a stylist's Top 5 Tips for seasonal displays!

some of the best tips & tricks i've learned and developed as a retail display stylist
[i've been at it for over 36 years, including designing booths at vintage shows like the one above]
work very successfully when applied to decorating homes... so i thought i'd share
the TOP FIVE techniques, tips, & tricks used in retail display
to help you get great visual impact with your seasonal decor!
1. start with a theme. 
my fall theme always begins with pumpkins, because I have a lot of them.
i've got glass, ceramic, wood, fabric, plastic, styrofoam, paper, dough, clay, terra cotta, real gourds,
and of course sweater pumpkins.
they spend far too many months packed in foam and cardboard, just waiting for their day in the spotlight,
so i give it to them for three months a year.
some people like swanky black & white accents with bling,
some like cute witches in orange and green and  yellow and black.

with a theme, I can coordinate all of the display areas in all of my rooms easily: 
every focal area has to have some pumpkins. 
i'm also big on natural elements: bleached leaves, faded roses, foliage & florals in pumpkin colors. 
add a few 'hard surface' elements: glass, silver, and wood containers.
So all of those elements together serve to define and express my theme.
2. find your focal points.
walk through your home, from the entry, and pay attention to where your eyes travel.
mine are the front porch, front entry, library table, mantel, buffet, dining table, and kitchen window. 
from small to large, each of these will hold the same theme, colors, and elements 
which will spread the season's 'story' all thru my house. 

by concentrating your efforts in the main focal areas, 
you'll get better visual impact AND save yourself time and money.
your seasonal decor needn't be on every single table, shelf, area - sometimes, less is more. 
(i can't believe i said that!)

the mantel is one of the main focal points as you enter this home.
 i didn't want to do a central arrangement or both sides, 
as these colors are so vibrant it would have been overwhelming. 
so i placed a clock on one side of the mantel,
 and a big colorful arrangement of flowers and pumpkins on the other side.

i practiced restraint  - something extremely hard to do!
in retail visual merchandising we normally do everything very BIG and very theatrical. 
 in a home, you have to dial it back a bit - especially in small rooms.
3. use color to pull your eye thru the space.
the photo above shows a display in the area just outside the front door.
from the first step up onto my covered front porch all the way thru the house, it's the same story. 
the pumpkin theme and the colors of orange, rust, and vanilla
catch your eye and cause you to look EXACTLY where i want you to look in the house!

i do that for two reasons: 
one, it's how i work. i'm obsessive that way. 
in retail, this practice is called 'color spotting' and it always works.
and two, this house is small. i mean, really small. it is a 1924 cottage, not even 1000 square feet. 
so to have too much visually going on [and definitely having too many different things going on] 
would cause me to lose my marbles staring at it all the time!
keeping the seasonal decor coordinated and simple, and placed strategically,
lets the color in the decor lead the eye of the beholder through the small space.
4. plan flexible, organic displays.
on my big long pine dining table, i grouped more of the same elements casually. 
i wanted the whole scheme to look sort of 'unstudied', just left there as if i had discovered it on a walk. 

i do add more stuff to my displays all thru the season. 
keep your displays organic (open to natural change). move things, add things, rearrange things. 
keep it interesting, not static.

one BIG change i make with my fall displays is this:
i begin in September with my pumpkins 'faceless'. 
that means if a pumpkin has a jack o' lantern face, it's turned toward the wall or back of the display. 
in October, i turn the pumpkins around so that the faces show for Halloween.
and then in November, i turn them back around again.
5. hang usable objects as art.
in a store, this is the equivalent of a moving hanging rack.
here, you see that door with old hooks i shared in a past post -
now it has a hanging straw purse filled with rust-colored silk roses and straw hats.
it's a neat 3-D artwork piece - i could have hung a painting here, but this is more tactile and fun.
find a coatrack or pegrack, something that you can alter, add to , and change with small touches.
functional items like scarves and gloves, umbrellas, even canvas bags of books
can look artful when arranged on purpose.

*** Hello to everyone visiting from the Funky Junk Interiors 'Love That Junk' Linkup!***
Thanks for the feature, Donna!

I've just added a brand new post with MORE ideas for re-purposing OLD DOORS!
click here to see what I've done with them over the years...


bonus tip:

6. use light to set a mood.
in the dining room table photo, and the foreground of the photo above,
you can see more glass vases with candles and fall leaves.
in the photo of the mantel, you can see a small lamp. 
warm light from candles and small lamps, a fireplace, or an illuminated painting on the wall
will add sparkle and glow to your rooms like no ceiling fixture or lamp on an end table can.
similarly, open window treatments will let in the golden autumn light
in the mornings and afternoons, 
creating changing patterns across the room and bringing it to life.

and with that...
a scented candle and beautiful music will be the finishing touches for beautiful rooms
that will welcome you, your family, and your friends in this autumn...
have fun creating seasonal touches in your home!

featured online:
Funky Junk Interiors | Love That Junk Link Party