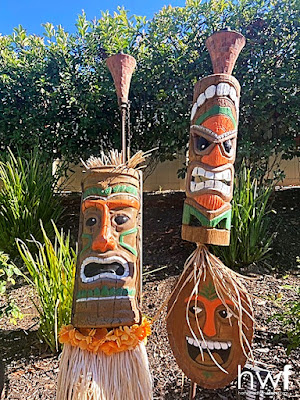
This one is coming out of the archives, because it's just SO fun and easy for summer party decor!
Like my last post, this is a paint project - because nothing can change the look of something faster then paint! It's also a pretty inexpensive way to add a fun touch to your decorating.These Tikis were in Mom & Dad's backyard for over 20 years, and I featured their first 'makeover' as part of my 'Thrifty Weekend Makeover' series here on the blog back in 2016.
Well, we saved those tikis when we moved to the new house, but we didn't think we'd use them... except for a party, maybe. Our decor was decidedly 'wine country farmhouse' in style, and tikis just didn't fit.
When I saw some photos from Palm Springs Mid-Century Modern Week, an idea came to mind for an area of our backyard that needed a punch.
Continue reading for an easy 'how-to'!
Since there were so many colors on the existing tikis, and that's not the look I wanted, I used what I had on hand to prime & cover them - and what I had was five cans of rose-gold metallic paint. They got a nice THICK coat of that, sealing the color IN and the water & sun damage OUT.
I only had a can and a half of gloss orange spray paint, so the rose gold as a base coat also made the orange seem richer.
(I don't know about you, but when an idea hits me outta' the blue, I just jump up and GO. I want to get started and get FINISHED so I can see if it will actually work. I do not want to get in my truck and drive to the store and buy supplies. I just want to DO IT NOW. That's pretty much where my 'use what you have' philosophy comes from. That, and being incredibly CHEAP.)
.JPG)
I had some unused wood trellises in the garage, so I took two of them and cut sections off, to create two different heights. This is is far more interesting than symmetry - plus I just didn't want them TOO tall by the fence. One of the sections that I cut off was used as a third piece, on the left side of the final arrangement.
Zip-ties hold the tallest trellis to the fence post, and the other trellises to the first trellis. I attached the tikis to the trellises with heavy twine.
A small citrus tree in a round rustic pot sits next to this, adding green color and softness to all the hard angles.

We love the mood this created in our yard... it's a little bit Polynesian, but it's also Mid Century Mod and Palm Springs Getaway Glam! It's colorful and kitschy and fun, the wood coordinates with other wood details we have, and it perfectly fills what was a big empty space at the end of the patio. (I cannot adequately convey the hatred I have for that beige vinyl fence. UGH.)
But it didn't stop there!
In 2020, being depressed about having to cancel our trip to Kauai due to the pandemic lockdown, I made a decision: If we can't go to Hawai'i, I'll bring Hawai'i to US!
I hauled out every tropical decor element we had in the garage, made a bar out of a sandbox and some barstools, and painted everything in sight. Our backyard turned into a tropical oasis and we've enjoyed it ever since!
And those ol' tikis? Yep, they got a new look, too!


Joined by a few newer tiki masks, they now bask in the sunshine on our back slope surrounded by tropical grasses and blooming roses.
This post marks the end of my summer content... which I hope you have enjoyed! In August, I'll be sharing some of my past creations for fall decor that have a beachy, tropical vibe. Because Deb isn't ready for summer to end just yet!
Stay tuned for some fun 'Tropi-FALL' ideas...
Shared Online:
Funky Junk Interiors | New Upcycle Ideas # 789

summer,tiki style,tropical style,outdoors,painting,diy decorating,DIY,decorating,colorful home,thrifted,tutorial,painted tikis
.JPG)


.JPG)


No comments:
Post a Comment