. -->
Showing posts with label Blast from the Past. Show all posts

4.03.2014

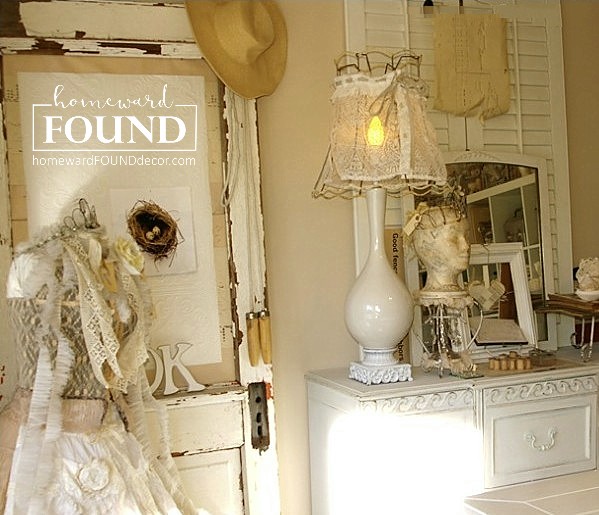
Vintage Door Bulletin Board

I have a thing for old doors. I love 'em. I collect 'em.
I use them for tabletops and wall art and headboards and shutters and fences and.....
I've made bulletin / inspiration boards out of them!
um... that would be the thing we did BEFORE Pinterest... pinning items on an actual BOARD...
 
Here's the basic 'how-to', Deb version:
First, you need an old / vintage door with an opening in it, like mine shown above.
The opening used to be a window... some doors have inset wood panels,
and you can remove those and use the opening, too.

I bet you can't guess what the bulletin board part is made from!
[no, it's not corkboard! you know that I never use things the way they are expected to be used!]

Here's a clue:
Any guesses?
How about now?
Yup, it's made from an acoustic ceiling tile!

WHY?
They are large, porous (easy to stick pins and tacks into) and pretty cheap.
And when I first made MY board, I found a tile in the garage - so I used it!

You'll need a large rectangular sized acoustic ceiling tile to fill the opening in a door.
Measure the opening on your door, and draw lines on the acoustic tile as a cutting guide.
Then cut the tile by using an electric carving knife!
[ Just like styrofoam. Wait, you didn't know that about cutting styrofoam?!]

After the tile is cut, wrap the cut edges with duct tape to prevent crumbling.
Then paint your tile and the duct tape with regular house paint -
and because it's already primed white when you buy it, it takes paint really well.
You could cover it with wallpaper, gift wrap, etc if you wanted to.

Then fit the tile into the door's opening from the back side...
most of them have a lip that held the old glass in place, and that will keep the tile from falling forward.
Secure the tile to the back of the door using metal brackets attached across each corner
[ much like the ones used on artist's canvases and frames ].

Or you can do what I did... and just hot glue the tile to the back of the door 
and then add a buncha' duct tape all around the edges for good measure.
It holds the thing in place, and no one is going to SEE the back!!!
Now comes the fun part...
fill it up with clippings and cuttings and photos and quotes,
even dimensional objects and souvenirs and special things
that inspire you and make you smile when you look at them.
.

2.06.2014

Tin Can 'Painted Pails'

Last fall, I shared a project that was a 'flashback' to something I had made long ago:
[ like, ah, WAY back in the NINETIES! LOL ]
Painted tin cans - I call them little 'Painted Pails'. 

I just found more photos of that product that I created for different seasons ;)
and since 'tin can crafts' seem to be THE hot trend right now,  
I figure why not share more inspiration?!

The photo above shows the Valentine version,
where the wire handles were bent into a heart shape.

The labels evolved from the very first Painted Pails I made in the Spring of 1995,
which looked like garden seed packets and fruit pie filling labels:

I also made versions of Painted Pails for Holiday | Winter:


The Happy Snowman versions had wire handles bent into 'top hat' shapes,
and also stackable snowmen made from several sizes of cans.

I made Painted Pails in Spring, for Easter:

... and the wire handles were bent into 'floppy ear' shapes.

and of course, there were the Pumpkin Painted Pails
 that I shared last fall in my Tin Can Painted Pail Post
 click for my TUTORIAL!...

I also made Painted Pails that looked like crayons. And Leprechauns. And Firecrackers.
But I really don't think more photos are needed for you to get the general idea.
If I were to guess as to how many tin cans I painted back then,
over a five year period that I was selling them at street fairs and in my tiny store,
I'd have to say it was about 50 cans a week. Yes, really!

I tell ya', I was pretty sick of painted tin cans by the time I was done!!!

The various holiday versions of these came about because every holiday,
I would go overboard to create a fun breakfast table setting for my four young children...

Balloons, streamers, napkins, and centerpiece would decorate the dining room.
The food would even match the holiday: 
pink milk and pancakes for Valentine's Day, green for St. Patrick's Day, orange for Halloween.
 I didn't spend a lot (I bought most of the stuff at thrift shops)
but it was so much fun to decorate the table after they had gone to bed,
and then watch them get all excited the next morning!

And at each place setting, they'd find a Painted Pail -
filled to the brim with art supplies and candy and a little stuffed animal.
It was just a simple thing I could do to make them happy.
For me, that is always the best part of crafting & decorating...

shared online:

One Project Closer | Creativity Unleashed
 

Cupcakes & Crinoline | Project Inspire{d}

10.03.2013

Tutorial: Pumpkin Pails!

 Today, I'm re-visiting a seasonal craft that I created nearly 20 years ago!  

Waaaaaay back in 1994, I painted some tin cans with jack o'lantern faces,
then added wire handles to make them into fun little pumpkin pails to sell at street fairs.
And because I had an endless supply of cans from a restaurant owner, I kept coming up with ideas....
I ended up creating all kinds of cute little 'painted pails' for every season FOR YEARS!
[ I might share some of the others in  upcoming seasons, we'll see ;) ]

Recently, I found a photo of that street fair booth (above)
and decided to make a NEW version of this craft so that I could share a tutorial with you!

This is an easy craft project that makes use of an everyday item,
is a perfect teacher's gift, and.... it's a timeless idea!
Painted Pumpkin Pail Tutorial

Materials:
tin cans - any size, clean, dry, and with one end removed.
white spray paint (satin or gloss)
clear spray paint (any finish)
craft paints in orange, yellow, white, and brown
various sized artist's paint brushes
water to clean brushes
an old fashioned bottle opener (has a pointed end)
a screwdriver with a long shank
 thin baling wire

Project Time:
@ 30 minutes
+ can be made in multiples at once
 1. Sit the tin can in a protected area for spray painting with the can bottom facing up.
2. It's easy to place two boxes together as shown to create a draft-free mini spray booth.
3. Spray one side of the can with the white paint. let dry for ten minutes,
turn can around, and spray the other side.

*OPTIONAL*
You may, at this point, choose to spray the can with a second coat of paint - in ORANGE.
This will enable you to skip step 5 below.
 4. Take the can, now dry, out of the paint box and move it to a table work area.
 5. Paint the can with the orange craft paint, using a large, flat brush.
[ art class #101: acrylic paints work best with synthetic brushes ]

6. Use a smaller flat brush and white paint to paint a jack o' lantern face on one side of the can.
Use two thin coats of white paint for best effect.

7. Clean that brush in water, and use it again with the yellow paint to fill in all of the white areas. 
Use two coats for best effect and brightest color.
 8. You can leave the face as-is, or add more detail using a small brush and paint mixed into more colors...
Shown here, there is a peachy-orange color pumpkin 'flesh' detail,
with a dark edge on the 'inside' and a white highlight on the 'outside', 
to make it look more like a carved pumpkin.

9. When the details are dry, put the can back into the spray box,
and spray it with clear sealer on both sides.

10. After the sealer is dry, remove the can from the spray box and go back to the table.
Place the can with the painted face toward you, and lay the 'old fashioned bottle opener' across the can. 
 11. Using the bottle opener's pointed end, poke a hole in the side of the can from the outside.

12. Reposition the bottle opener to the inside of the can,
 and press the triangle of cut tin up and toward the rim of the can.

13. Continue pressing the point of the tin triangle until it curls under into itself,
presses up against the inside edge of the can, and the point is no longer visible.

14. Repeat on other side of can.

*OPTIONAL*
You can also use a drill to put two small holes into the sides of the can.
 15. Cut a length of baling wire @ 18" long. BEND (not fold) it into a large loop, 
and thread each end of the wire through the holes on the sides of the can. 

16. Bend the end of the wire up and around the loop on each side, as tightly as you can to secure.

17. Wrap each end wire tightly around the screwdriver shank to create a corkscrew curl.
slide the curl off of the shank, and bend into position. Repeat on other side.
When complete, your Painted Pumpkin Pail will look like the lil' guy on the left above!
Add a ribbon and fill him up with candy, treats, a plant, a candle, 
or even a Sweet Sweater Pumpkin!