. -->
Showing posts with label Sweet Sweater Pumpkins. Show all posts

10.25.2014

Happy HalloWEEK! part 1

Everyone knows that the celebrating lasts longer than one night :)
so for the whole week, I'm posting fun ideas and inspiration EVERY DAY on
the homewardFOUND decor facebook page!
(Did you know that you don't have to be a facebook user to see that page content?!
Click over and check it out! )

.and 
 I've rounded up my six BEST pumpkin ideas for you:
 
for making stale old pumpkin decor look shiny and new

Go on, get your spooky on!

PS: like that 'spider web-by' embellished umbrella in my photo? see more here

shared online:

Yesterday on Tuesday | Project Inspire{d}


10.18.2014

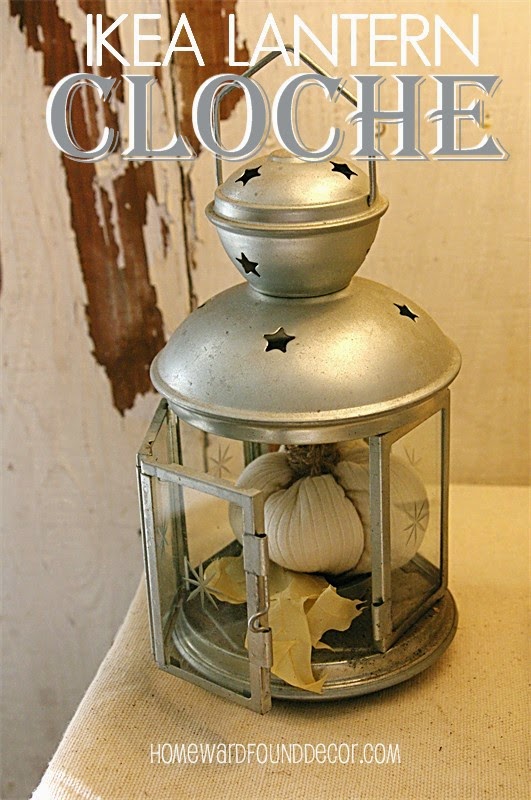
IKEA Lantern Cloche

Here's a truly 'Fast, Cheap & Easy'TM decorating idea for you:
Use a simple five dollar galvanized metal lantern from IKEA as a cloche.

Open up that lil' latched door and place something sweet, special and small inside,
perched on the votive-holder cup like a pedestal.
You can leave the door open, or close it back up.
You can sit the lantern ON something, as seen here, or hang it FROM something
as long as whatever you put in there isn't too heavy...

I used one of my original Sweet Sweater Pumpkins in mine this year.
In the past, I've also used a Nest, a large wooden Easter egg, and a snowball ornament,
since this idea translates to use for every season.

Simple as can be, and ever so much more interesting than a plain glass dome!

Want to make your own versions of my original sweater pumpkins?
My free tutorial is HERE!

10.15.2014

Vanilla... Nice, Nice, Baby

I guess it's not hard to see where my inspiration came from for this decor scheme....
smile.

My autumn color palette always - ALWAYS - includes tones of vanilla.
From pale cream to warm ivory, I love this color.
Mixed with soft brown-sugar tans and golden caramel hues,
 it's warm and inviting and comforting....
and craving-inducing
(especially when I am burning a vanilla scented candle, which is every day!)

My last post showed you the wall o' shelves in my office/studio,
decorated for Autumn in my fave hues.
Today, let's look across the room at the breakfront/sideboard/dresser area:
(Let me give you your bearings, because this image can be confusing...
There is a wall behind the dresser-top display, 
with two mirrors and my inspiration board hanging on the wall.
That's why you see the wall o' shelves on the left and another dresser on the right - reflections)
My inspiration board is long and narrow, to fit in the space between the mirrors.
Every season, I swap out the photos and quotes pinned to it.

Oh, and the 'bulletin board' itself?
Cardboard boxes, laid flat, sized to fit the space, covered in gift wrap, and nailed to the wall.
EEEEEEEEEEEEEEEasy.
 On the dresser/sideboard top, I mix and match and add stuff every season
to create an inspiring and pleasing vignette.

This season, I used wood and galvanized metal for depth,
with my ubiquitous white dinnerware to lighten it all up.
(dishes are not just for serving food, you know!
Add in creamy tones in bleached leaves and my Original Sweet Sweater Pumpkins,
and then the final details:
 A perfect cashmere pumpkin sits under a handmade wire dome / 'cagelet',
displayed on a cool white ceramic pedestal bowl with a plate on top.
 I made this wire folly YEARS ago (inspired by Alicia at Posie Gets Cozy!)
and I love changing it up every season.

I know, I know...
every time I share photos of this, I get messages and comments about making a tutorial...
truthfully, I haven't had the patience to break it down into the 20 steps it will take.
Not sure anyone would hang around to even READ a 20-step tutorial!!!!
 I tuck little sentimental details into my display here because I can see them when I am writing...
those two ceramic tiles were made my by creative daughter Brianna in her high school art class.
One is sunshine, one is rain... they sum up life for me,
and remind me every day of a sweet little redheaded girl who has always loved art.
I'm talking about Anni - but that applies to ME, too! ;)

One last area in my office is the dresser to the right of my long desk...
the dresser belonged to my Grandpa Ward, and I treasure it.
On top of the dresser, a classic alabaster lamp (found for TEN BUCKS at Goodwill!)
casts a warm light onto another gathering of creamy vanilla decor...
wood yardsticks, old papers and neutral gift wrap are stored in a miniature milk can,
and more Sweet Sweater Pumpkins are displayed,
one topped by two crowns under a wire dome - made from a tomato cage!
( and THIS one I DID create a tutorial for right here )
 I still have a bunch of bleached leaves and sweater pumpkins that I didn't use in the vignettes,
so I filled up two canvas totes and plopped them into my vintage wire shopping cart by the door.
 I think they just look like two scoops of vanilla bean ice cream!
.
My no-sew Sweet Sweater Pumpkin Tutorial is available FREE here.
Find my Bleached Leaf Tutorial here.

10.11.2014

I Admit It, I'm Plain Ol' Vanilla....

While I love the occasional seasonal addition of a bright, happy hue to my decor,
I am basically a vanilla girl. 
Warm, soft neutral colors are my preferred palette, 
and my go-to design choices year-round are always pale and soft,
like a melted bowl of vanilla bean ice cream with caramel sauce.

Great. Now I'm hungry!

So anyway, each Autumn, while everyone else is decking their haunted halls 
with orange and rust and yellow, (or maybe black and purple)
I am creating serene, luscious, warm & cozy vignettes from shades of vanilla and brown sugar.

In Autumn, my Original Sweet Sweater Pumpkins in neutral tones are ALWAYS on the menu,
(see some of the ways I have used them in the past here)
 and this year is very, very vanilla....
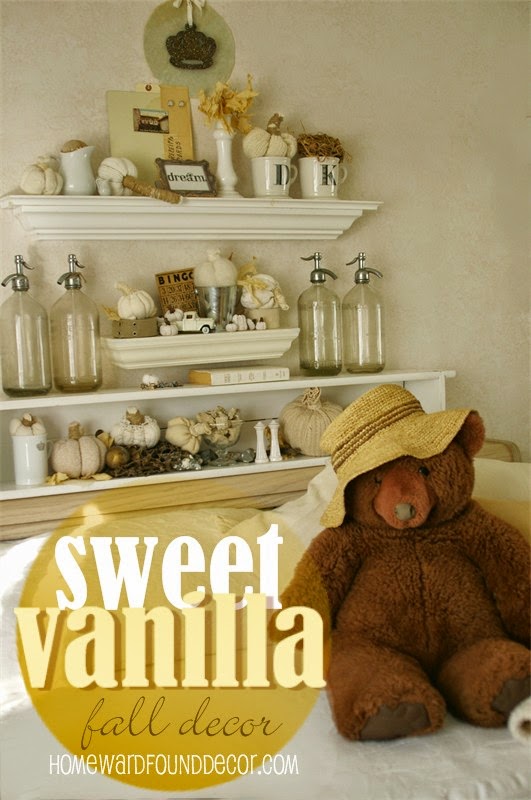
In one area of my office/studio, I have small wall shelves over a daybed.
These provide a canvas for an ever-changing seasonal display for my collected treasures.
Here on these shelves, my pumpkins nestle into containers of many kinds:
Creamy sweater pumpkins perch on top of 
a rolled-up canvas military belt and an old roll of medical tape, 
as well as in a little galvanized bucket.
 My miniature clay pumpkins sit on the shelf and on the back of a vintage toy truck
(that reminds me of my Grandpa Ward's truck each time I look at it)
Coffee mugs with my initials serve as pedestals for a sweater pumpkin 
and a tiny 'found objects nest' that I made.
More sweater pumpkins simply sit on the shelves, paired with small ironstone pieces.

BTW, the 'bottom shelf' you see in the photo below?
Not a shelf, actually.
It's a wood window box turned sideways, sitting on top of a bookcase headboard.
Using it this way gave me added display space AND storage for the piece.
I simply MUST include a nod to my favorite year 'round decorative element: Mister Big Bear.
My mom gave him to me over 22 years ago, 
and he's been the go-to cuddle spot for sick kids and sick Deb, 
has absorbed a LOT of tears on sad occasions, 
and has charmed grumpy grandchildren into cheerfulness countless times.
He's family <3 ... and he doesn't mind being dressed up!

Follow my original tutorials to make your own:
Sweet Sweater Pumpkins
Mini Clay Pumpkins

Find more sweet vanilla decor in THIS POST!

Linked Up:


Yesterday on Tuesday | Project Inspire{d}

Practically Functional | Creativity Unleashed

11.25.2013

Vintage Pink & Silver Thanksgiving

 For my final inspiration Thanksgiving tablescape,
I'm really going in a different direction...

a Pink & Silver Thanksgiving Table!

I was inspired by my own PINK Sweet Sweater Pumpkins
and my mom's wedding china from the 1960's...
her china pattern has little pink rosebuds on gray stems with gray leaves.
In order to keep the whole look from going far too 'spring' in theme,
I introduced some deep silver/pewter 'winter' colors...
they serve to pull out the gray leaves in the patterns and highlight the silver plate rim.
The Centerpiece:
 I gathered up the family silver tea set,
three patterns of china, including an antique china pedestal,
along with my wire tomato cage dome and some antique chandelier crystals
to create a sparkling multi-level centerpiece for the table.
Some cuttings of passion vine and rosemary from the garden pair with pink petunias and roses.

Want to make your own wire dome from a two dollar tomato cage?! 
Click here for my tutorial!
 The Linens:
Over a pewter satin tablecloth, I laid a light-weight white crocheted lace tablecloth.
The contrast of the dark color underneath really makes the lace details pop.
Napkins are simple pewter satin.

The Rest:
The china shown here is a classic and feminine mid-century pattern,
with a silver plated rim, gray leaves, and pink rosebuds.
A secondary and complimentary pattern with larger roses and leaves
appears in the espresso cups & saucers,  and several of the serving pieces.

  Floral-motif antique silver flatware and cut crystal glassware brings sparkle to the neutral setting.
The napkin 'rings' are simple strands of vintage chandelier crystals,
wrapped around a rolled satin pewter napkins.
A variation has a small paper doily gathered with a pink vintage ribbon,
and a crystal ornament tied on.


I've placed a mini PINK Sweet Sweater Pumpkin at each place setting as a gift,
in a miniature espresso cup.
  It's an idea easily replicated with a real pumpkin, a chocolate pumpkin, or a candle.
Just a little token of thanks...

11.23.2013

Vintage White Thanksgiving

Today I'm offering a very feminine variation on the tablescape from my last post.
 With a simple change of a few elements, we can create a whole new look,
and the previous 'contemporary vintage' look goes completely 'Shabby Chic'
[with a nod to Her Madge of Shabbiness, Queen Rachel Ashwell]

Here's how I pulled together this tablescape:
 The Centerpiece:
I kept the tallest Sweet Sweater Pumpkin sculpture in pale neutral tones and the pale leaves.
I added in cut crystal bowls and ivory & white pumpkins,
along with some vintage fabric carnations.... you could use real ones, of course.
I love white carnations for their spicy scent and low price!

The Linens:
Over the tan linen tablecloth, I laid a light-weight white crocheted lace tablecloth.
The contrast of the tan really makes the lace details pop.
Napkins are vintage white cotton, with lace trim.

The Rest:
White ceramic dinnerware in a classic pattern that truly works with any decor style,
while gold flatware and cut crystal glassware brings sparkle to the neutral setting.
The white floral pattern on the clear candle holders coordinates with the theme, too.
  It's a simple combination that looks old, luxe, and feminine.
[Grandma will LOVE this one! ]

The napkin 'rings' are the same as in the last tablescape, serving as place cards as well.
They are a strip of glossy paper with a sticker, and bleached leaves tucked into the top.
This time the napkins are gathered softly, instead of a crisp fold...
I've placed a mini Sweet Sweater Pumpkin at each placesetting as a gift,
which is an idea easily replicated with a real pumpkin, a chocolate pumpkin, or a candle.
Just a little token of thanks...
Again, this didn't take a lot of time to put together!
A beautiful Holiday table is easy when you use what you have in a fresh, new way...

11.21.2013

Black, White & Tan Thanksgiving Table

 I love mixing up the elements I have on hand to create a whole new look.
When it comes to tablescapes, it's kind of fun to do the unexpected...
like mixing the crisp contemporary color scheme of black, white and tan
with some softer, earthy vintage and natural elements.

Here's how I pulled together this look:
 The centerpiece:I used several of my original Sweet Sweater Pumpkins...
two are mounted on pedestals (a terra cotta urn and a black column), 
one is perched inside a black flocked velvet shadowbox frame on the wall,
and two more nestle with real leaves on a ceramic platter - that has leaves in its subtle pattern.
Now, even if you didn't get any of my pumpkins,
you can certainly do this with other elements - 
REAL pumpkins, pine cones, wood rounds, or any material from nature.

The Linens:
The white platter sits on a thick felt leaf cutout,
which tops a linen tablecloth in a light tan color to further the theme and color scheme.
The napkins are a crisp black satin for a sleek touch.

The Rest:
Black and white ceramic dinnerware - the black very contemporary and the white rather classic -
combine perfectly for high-contrast style.
Sleek clear glassware - vintage and new - along with gold flatware are simple ways to add sparkle.
The highball glasses are family heirlooms, the goblets are from a discount store - 
it's not about pedigree or price here, but style. They mix perfectly.

The napkin is bound by a strip of glossy paper with a nametag sticker and a dried leaf tucked in - 
serving as both napkin 'ring' and placecard.

The napkin can be placed in the soup/salad bowl
or beside the plate.
If you prefer a more streamlined, modern look,
replace the frame, pumpkins and leaves with simple white gourds & pumpkins
on more white platters.

This all came together in just an hour.... without pre-planning.
I looked around and saw what I had here in the house, and came up with the color scheme.

Pulling together a delightful table for your guests 
doesn't have to break the bank OR cost you a lot of time.
I hope this will inspire you to dig through your cabinets and see what you have in there!
 My next post will show you a variation on this look
with a much more feminine vintage style...
Shabby Chic fans, you're going to love it!