. -->
Showing posts with label gift wrapping. Show all posts

2.06.2020

gift bag wall art tutorial

dollar store, dollar store crafts, valentine's day, valentine's day crafts, home decor, seasonal decor, gift wrapping, gift bags, wall art, make art, papercrafts, re-purposing, hearts
i love making somethin' outta' nuthin'! using inexpensive or free supplies is my jam.
and i love sharing those kinds of ideas here.
we all know that crazy-cheap retailers like Dollar Tree have loads of paper gift bags every season:
(Dollar Tree photo)

did you ever think of those as not just gift bags but craft supplies?
doing something unexpected with things is my jam, too...
like turning gift bags into wall art that echoes the current 'handlettered sign' trend! 

continue reading for this super 'fast, cheap & easy' project tutorial

5.07.2018

Mother, May I?

ok, friends, Mother's Day is this coming Sunday!
here are some easy and creative last-minute ideas for your celebrations...

continue reading to see all of my Mother's Day posts!

12.31.2017

Take the Party With You Tonight!

it's New Years' Eve!
time to pop the corks, pour the bubbly, and start celebrating!

 i've just got to share this nifty way to transport sparkling wine and glasses to an event -
whether you are heading to the roof to watch fireworks or the ball drop at midnight,
or to the neighbor's place for some revelry,
it's a perfect way to take the party with you!

Click 'Continue Reading' for the tutorial...

11.28.2016

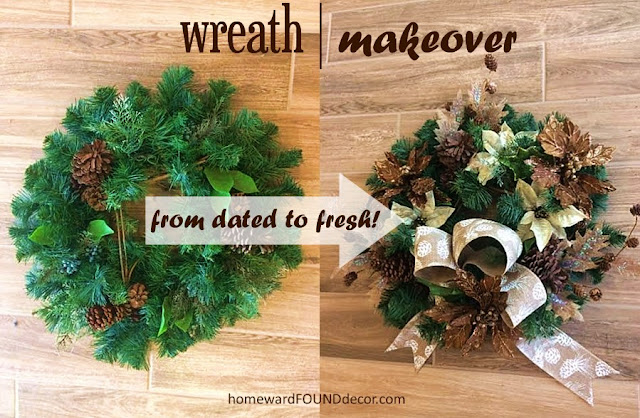
Easy Christmas Wreath Makeover

christmas decor
Welcoming people to our homes is important every day - especially during the Holiday season.
A wreath for the door or front porch is something that we almost all include in our decor... 

Like you, I gaze longingly at the beautiful wreaths and garlands 
displayed at elegant home decor shops and garden centers
And THEN I look at the price tags... not happenin', folks!!

Fortunately, those inspiring creations can lead the way to making what we already have BETTER!
I'm always up for taking something old and making it look new
(okay, well, not always - sometimes I take new things and make them look old!)
...and the wreath that my Mom has been using for about 20 years now was due for an update.

continue reading for my secrets...

8.25.2016

pretty paper posies

Things are really bloomin' here at project homeward!

A few weeks ago, I posted the paper flowers that I created,
 using vintage book pages and sheet music.
Find my Paper Flower Tutorial HERE

When my Mom saw those flowers hanging on the wall in my studio,
she got VERY excited and asked me to make some for her bedroom.
She's been buying decorative wrapping paper ever since for her flowers!

Wednesday was the day... 
I cut, glued, stapled, folded, fringed and fluffed various papers
and the result was the pretty posies you see in these images:


We did add ONE thing to these that I don't have on mine: BLING!
A couple of sparkly earrings are the perfect finishing touch.

It was a lot of fun working on these together
(we were working on them on the kitchen island, and Mom called herself my 'sous chef'!)

She loves the way the flowers brighten up her bedroom...
she's re-using the linens that she had in the master bedroom from the old house,
and that room had a lot of bronze and brown in it. It was more masculine - for Dad.
The use of aqua and white in her new room is much more feminine and cheerful
and Mom definitely deserves cheerful <3

wouldn't paper flowers like these make great party decor?
warm oranges for fall, reds & whites for Holiday, yellow for spring,

baby blues & pinks for a baby shower...
just THINK of the possibilities! (wink)

Shared Online:

Cupcakes & Crinoline | Project Inspire{d}


7.22.2016

Paper Flower Power!

  Don't know what it is lately, but apparently I have blossoms on the brain!
I recently saw some gorgeous photos of brightly-colored paper flowers on Instagram,
posted by 'BloomBox_oc' - I tried to save an image to share here, but it wouldn't work.

Their photos reminded me of a paper flower that I won at an event, 
so I dug through some of my (still packed) boxes and found it...
it's the middle flower in that image above, made from old book pages and tissue paper
by a very creative vintage show vendor named Becky, from 'Whimsies'.

All that flower power inspired me,
 so I dug out a bunch of my own vintage paper and made myself some:
It was fun!
I haven't spent a lot of time doing creative things for myself lately, 
and this was a nice way to spend the hottest part of the day - 106 degrees. YIPES.

And when I was done, I had a buncha' blooms to put on my studio/office wall:
I haven't made time to do many creative things for myself lately, 
and this one just made me smile.
Just in case that photo above doesn't make the scale clear, here's a reference shot:
Yeah, these babies are HUGE!

This project was was fun, easy, and I already had everything I needed to make them -
which is pretty much how most of my projects come about, anyway:
I get inspired and then dig through what I have to 'make it work'!

Through the process, I snapped some photos and put together a simple tutorial:


Looks like I'll be making more in the near future, too...
my Mom saw these on my wall and asked
"I think these are exactly what I need for the wall over my bed!
Can you make some in aqua and tan and white, to match my linens?
"
Why, yes, Mom, I sure can!  see more of these here!

Shared Online:

Cupcakes & Crinoline | Project Inspire{d}


11.27.2015

Holiday & Christmas Decor Inspiration

Over the past 40 years,
I have had the great blessing of creating beautiful Christmas decor
for many residences and businesses...
for Four Seasons Hotel & Microsoft executive homes,
for many small businesses like Molbak's Home+Garden store 
for big huge famous businesses like Chateau Ste. Michelle and Columbia wineries,
and the Disneyland Resort. 

Now I share my tips, tricks, and ideas here on homewardFOUND decor!
You'll find loads of Holiday inspiration here...

continue reading...

10.25.2015

It's Not Too Late to Get Your SPOOK On!

Looking for last minute Halloween decor ideas?
(it's okay!)
Have no fear! I have a TREAT for you in my archives:
a bunch of my trademark 'Fast, Cheap & Easy' TM ideas...

just click on the 'read more' link!

12.17.2014

Black & White & Winter All Over!

It's finally beginning to look a bit like Christmas around HOMEWARDfound central!
I've been so busy working that I didn't even remove the fall pumpkins from my office until SUNDAY.
Yes, you read that right.
I debated even decorating at ALL, but the urge got the best of me and I went for it - 
although in a different way than I usually do.

This year, I decided to focus on decorating for the winter season
rather than just for Christmas...

I don't have tons of bins of Holiday decor anymore, just a few with special items,
so I selected some things from there
and then added in everyday 'stuff' that helped me create a color scheme.
I went for a crisp black, white, and silver look:
.
The shelves on the wall in the office are rather triangular,
so when filled they remind me of a tree shape.

Along with my growing black & white coffee mug collection,
I used sparkly paper bags from the dollar store, two of my Original Sweet Sweater Snowmen,
a glass nativity scene, white tissue snowflakes, sparkly glittery metal branches, a lace mask,
and the rare white candy canes that I have been hauling around since 2009
(and OH are they STALE!)

Here are a few of the other elements I used:
 I do still collect white Santa china & ironstone mugs...
I wash all of the red paint off of them, though, so they fit my pale neutral color scheme!
This year, I found these tiny little tophat ornaments at Dollar Tree,
and they sit perfectly on top of the smallest size mugs!
 You've seen this truck before... it has a place of honor every season, 
because it reminds me of my Grandpa Ward's truck.
And the castle ornament.... well, I don't really need to explain that one, do I? ;)

Across the room, a breakfront/dresser is a large display space,
and I have been putting the tree here each year...
This year, I decided to create a DIFFERENT kind of tree...
 and used my wire tomato cage dome instead!
I could have used a plain ol' wire tomato cage tree,
but I was lazy and in a hurry and so I used what was already in the room.

 I placed the dome on a platter on top of a china pedestal bowl to raise it up,
and my special vintage ornaments in silver hang delicately from the wire crosspieces.
A birdsnest that I made cradles a broken ornament at the base of the dome,
and a mini-sized tophat that I bought at Disneyland serves as a jaunty dome topper.

 White china & ironstone holds more ornaments across the vignette,
and some black accents really POP against the white... especially that Chanel box :)
 Last Christmas, when I was having a blast with my kids and grandkids in Seattle,
I bought the white ceramic Space Needle salt & pepper shakers.
(They were the least cheesy souvenirs I could find down at Pier 39!)

Then this year, I found the white ceramic Sleeping Beauty Castle at Disneyland.
(I love the way the snowflakes show up behind it in the flocked black shadow box frame here...
they remind me of the Disneyland fireworks!)

As I worked, I realized that I have a growing collection here - figures of the places I love best!
Now my plan is to find a ceramic figure of the Alamo in San Antonio
(even if it's not white, I can paint it white)
and then some other places that are really special to me.
I can use them in my decor all year long, instead of just at Christmas!

 Just a few more detail shots of little decor touches...
I don't have the light strands for the clear bubble lights anymore,
so I just piled them into an enamel pail. They still make me smile!

Another handmade nest found a home in an ironstone chamber pot,
hung by its handle on an old wood gate section.

...and my vintage wire shopping cart corrals all of my gift wrap supplies!

SO, even though I waited a REALLY long time to get my decorating mojo on,
it was worth the wait.
Mostly because I don't have to take it all down in two weeks!!!

LINKED UP:
Practically Functional | Creativity Unleashed

11.22.2014

Pretty Potluck Presentation

'Tis the Season for parties - and potlucks!
It seems most gatherings now include everyone pitching in and bringing a dish to share -
so deliver your goodies with style using a few simple elements from your kitchen!
( I know Tupperware and Pyrex work well, but they aren't exactly pretty!)
Whether you are contributing a salad, a dessert, or a hot casserole,
this simple wrap & carry method will secure the food
AND look great when it comes time to serve!

All you have to do is cover the bowl with a plate or platter,
then tie it on securely using a plain muslin dishcloth or sturdy twill ribbon:
* Lay a dishtowel on the counter, and sit the bowl of food on top.
* To insulate the bowl, add a second dishtowel as a wrap around the bowl itself.
* Place the plate/platter (depending on the size of the bowl) on top. 
 *  Lift the two opposite corners and tie them on top of the bowl.
* Repeat with the other two opposite corners.
* Finally, pop the serving utensil into the bow, and tie it one more time to secure.
You can also fold the dishtowel into a long strip,
and wrap it once around the bowl & plate to secure.
Add the serving utensil and tie again.

Ramekins and casserole dishes work, too - just find a plate or platter that fits the top,
and use heavy twill ribbon to secure.

Use brand new, thrifted, or vintage ceramics and linens - it's up to you!
( PS: The dishtowel comes in handy for drying off the dishes after the party, too!!!
)