. -->
Showing posts with label tomato cage crafts. Show all posts

10.04.2014

Haunted Mannequin

Once again, the master visual stylists at Roger's Gardens in Corona del Mar, CA
have outdone themselves with this years' Halloween decor...
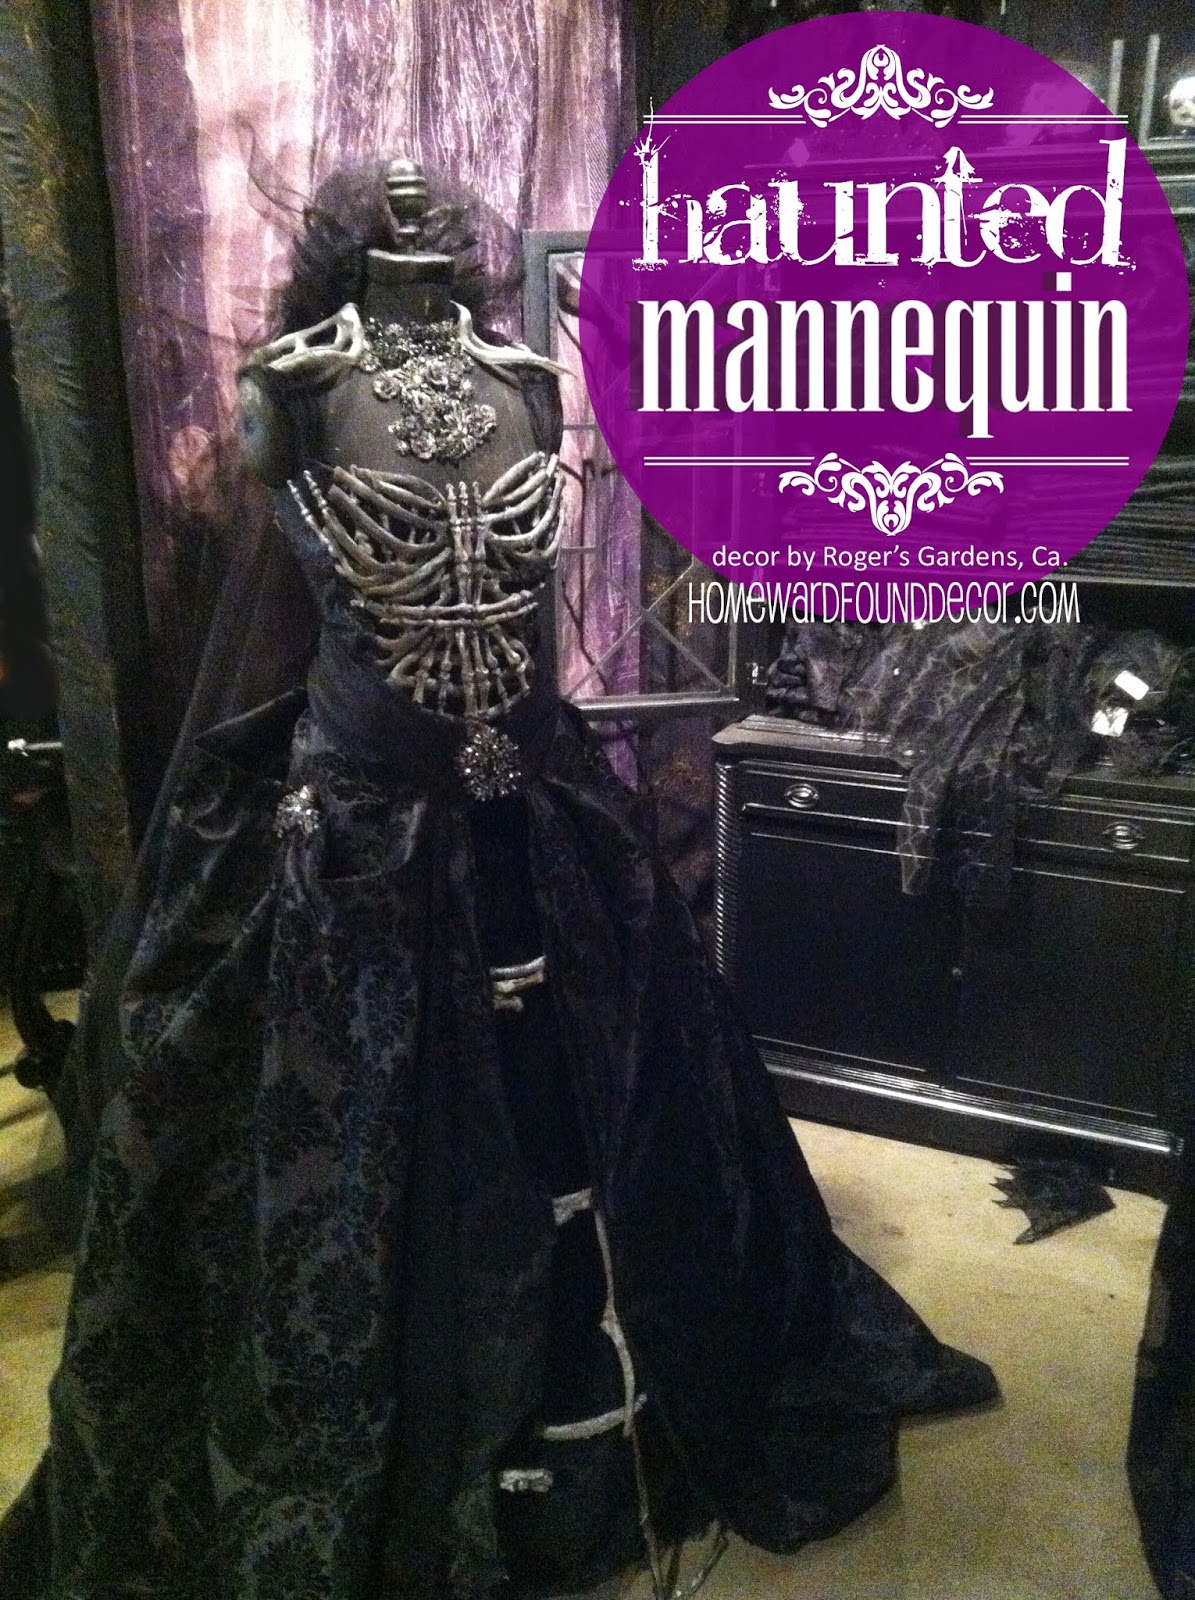
the theme is 'Haunted Elegance', and this Haunted Mannequin is a perfect example.
She's elegant and scary and vintage-looking
AND 
she has secrets!

I thought there were some ideas here that could easily be used to create your own mannequin
for Halloween decor in your home...

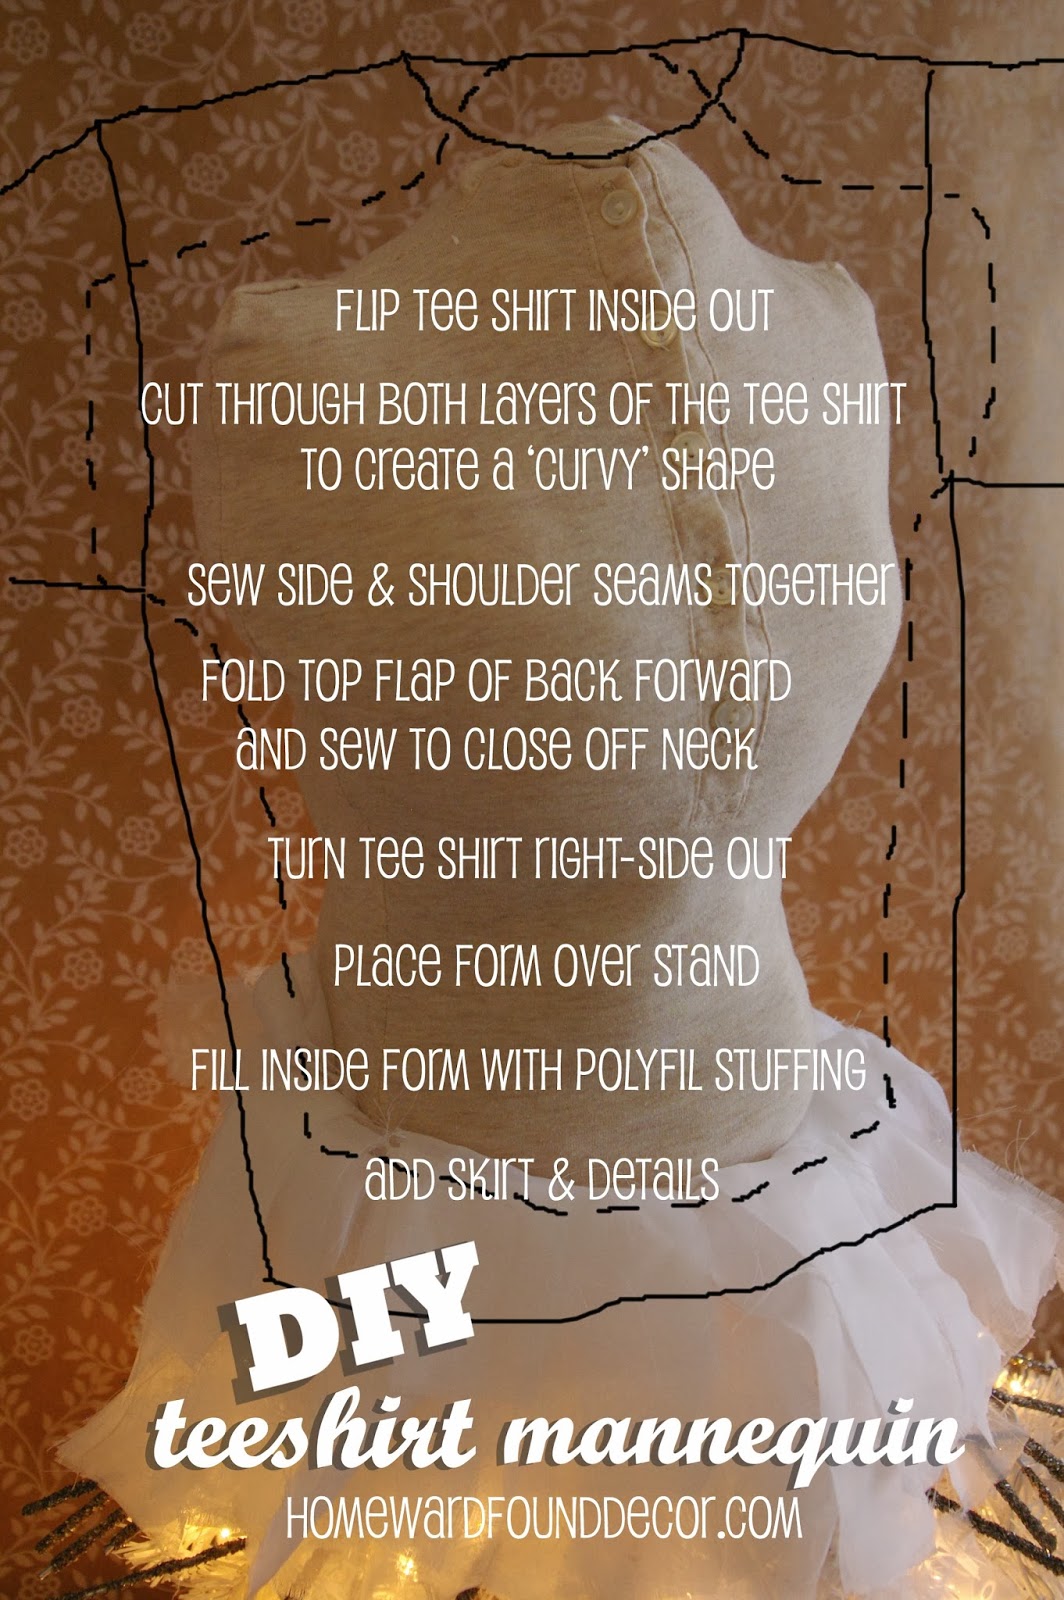
The mannequin herself is a simple black cloth figure on a black wood stand - 
you can find those new or simply paint an existing mannequin form black.

Her first secret is her clothes. They aren't clothes at all.
They are TABLECLOTHS!
Yep.
See that cabinet behind her? It's holding damask and netting linens for sale.
The visual crew used it as fabric to create her wardrobe.
(It's kind of a 'Project Haunted Runway' thing going on there)

And there's another secret to be shared:
Her skirt has an underlayer to give it shape.
It's not a petticoat or a hoop. It's more a SKELETON of a hoop - 
created with
(drum roll, please)
WIRE TOMATO CAGES!

( I LOVE using tomato cages as a decor element! See more here!) 

Cut open on one side and then bent and connected together, 
the wire tomato cages are partially wrapped with cloth tape (like medical tape) to hold them together - 
and it looks very musty and old.
Then the layers of fabric are added, tied on, pinned,
bustled and flounced to give her Edwardian-era gothic fashion style...
open in front to allow a peek at the underskirt framework.
A sash of black satin holds the 'skirt' on and is finished with a sparkling pin.

On her back, a swath of the netting tablecloth is gathered up to form a cowl collar on top,
and then fall like a cape behind her.
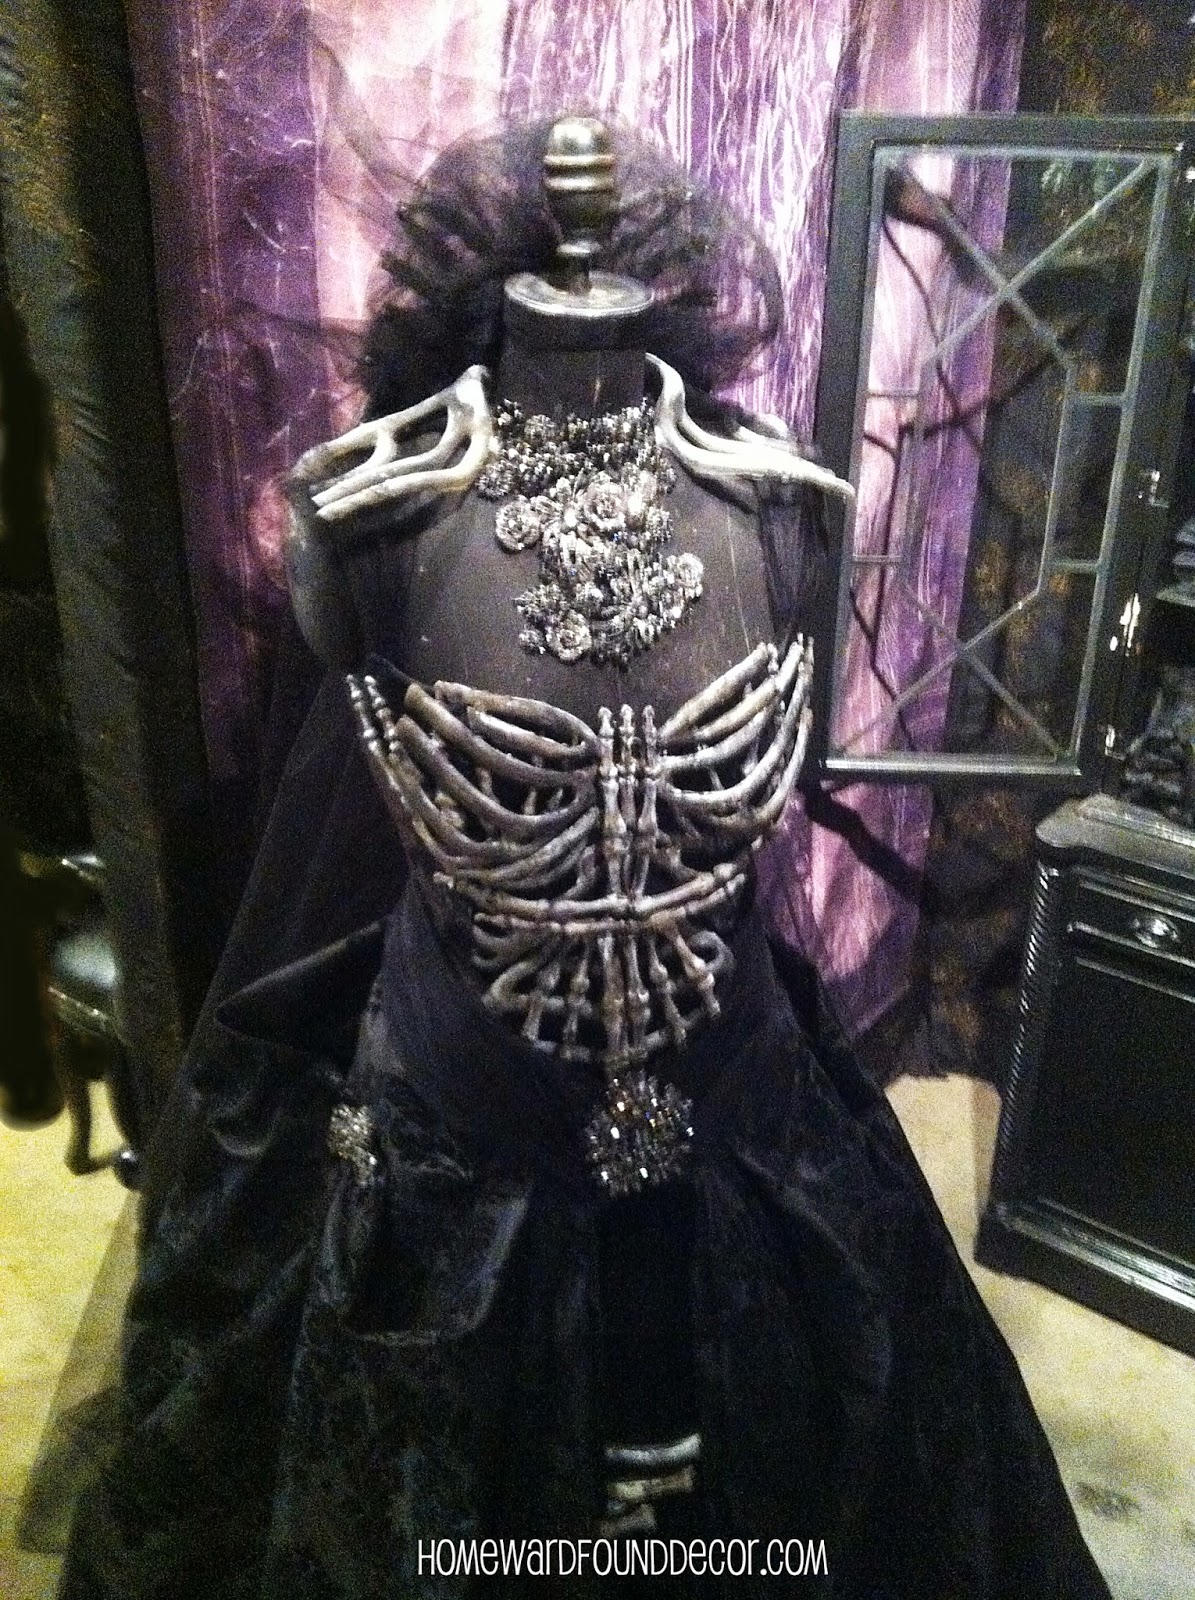
Her bodice is expertly adorned with bones.
Not an actual 'skeleton' showing her ribs, this effect is more artful and suggestive.
More bones on her shoulders give the effect of epaulets.

Bones can be found at the Dollar Tree or party supply store...
and no, they won't look like these!
However, after a wash of thinned light gray paint
and then some 'antiquing' with a dark gray paint wiped on,
you'll get an old, decrepit look to them.

...and then there's her jewelry!

This stunning necklace was created by combining multiple sparkling rhinestone 
pins, brooches, earrings, belt buckles, and necklace pendants.
The assemblage is pinned right onto the mannequin form, 
but you could hang a real assembled necklace on one, too.

I just love how the designers there come up with fun new ways to use materials
that we see EVERYWHERE for Halloween...
I mean, other stores put tablecloths on tables, for goodness sake.
But at Roger's Gardens, they elevate the everyday to ecstasy!

shared online:


Practically Functional | Creativity Unleashed

Yesterday on Tuesday | Project Inspire{d}

4.24.2014

Going Green!

 I half-jokingly posted on the HOMEWARDfound facebook page the other day,
letting out a dirty little secret of my total decorating obsession....

When I change the graphics on my social media sites, 
I ALSO change the decor in my office / studio. To match.
So that when my fresh new home pages are up on my laptop screen, they coordinate with the room.

I know, I know... #Imayneedtherapy

ANyway, the new HWf graphics that I created for May 2014 are all about green and white:
I uploaded the new graphics on Monday. So, on Tuesday, the decor in the office changed... 
out went the yellow from March & April, and in came the greens.

It's amazing how simple accessory and color changes can freshen up a room!

when i redecorate, I just round up and grab everything in the color scheme I can find,
then sort through it as I create vignettes around the room.
If I don't use something, I just pile it into a wire basket as part of a color montage!


These two images show projects that I've shared here on the blog:
The wire dome made from a tomato cage and the seed packet tin can vase.
I've used them both in dozens of ways!

Many of the things I use in my office decor ARE 'green' as far as eco-friendly goes,
because there's a LOT of re-imagine, re-use, re-cycle action going on here!
From thrifted, vintage and antique items to everyday materials re-purposed into another use,
nothing is off-limits.

Well, not unless it's red or orange or something. ;)
Just call me #ColorObsessed!

shared online:

Yesterday on Tuesday | Project Inspire{d}

1.09.2014

DIY mannequin - from a tee shirt!

i'll admit it, i've fallen prey to the 'vintage mannequin' craze.

over the years i have admired them from afar, 
but never had the chance to get my hands on one of the 'real' ones.
oh, sure, i had a chicken-wire one picked up for a song after a gift show,
and i rehabbed a really old cardboard bust form found at a yard sale.

My friend Todd recently shared this image on facebook:
SOURCE: http://www.pinterest.com/pin/132011832801322296/

When I saw it, I thought "I really want to make that.
But I don't have a dress form / mannequin anymore.
And it's Christmassy... It's too late for that."

THEN my Muse arrived....
and reminded me that I have a WHITE faux Christmas tree
that would look FAB.U.LOUS all through the winter months as the skirt for a mannequin.
I just needed a mannequin.
a
They say 'necessity is the mother of invention',
so I came up with one of my trademark 'Fast, Cheap & Easy' solutions:
I made a mannequin form from an old tee shirt!

It was a simple matter of cutting and stitching a few seams...
here's a quick tutorial for making your own:


[solid lines show original tee shirt outline; dotted lines are approximately where to cut for form]

once mine was done, i popped it onto the top of my small white Christmas tree!

 SAFETY TIP: if you do this, remove all lights from the area under the tee shirt form.

I removed the lights on the top branches and then bent the branches downward,
so I could easily slip the tee shirt on and stuff it with polyfil stuffing.
[ and yes, I gave her some lovely lady lumps! ]
Then I created her 'skirt' by adding my vintage metal & glitter tree branches to the tree,
and wrapping a fringe-y scarf around the very bottom of the tee shirt.

You don't have to use a tree as the base, you know...
What about a lampshade? Or a wire tomato cage? [one of my fave multi-use props]
 Up on top, I wrapped a cheap white garland around her as a scarf,
finishing it off with a vintage ribbon and rhinestone pin accent.
My own Original Ice Queen Crown encircles her neck.

I chose a tan tee shirt for the 'vintage' look, but black would look swanky! 


Shared Online:

One Project Closer | Creativity Unleashed

The Vintage Farmhouse | Creative Things Thursday


12.20.2013

Dome for the Holidays....

As I was unpacking bins of Christmas decor a few weeks ago,
I discovered a small box holding some vintage-look bottlebrush trees
that I honestly didn't think I had anymore. I was VERY pleasantly surprised!

I love their creamy ivory color and subtle glitter-i-ness!
[these are relatively new trees, from the Department 56 collection]
 They needed more 'oomph', so I rounded up some containers to use as diminutive 'tree stands':
the one last remaining tin container that my 'Junk Snowmen' were made in,
and five silver vessels from my Mom's collection of family pieces.

I sat them on a silver tray (again, Mom's!) and added several of my own vintage ornaments.
To complete the display, I popped a wire dome made from a wire tomato cage on top of it all.
Some HUGE vintage chandelier crystals dangle from the dome and add sparkle...

You can find my tutorial for making the wire dome from a tomato cage HERE
This vignette in my office also includes several other domes...
One is an antique flower frog, made of curled wire that holds my white candy canes!

Another dome is simply a bare metal wire lampshade frame.
I love the sculptural lines and shape of these - I've had some very fanciful ones in the past,
and they add a finishing touch to any vignette.

Here, one of my NeSts made from daylily foliage holds vintage glass ornaments,
a german glass glittered crown cutout, and a crystal snowflake.
The box serving as a 'stand' used to hold Christmas light bulbs!

It's all just simple items, combined to tell a story ...
One more dome that I am using right now is the curliqued wire 'cagelet'
that I recently mentioned in this post.
It sits over a stack of my dishes and a white ironstone bowl that holds another NeSt
and one of my favorite flocked ornaments - new, not vintage.
[I found four sets of three of these at Ross a few years ago, and HAD to have them]

I love how the golden afternoon sunlight pours into the room and spills over these pieces.
 One Last Detail:
When I added the glass tree topper spire to the vignette,
I sat it in yet another silver vessel - a goblet.
The raised height lefts the spire up to make it more noticeable behind the domes...

You can also display tree spires on candlesticks:
Just insert a taper candle into the candlestick, 

then slide the tree spire over the candle for support.

11.12.2013

Use Tomato Cages as Trees!

I know, I know, it's not even Thanksgiving yet...
but everyone is looking for Holiday Decorating ideas,
so I need to start popping them in here from time to time!

Years ago, in the course of my retail visual merchandising career,
 I created a Christmas Ornament Display Tree using a wire tomato cage.
It was a last-minute solution on a budget - and it worked.

Many years after that, I was asked by a well-known winery to create something
simple . easy. contemporary . and CHEAP
for their Holiday retail displays in their wine shop.
And I created the wire trees all over again:
In these photos, you can see that there are several ways to make these trees. 
Variety is good - especially when all of the trees can be seen at once, as in this winery.

The first thing you'll notice
is that the tomato cages are used 'upside down' from how they normally appear
when they are holding your tomato plants upright in the garden!
The pointed tops of these trees are the long legs / upright rods of the contraption,
held together with a zip-tie.
The GOLD TREES are very simple to make:
gold metallic tinsel garland is wrapped around all of the wire surfaces (rods & rings) of each cage.
I used very tiny clear zip-ties to secure the tinsel in several places as I wrapped.

The WHITE TREES are made in two ways:
One is simply wrapped, just like the gold trees.

The other was made by wrapping the white iridescent tinsel  
all the way around the outside of the cage, encasing all of the rods.

Before I started wrapping, I cut the top two rings off - leaving only the lowest ring at the base.
Then I zip-tied the top of the upright rods together,
to create the cone shape.

These are very angular and modern in shape, because of the three upright rods/legs.
Combining two modified cages after removing the rings,
and stacking them so that the rods are placed between each other
will result in a more rounded cone shape to wrap it with tinsel.

The RED & WHITE STRIPED TREES
are made exactly like the white cone tree above.

The FAUX PINE TREE
is made using a garland of greenery, instead of the tinsel like the others:

Start with a thick faux pine garland.
Wrap the lowest ring with the garland, attaching it with wire or zip-ties as you go.
Cut the garland once it has wrapped the base ring.
Move on to the next highest ring on the frame, and repeat.
Move to the top ring on the frame, and repeat.

Use a zip-tie to pull the ends of the upright wire rods together at the very tip of the wire cage.
Take a small section of the garland and wrap it around the zip-tie,
and twist the ends of the greenery together to secure it to the top of the tree.

OPTION:
You can use three faux pine wreaths - one large and two medium sized -
in place of the garland. Then just use an 8" piece of garland for the top of the tree.
Saves a LOT of time!

When done, you can hang lightweight ornaments from the greenery.

If you plan to have lights on your trees, put the light strands on FIRST - before the garlands.
They will hide the wires! 
These work perfectly to display outdoors, as well as indoors.


There are generally two sizes of wire tomato cages available at garden centers,
so you can get some variety in your displays.

shared online:


OPC/TBH . The Humble Brag


5.15.2013

Create a Cloche and Dome It!

Using a cloche is a simple way to give small items presence in your decor.

Most cloches / domes are made of glass, especially the vintage ones... 
but you know I love using unexpected materials in new ways,
so I created a dome from a wire tomato cage!

I showed it covered with ivy in a past post, but of course it can be used WITHOUT the ivy...


The wire form is an industrial-style way 
to create a 'cloche' effect:
Place it over several small items to add the finishing touch to any vignette.

It's also indestructible, great for use outdoors in EVERY season...
[and at @ $2.99 per wire tomato cage, 
it's a VERY inexpensive way to get a lot of usable style!]


Another easy way to create a dome is to use a metal lampshade frame...
Simply remove the fabric, and use the bare metal frame to top a gathering of items.

Lampshades come in endless sizes and styles, 
so you can create dozens of different domes!

This is a great use for old lampshades, since the fabrics get stained and torn -
you can pick them up for a song at thrift shops and the Goodwill outlets!