. -->
Showing posts with label TOP TIPS. Show all posts

5.11.2013

Mothers Day Flowers Are In the Bag!

Flowers from the grocery market or corner florist are the default Mothers Day gift... 
every mother knows that.
[sorry, gang, it's not a secret.]
If you are grabbing a bouquet or potted plant on the way to brunch with Mom,
here's a way to make those flowers look like ANYTHING but 'last minute'...


Hit up a vintage fashion boutique or thrift shop
or TJ Maxx, Ross, or Marshalls if you want something new.
Grab a cute, colorful PURSE or HANDBAG or TOTE BAG.
Put the grocery store flowers into the purse!
[for extra brownie points from Mom, add a matching scarf]

it's GIFT and GIFTWRAP all in one!

Shown here, a simple and inexpensive grocery store bouquet of tulips
placed in a double-layer plastic bag 'vase' is tucked inside a vintage beaded evening bag.
A pair of lacy gloves are the perfect finishing touch...

Potted plants from the hardware store are slipped into a plastic grocery bag, 
then nestled inside a bright, colorful spring purse.

a canvas beach tote or woven market bag would work just as well!

A coordinating scarf is an extra-special finishing touch!

Now sit back and wait for the compliments [and glares of jealousy from siblings]
when you present YOUR flowers to Mom! ;)

psssst.... these would also be PERFECT table centerpieces
for a Mother's Day brunch, luncheon, or tea!


shared online:

Funky Junk Interiors | New Upcycled Projects to Make #625

Yesterday on Tuesday | Project Inspire{d}

5.01.2013

Tutorial: May Day Tin Can Flower Baskets

Happy May Day!
I've been making this cute Spring craft for decades:
flower buckets made from upcycled tin cans and seed packets!

I've had a 'thing' for upcycling tin cans for quite a while...
Back in the 90's, I had a decorative painting business
and made these pails - and I handpainted 'vintage'-look seed packets on the front of the cans. 
Hundreds and hundreds of cans!
 I really loved my friends in the restaurant industry, who supplied me with all I could want.
I painted and sold these with designs for every season and every holiday,
in practically every shape and size of can that exists. Mine had little wire handles, too...
see my Painted Pails here!

Now I've created this version that requires NO painting!
You'll love this 'Fast, Cheap & Easy' TM project -
and will have little buckets of flowers to share with everyone today!

 Supplies:
* empty tin cans with lids removed
* seed packets (full or empty)
* string or garden twine & scissors
* manual can opener (with pointed end)
* glue stick optional
* flowers clipped from your yard (or 2" potted plants)


1. wash empty tin cans and remove paper labels [GooGone works well on stubborn glue]
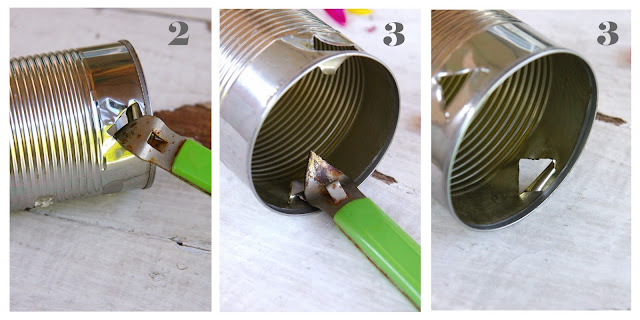
2. use can opener to pierce two holes at top edge of either side of can (point down)
3. use back of can opener to roll and press punctured metal FLAT on inside of can (no sharp point)
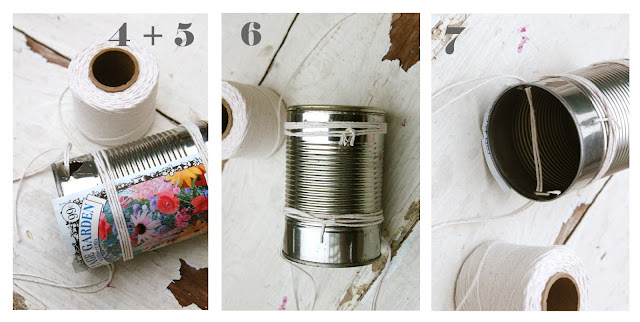
4. lay can on side, and lay seed packet over the seam of the can (or over stubborn glue spots!). 
glue in place with the glue stick if you wish.
5. cut @ 24" piece of string/twine and wrap it several times around the can and the seed packet,
 near the bottom of the can. Repeat with another string at top of seed packet/can.
6. tie strings tightly on the back side of the can to hold the seed packet in place.
7. cut @ 24" piece of string/twine, double it, 
and pass the ends through both holes on the sides of the can. tie ends together to form hanging loop.
8. fill can with water (@2 inches) 

 9. add flowers!

 10. hang up on a doorknob or display on a tabletop, counter, or shelf...


You can use empty seed packets, or ones that are still full of seeds - 
and if you can fill the can with the same kinds of flowers that are on/in the seed packet,
it's a doubly sweet gift.

[PS: I found these pretty seed packets at the Dollar Tree store - ten for a buck!]


This project inspired a party decor theme for Mothers Day!
See more in this post


shared online:

2016: Project Inspired{d} Party


one project closer | Creativity Unleashed

creative country mom | Home Sweet Garden Party

the answer is chocolate | bff open house link party #26

featured:
see post here


3.25.2013

Be a Good Egg!

so many fabulous egg-related decor ideas are floating around the internets right now:
literally hundreds of ideas for coloring Easter eggs and making patterned Easter eggs 
and ideas for making wreaths and topiaries from plastic Easter eggs. 
LOVE the creativity i see out there!

but.... what if you don't celebrate Easter
or what if you just want a more subdued palette?

you're in luck! 
(and good company, to be honest... pastel eggs are NOT my thing. 
the closest i got to them was when i brought home 
two dozen brightly-colored 'Cascarones' from a visit to Texas one spring.)

so today, i offer up some inspiration 
for creating spring decor with un-decorated eggs!
some are real, and some aren't.... use papier mache', clay, wood, or ceramic eggs.
first up, an ostrich egg (HUGE) embellished with a strip of vintage sheet music.
[the title 'Song of the Bird' was a perfect fit!]
i nestled the finished egg into a handmade birdsnest, 
then sat the nest on a 'pedestal' of an upside-down milk glass lamp shade (with the narrow end up).

here's a photo of the same egg standing UP in the nest, without the glass base:

another idea is to create a small vignette inside a glass jar...
and this works perfectly when you are using real (blown) eggs, because they are protected.
[note: do not - under any circumstances - 
forget to blow the eggs, and then seal them in a jar. 
BAAAAAAAD side effects :( ]

a little nest of grass is placed in the jar and an egg nestled into it.
a scrap of vintage sheet music or a poem with a Spring theme might be inserted as a 'backdrop',
and a strip with an appropriately 'Spring-y' title is glued onto the jar as a label.
i also covered the jar tops with a scrap of burlap, tied with twine.

[i use pickle or olive jars from thrift stores. 
they come in medium and large sizes, are wider than mason jars, and have no embossing on the sides to blur the contents]

this LARGE handmade nest sits atop an aged garden urn.
[i used ivy and hops vines from the yard to make it]
moss from a corner of the yard fills the center of the nest,  providing a soft resting place for a few eggs.
a glass garden cloche finishes off the look perfectly.
[you could also tuck in some gardener's gloves, hand tools, and some bulbs 
for a perfect Spring gift!]

then again, you don't really have to have a nest...
a simple egg presentation:
a glass salt cellar or napkin ring can hold an egg,
and a clear stemless wineglass as a 'dome' will finish it off with style.
if you write each guests' name on the egg, these are perfect place cards!
_________________________________

those last two shots are a bit of a sneak-peek - 
they are part of a garden-theme project and photoshoot last winter in Seattle
that i'll be sharing here on the HOMEWARDfound blog later this week.

i am delighted that photos from that shoot are featured
in the Spring issue of Creating Vintage Charm magazine!

2.27.2013

My Bloomin' Secret

potted spring bulbs look and smell wonderful indoors
[especially if they are potted up in a cute teacup or coffee mug, as shown here]
but within a week, you're going to have a bloomed-out plant.

i have a stylist's little secret for you
that will keep your indoor bulbs looking fresh for WEEKS...

tuck a test tube or floral tube into the pot, snugged right up next to the plant stems
and slip a fresh-cut daffodil or tulip from the florist or your garden into the tube.


you end up with a healthy green plant that has perpetual blooms
in as many colors as you'd like throughout the season!
one week you can have bright yellow King Alfred daffs,
and the next enjoy soft white Ice Princess Narcissus.

...and if you don't tell anyone about your bloomin' secret, they'll never know!
shhhhhhhhhhhhhhhhhhhhhh.......

2.01.2013

Top Tips for 'Vintage'-look Florals


I'd like to welcome guests arriving
from DEEconstructed's blog post!
 this post about working with flowers
originally appeared on HOMEWARDfoundDecor in February...
I hope you enjoy it!


 Welcome to Day 18!

 along with chocolate, the number one Valentine's Day gift is flowers.
and as much as i love a huge bouquet of fresh roses (white, please),
i really love using vintage florals in my decor. but they can be pricy!
over the years of styling retail displays and creating products for sale at vintage shows,
i've discovered a few tricks for using flowers in a way that makes them look more 'vintage'...

 * bunch 'em up into an old fashioned 'tussy mussy'

this bouquet (also shown in the top photo in this post) is a mix of about 20 fabric/silk flowers
and MOST of them aren't old. 
grabbed for pennies at garage sales, thrift stores, and even the dollar store,
those flowers form the 'base' of the bouquet, packed tightly into a bunch.

then the actual vintage flowers are inserted so that they sit above the others and at the edges of the bouquet
those are the flowers that you focus on when you look at the bouquet
[the white sweet william and deep pink mini roses, for example]

the stems are held tightly together with rubber bands,
then are wrapped up in a large vintage white doily. 
the top edge of the doily is left loose and looks like a collar around the flowers.
i also wound some vintage seam binding and ribbon around the stems,
finishing them off by dangling a cubic zirconia engagement ring and a vintage crystal.

 * create a domed arrangement

a styrofoam or floral foam ball is shoved tightly into a vase as the base of this arrangement.
snip flower stems to @ 2-3", and begin inserting them into the ball along the vase edge. 
work upward and place those flowers very closely together
[your flowers should all be the same type for this to look best - all roses, or tulips, for example]
the roses in the arrangement shown above were not vintage,
but here's a trick to making them LOOK vintage:

1. put on some gloves, and create a bleach solution of 1/4 cup bleach to 2 cups water. 
2. mix in a plastic spray bottle with a 'fine mist' spray option on the nozzle. (not 'stream')

3. take your new fabric flowers outside, and prop the flowers up in an bucket or paint can.
[you want them to be sitting as they will be when displayed]
4. sit the bucket of flowers on a large piece of cardboard or dropcloth to catch the overspray.

5. VERY LIGHTLY spray the bleach/water mixture over the flowers from @ 12" away.
spray from the TOP, and let the mist of bleach/water fall down onto the petals. 
6. let them dry, then repeat. 
7. for the second spray, move in a bit closer and focus on the ends of the petals of the large flowers.
[you may have to remove the stems from the bucket and hold each one]
8. let dry. then use in your decor!

this method will cause the flower petals on the outside of the blooms to fade and wrinkle a bit,
just as they do over time in vintage flowers.


* you can make even cheap fabric/silk flowers look more 'real':

when placing your flowers into containers, tweak the stems...
bend them and twist them just as real flowers do when growing in a garden.
have some facing downward, some reaching upward.

pull a few of the blooms open - stretch out the outer petals
[hair spray will stiffen them up so they hold]
and pull a few petals off of one bloom... scatter them on the table below the arrangement. 
it just looks a bit more 'real' that way!


1.19.2013

Chalk It Up to Inspiration!


this particular post could not have been planned for a more perfect day...
Donna over at Funky Junk Interiors has a great link party every Saturday
and as i was preparing to upload my images, i saw that this weekend, her topic is...

well, if this isn't a marriage made in heaven, i don't know what is!
 so, if you are visiting me via Funky Junk Interiors, WELCOME!

over the years, i've made chalkboards out of some interesting materials:
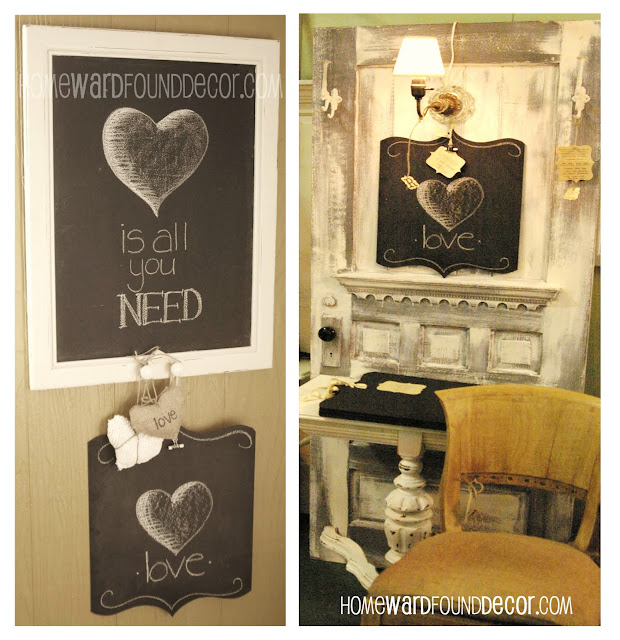
the one with the curvy edges? it's made from heavy cardboard! yup. 
the boards were stacked up six at a time and jigsawed to cut the ogee curves,
painted with chalkboard paint, had a hole drilled in the top, and hung from bias tape loops.

the one in a frame? it's a cheap thrift store painting!
it was really ugly, too... one of those where the print won't come out of the frame.
by painting right over that ugly scene with black chalkboard paint
and then painting the frame white, it looked brand new and totally fresh!
of course you've probably seen old doors used as chalkboards, like the one on the right above.
SO many uses for them, in just about every room in a home or business.
[top tip: great place to find inexpensive doors for this? 

 the chalkboard door with a table on the left above?
the hubs came up with the idea to use half of a drop-leaf table and an old door
to create a space-saving and very handy fixture for entry halls, landings, or small kitchens.
we made a lot of those over the years, in many different styles -
the old gray front door shown in the previous photo is one, too, using part of an eastlake table.

but hands-down, the BEST IDEA i EVER had 
for making chalkboards is this:

yep! use a sheet of cement tile backer board!
sand well and paint it, then drill holes in the corners and screw into studs in your wall.
it ends up looking, feeling, and SOUNDING exactly like 
an old slate chalkboard when you write on it!

i needed a chalkboard for my barn store, and saw that tile board sitting in the shop -
BADDA BING! an idea was born!
i also had some old wooden rain gutters on hand, 
so a piece was cut and attached to the wall just below the board to hold the chalk and eraser.

12.28.2012

welcome winter...


it's time to clear out the Christmas decor and freshen our rooms for time spent indoors...
let's cozy them up and make them inviting with stuff you probably already have!
let's greet the new year with a happy home and a happy heart

homewardFOUND is ideas, inspiration, tutorials, tips & tricks 
for easy seasonal decorating using everyday finds...

11.28.2012

Fresh & Green Holiday Decor Ideas!


to follow up the fabulous SnoWONDER-ful Giveaway last week,
i thought you'd like to see a few more ideas for using it in your Holiday decor!
above, a vintage glass pie plate is filled with sno-balls made from the magic SnoWonder faux snow. 
yes, they hold their shape like that - and are still wet and 'cold'!
they look absolutely real - except you can't do THIS with real snowballs:
 what else can you do with SnoWonder faux snow?

one year for Christmas Eve dinner,
i placed a scoop of sno inside my collection of vintage Santa mugs
and used them at each placesetting:
 i like the simplicity of the sage green ornaments hanging from the chandelier on spiraled pipe cleaners, too.

btw, my spiffy white Santa mugs started out just like the ones you see in antique shops - red and white. 
i just soaked them in hot water and soap, then used an old credit card to scrape off the softened red paint.
it was an easy fix to stay true to my own style!
i am a big proponent of using ornaments all over the place - not just on the tree.
[when the tree is full, you gotta' stop.
but when you fill other containers with them, you can keep going!]
in the photo above, you see a HUGE aluminum pedestal punch bowl filled with a mound of SnoWonder,
and various ornaments nestled into the snow. 

TOP TIP!
see the white, chartreuse, and silver bell in the photo?
it has no back. really. it was broken when i bought it. 
nestle broken ornaments or figures into snow, or glitter, or greenery,
and no one will ever see the back and know that it is not a perfect vintage treasure.
 a clear glass footed bowl also plays host to SnoWonder and some ornaments.
mixing up the ornament sizes, patterns, and shapes makes for an interesting display.
the monochromatic palette of white, silver, and clear neutrals
is invigorated by the shades of green: evergreen, celadon, sage, and chartreuse.
 a white ironstone platter with a huge crack in it 
is still able to serve up a healthy serving of ornaments on a bed of fresh Sno!

since SNOW was the major theme of my Christmas decor that year,
it carried into other ways to bring wintery delights inside.
i mixed clear glass, silver, and white neutrals
with some fresh green colors for simplified style...
 with a soft color palette and not a lot of 'stuff',
the whole look is clean, spare, simple, and spacious...
in a 900 square foot Cottage, keeping it spacious was important! 
i used a fake tree, with mini white lights and strands of large white light bulbs.
sadly, the large bulbs ended up BLINDING anyone who looked at the tree at night!
so I took some polyfil stuffing and placed a 'pouffe' of it as 'snow' over each bulb to soften the brightness.
[NOTE: these were NEW bulbs and burned cool - 
please DO NOT place anything over old or hot light bulbs!]
 i also used large plastic glittered snowflakes on the tree [with one as a topper]
an abundance of white and silver glass ball ornaments in various sizes and finishes
and some funky paper ornaments with glittered designs....
they were gift tags that i bought at a paper supply store on clearance!

[if i were to replicate this look NOW, 
i'd use manilla tags stamped with a green inked design instead]
 on the mantel, glass and silver containers were grouped on either side
and filled the glass vases with MORE ornaments in green, white, and silver - 
i love doing this - it's so easy, and keeps ornaments from breaking!
some pine boughs and white mini lights finish it off.

i also made some fun poinsettia-like flowers
from vintage pipe cleaners and silver resin mini-ornaments.
[i am looking for more of those shaped pipe cleaners
and will put together a tutorial for you soon...]
the flowers sit in a tall silver florist's bucket, with some greens, a large ornament, 
and some dripping silver glass garland.
i like them a lot better than real poinsettias, but those would look lovely here, too.
especially the 'Limelight' variety with bright lime green bracts. 

it didn't take a lot of 'stuff' or money or even time to put this look together - 
just a fresh idea, the color green, and Snow!

 click HERE to visit the SnoWonder website