. -->
Showing posts with label crafting with kids. Show all posts

3.02.2020

paint chip shamrocks!

paper crafts, green decor, saint patricks day, march decor, spring decor, DIY, shamrocks, shamrock decor, diy decorating, home decor, paint chips, painting, party decor
it's finally MARCH!
so now i can divulge the second decor project that i came up with
after creating my 'painted paint chip' paper <<< click for tutorial
(this project was actually the REASON i came up with that alternative to using actual paint chips)

inspired by my own pink 'paint chip hearts' shared back in February, 

i tweaked that process to make shamrocks to decorate with, in honor of St. Patricks' Day - 
and it's SO easy, even your kids can do this!

continue reading for an easy-peasy spring decor craft that your little leprechauns will love...

2.06.2020

gift bag wall art tutorial

dollar store, dollar store crafts, valentine's day, valentine's day crafts, home decor, seasonal decor, gift wrapping, gift bags, wall art, make art, papercrafts, re-purposing, hearts
i love making somethin' outta' nuthin'! using inexpensive or free supplies is my jam.
and i love sharing those kinds of ideas here.
we all know that crazy-cheap retailers like Dollar Tree have loads of paper gift bags every season:
(Dollar Tree photo)

did you ever think of those as not just gift bags but craft supplies?
doing something unexpected with things is my jam, too...
like turning gift bags into wall art that echoes the current 'handlettered sign' trend! 

continue reading for this super 'fast, cheap & easy' project tutorial

12.06.2019

faux wood 'junk' trees

faux wood, wood-look, junk trees, junking, diy, handmade, crafts, home decor, Christmas
 this is not a collection of trees made from wood. nope.
it's a collection of trees made from wood-printed PAPER! 

'continue reading' to see more details of this easy and kid-friendly craft
that can be made with new or reclaimed materials -
a simple, inexpensive way to get a 'junk project' look for your holiday & winter decor!

12.04.2019

sweet sweater... trees!

thrifting, junking, repurposed, upcycled, reused, home decor, Chrismtas decor, sweater trees
yep, i found something ELSE to use sweaters for!
( no, this isn't my original idea - i've seen some really darling colorful ones on the 'net! )
but this is ME, queen of sweaterdom, so i had to try to make my own versions of them...
and i like the simple, warm look!

'continue reading' for this super-simple holiday & winter decor project
made with thrifted / upcycled sweaters...

9.06.2019

well, hello, pumpkins!

(i know, it's been a year since i closed this blog! i wasn't going to post anymore!
but a recent project is SO easy and SO worth sharing with you that... well, here i am again!)

a while back, i had an idea for a new decor project.
it was inspired by some scrap wood cacti shared by 'A Crafty Mix'
on Funky Junk Interiors Junk Projects Party #474 ,
only my idea was to use *a particular wood item* as the basis of my repurposed cacti.
then i forgot all about it. (hey, it's summer....)

this past week, for some strange reason, that forgotten idea morphed into a new one.
and it was pumpkins, natch. i mean - this is me, the former pumpkin queen. 
what ELSE am i gonna' be thinking about as fall approaches, right?
...and shared them all with you here on the blog. 

so with my 'pumpkin brain' engaged, i made a stop at the local Savers thrift store,
and they had exactly what i needed. i saw it, i liked it, i wanted it, i got it. (yeah).
and then... i painted it!

<<< click 'continue reading' to see what i did - and what i used!

3.29.2018

Tutorial: 'Bunny Ears' Napkins!

Easter egg hunts, candy, family time, Easter dinner, Easter brunch, Easter decorating, hosting family, Easter table decor, Easter decor , Easter bunny
here's a quick project to add sweet smiles to your Easter tablescape: 
make plain old napkins new: fold them into bunny ear shapes!
so easy the kids can do it - and they're sure to giggle the whole time!

continue reading for my simple tutorial... c'mon, hop to it!

12.09.2016

a POKEMON Christmas Tree!

...and now for something COMPLETELY different...

My youngest daughter Brianna loves to decorate for Christmas - 
she's very creative, and used to work with me as I decorated the wineries in Washington.
She has a special challenge when it comes to holiday decor:
My grandson's Birthday is on December 18th, and she doesn't want to overshadow that -

but she also doesn't want to wait until AFTER that day to put up the tree, 
so she decorates their tree in his birthday theme each year!

THIS YEAR, she has outdone herself... with a POKEMON theme!

continue reading to see some really fun ideas...

10.25.2015

It's Not Too Late to Get Your SPOOK On!

Looking for last minute Halloween decor ideas?
(it's okay!)
Have no fear! I have a TREAT for you in my archives:
a bunch of my trademark 'Fast, Cheap & Easy' TM ideas...

just click on the 'read more' link!

11.05.2014

The Holiday Tree: for Every Season

Let me tell you a story...

Monday, I was trying to come up with an idea for a post for today.
I had NUTHIN' - no how, no where. The well was DRY, my friends.
I was, frankly, 'too tired to be inspired'!!!
I posted on my facebook page and asked my HOMEees there to chime in, 
sharing their best tips for getting their creative MoJo back... and I got some great replies!

Carol took a very practical and restful tact:
'Take a day off from being creative... 
I find house cleaning to be very therapeutic and lets my brain rest.'
 
I joke that I only clean so I can decorate, 
but the truth is that cleaning is for me a bit like 'priming the canvas' is for a painter. 
It starts the creative engine running so ideas can flow!

Emily offered a virtual hug and a wide perspective:
'
Awww... we've all been there! I usually just take a break and/or head outside.'
 
Great advice - because, really, is it ever possible to head outside into the beauty of nature
(where ever you are) 
and NOT be inspired?! I don't think so. 

Lilliam spoke words of a sage:
'
Take a moment to just sit still, in silence and the inspiration for the right Idea will come to you. 
.Still.'

Oh, Lil, I try. I really DO. I'm just not a 'still' girl. 
I can walk on the beach for hours/miles. I can sit and read for hours.
But just sitting.... doing nothing.... waiting..... I just can't do it.
I hear the Jeopardy theme song every time I try!! 
(I CAN lie still for a massage, though!!)

So, after I read these words of wisdom, I decided to take a break.
I headed downstairs to the kitchen, to grab a fresh glass of ice water and then head outdoors...
and on the way into the kitchen, I walked past something.
I see it every day - in my peripheral vision.
I KNOW it's there, but it never really 'registers', if you know what I mean. It's just.... there.

But at THAT moment, I stopped.
I backed up a few steps and looked at it. For a good long while.
And while I did, I remembered something important.
That's when I KNEW that I had the content for this blog post!
So I ran upstairs, grabbed the camera, and went back down lickety-split
to snap a few images.

Aaaaaaand here we are.... today.

Do you want to know what I remembered?
That this small, inexpensive, simple decor element is something that I grew up with.
I remember it well from throughout my childhood.
And when I had my own children, I replicated it for them.
Now that THEY have children, they have replicated it, as well!

It's what we call 'The HOLIDAY Tree'.
(And it's not a Christmas tree by another name!)

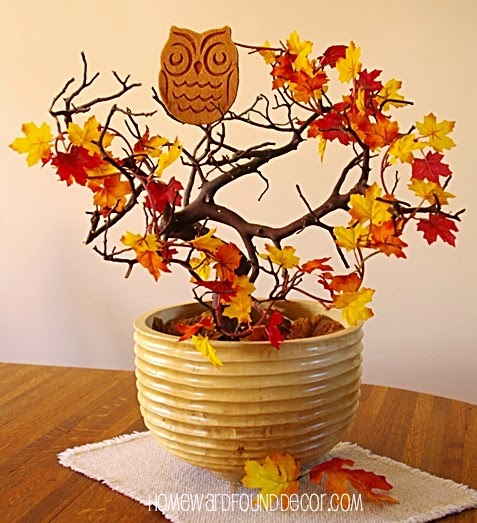
It's a little tree that is decorated every season, for every holiday.

The idea is SO simple: It's a branch.
 As in, a branch off the tree in the yard or the nearby forest
or even purchased at the local craft store.
Not a BIG branch, just a lil' branch. Two feet tall or so.
It sits in a pot or planter or tin or box...
held in place by rocks or plaster of paris.

And there's pretty 'stuff' on the branches... 
little stuff, not heavy stuff:

We've used silly things like happy meal toys and action figures for Halloween,
vintage ornaments and mini candy canes at Christmas, 
bright plastic eggs for Easter, woven paper hearts for Valentine's Day, miniature flags in Summer,
everyone's favorite personal treasures for their birthday week, 
and some multi-colored plastic mini lights that look like the M&M characters.
 

Small things all, but the important thing was that every month there was a day 
when we all worked together to create & find fun things to decorate the Holiday Tree with.

I still have those colored plastic M&M light covers, BTW ;)

Mom uses Dollar Tree garlands and tiny ornaments 
and in this photo, she even used a felt coaster owl!
Anything goes.

The tree always sat somewhere we'd pass by it every day, 
so that the enjoyment was constant...

When I was a kid, the Holiday Tree sat on the HiFi (yes, I am OLD!) in the living room.
When my kids were young, our Holiday Tree sat on top of a cabinet on the stair landing or in the family room.

Right now, my Mom's Holiday tree is sitting on her buffet,  next to the kitchen door - which is where I saw it on Monday.
It's been in the room all along, decorated differently each season... but until Monday, 
I had completely forgotten about how much this tradition is a part of me. A part of my family.
A huge part of why decorating for every season is what I do. 


Now that I remember, I am so thankful for the simple ways 
that my Mom taught me about creativity. 
They've stayed with me... and my kids and grandkids. It's 'Generational Creativity'!


shared online:


Practically Functional | Creativity Unleashed

9.24.2014

Copper Kitchen Scrubby Pumpkins!

 I think this is, quite possibly, the EASIEST crafty idea I've come up with. EVAH.
And it's for pumpkins - go figure :)

This is so easy - I literally made it as fast as I thought of it!
It's got three 'ingredients' and two steps.
Should take you all of... oh, three minutes.... to make.
 Take the copper scrubbies out of the package that you bought for a BUCK at the Dollar Tree store.
 Break a small branch or twig from a tree or bush, and shove it into the middle of the copper scrubby.
Tuck a fall leaf or two into the copper scrubby, right next to the branch.
Tah Dah!
You have a pumpkin!
Or maybe an apple, if your stems are as long as mine shown here ;) 

That's IT.

I ALSO played with one and pulled it apart a bit,
then created a stem by twisting the copper mesh.
I don't like it as much, but that's how crafting is -  Some things work, some don't.

Anyway, that's a truly 'Fast, Cheap & Easy'TM decor project for you!
No fuss, no muss, no stress, and hardly any money. Just good, cheap fun.
Oh, wait... I shoulda' said Good CLEAN fun, huh?
'Cause they're kitchen scrubbies, right? LOL

PIN-ABLE 'how to' IMAGE:
I came up with this idea last week,
when I saw a bag of copper kitchen scrubbies at the Dollar Tree store.
I bought them then, and it wasn't until yesterday morning that I created and photographed them
(in record time, BTW).
After editing my images and preparing this blog post, 
I decided to do a quick Google search for anything slightly resembling these before publishing.

Though I have never seen anything like them,

I've learned to do my due diligence in the DIY/craft industry, 
because being professional, thoughtful, and ORIGINAL is important.
If I'm inspired by someone or something,  or find out they beat me to it,

I'll gladly credit them.

...and if I'm not the first/original, I'll 'fess up to it... 

I found ONE image from ONE blog post, back in 2012.
So, even though I did come up with this idea on my own,
I am not the first person to do so or to put it online. I'm the second :)
Check out Danyelle's version from 2012 over at Life Is A Party -
hers have the addition of wire as a stem, instead of a branch.

You can also see a pretty sweet little wreath made from the same materials,
in a post from 2010 on the Dollar Store Crafts blog.


Want more of my pumpkin ideas?


painted pumpkins
mini clay pumpkins

glass globe pumpkins 
painted pail pumpkins
sweet sweater pumpkins
... and I'll have another one in my next post!

shared online:


One Project Closer | Creativity Unleashed

Cupcakes & Crinoline | Project Inspire{d}


Thank you, MaryBeth, for including my pumpkins in your Project Inspire{d} Feature!
.

8.16.2014

Save Vacation Finds in a NeSt

As Summer winds down and I am enjoying my social media break,
I thought I'd send you a 'postcard' of sorts...
with an idea for preserving your summer vacation memories.

I don't know how I started this practice, but years ago, I began making 
Found Item NeSts
(and no, I don't know why I capitalize it that way, either!)

When on vacation or even a day trip,
I'd pick up shells and sea glass at the shore, 
or tiny pinecones and feathers and leaves in the mountains,
and then find long grass nearby to weave into a nest.

The NeSt shown below also contained a wine cork, 
since the day had been spent celebrating a special occasion.
You can put anything into a nest!
The collected items would then go into the nest for display,
giving smaller items a lot more presence so that they were more noticeable on a shelf or table.
To my amazement, the nests never lost the smell of their place of origin -
salty sea air or pungent pine forests -
adding another level of enjoyment to them.

I've also made NeSts to observe each season of the year,
gathering up tiny mementoes of spring or fall  
like dried daffodil blooms and little russet leaves to place into the nests,
then displaying them on my mantel or entryway table...
I previously shared a simple tutorial for making a NeSt here,
where you'll see that this project isn't time-consuming or difficult at all...
a perfectly relaxing 'last day of vacation' craft!

It's truly a simple way to gather items from nature that will enhance your home
and bring sweet memories to mind whenever you see it.

Another easy idea for preserving vacation memories:
I also gather a small bit of sand from the beaches I visit, 
then place it into tiny jars with tags identifying the beach.
This would work with rocks, tiny shells, cones, and leaves, as well.
And the bottles don't have to be expensive or antique - 
in this photo, you can see that I used an empty Starbucks Frappacino bottle
and even salt & pepper shaker bases!


shared online:

Yesterday on Tuesday | Project Inspire{d}


Practically Functional | Creativity Unleashed
 

6.26.2014

My Creative Source

Many (many) years ago, there was a little redheaded girl who loved to read.
LOVED. TO. READ.
Loved it SO much that she hid in her room reading all the time,
and her mom & grandma would literally kick her outside and close the door,
entreating her to 'Go Play!'.
Most of the time, I DID go play - bikes, barbies, kiddles, house, swimming, skating -
with my neighborhood friends, 
until dusk fell and the streetlights came on and Moms called their kids in to dinner.

Other times, I sneaked a book out of the house - under my tee shirt - 
 and climbed the tree in the yard to read hidden among the branches, undisturbed.

And there was this one book.....
the 'Make and Do' volume of the Childcraft 'How and Why' Library from World Book.
ah, the wonders it held inside!
Every page revealed creative ideas GALORE.
Pages dog-eared from being folded over for 'things I want to make'.
Cover sticky with remnants of paste and glitter and paint.

I made things for Christmas and holidays and birthdays and every days.

Oh, how I loved that book.
In later years, my mom gave me the whole World Book set for MY kids, 
and they loved it just as much as I did.

A week ago, I went into a thrift store and there was the whole set of the books. 
[ not MY actual set, mind you ]

I rifled through them in a split second, looking for the familiar cover...

and breathed a huge sigh of relief when I found it!
I bought it for the grand sum of FIFTY CENTS and brought it home.
I sat on the twin bed in my office, which is covered with a white matlasse spread - 
reminding me of my own childhood bed all those years ago.
On hot summer days back then, I lived for 'rest time' -
 I was too old for naps, but it helped my mom get my little brother to nap if I laid down, too -
but I never argued about it,
because THAT was when I could curl up on my bed with this book, 
and just devour its enticing and inspiring contents - page by page:
 So, when I came home the other day,
I did exactly that... devoured it from cover to cover.

And on one particular page,
I spied something that I realized had been embedded in my mind all of my life.
It brought a smile to my face as I read it,
because the formation of my homewardFOUND philosophy
of using what you have to make beautiful things
started right in this very book when I was a child:
Tin Cans? yep. Buttons? yep. Balloons? yep.
I've shared posts for craft and decor ideas using all of those elements - and many more.
(Sweaters aren't specifically mentioned here, but let's just go with the 'cloth' reference, shall we?!)

What a thrill to see something that inspired me so much as a child
and formed one of my most definitive design qualities: re-purposing everyday items into decor.

I didn't just find a treasured book last week...
I found another part of ME!

4.16.2014

Not Just a Cookie Cutter!

use holiday cookie cutters for napkin rings, tree ornaments, and more - all year long!
"Can't see the forest for the trees".
Ever heard that?

Something has happened to me REPEATEDLY over the past three weeks.
At first, I thought 'huh?'. Then I laughed. Finally, I got creative.
And that's when I realized my brain was trying to tell me something....

So, here's the situation:
In my new position in retail at the Happiest Place on Earth, 
I see a LOT of certain products. The ears, for example. They are EVERYWHERE.
And there's this ONE item that is right by the registers, 
where people routinely pick it up. They look at it. Some buy it.
But many - and I mean MANY  - many more than you would expect -
pick it up and look at cashiers and ask 
'What IS this? What's it FOR?'
every.single.day.

May I present said item?:
use holiday cookie cutters for napkin rings, tree ornaments, and more - all year long!
words FAIL me.
I just don't get how people do NOT know what this is.
I am not talking about people from far-flung foreign lands here, friends...
These are people from first-world countries with stores and books and web shopping.

It's a cookie cutter. 
In the shape of Mickey Mouse ears.
Pretty standard item. At least, I THOUGHT it was!

Anyway, after wiping the astonished look off of my face and replacing it with a suitable Disney smile,
I began to share different ideas for using this apparatus with those who asked about it.
I solve the mystery for guests and expound the versatility of said item,
sharing 'value added' uses with them.

The guests and my co-cast members have repeatedly told me that 
I have a very unique way of seeing things.
Is that a compliment???!

... and that's when I realized that the reason I HAVE this blog
is because I do not think like other people do,
and I need to take the things that smack me across the face on a daily basis 
and turn them into blog fodder!


continue reading to find out the ideas I had for the Mickey Ear Cookie Cutter
[ which are borne out of things that I've done for YEARS in my own home ]
because they are applicable to ANY cookie cutter at ANY time of year...

3.25.2014

Tutorial: Recycled Paper Daffodils

I love turning scraps into decor items... paper, for example.
Whether it's leftover gift wrap, an old magazine, or a book of vintage sheet music,
I love looking at it and asking myself 
"OK, what can I do with THIS? (besides pitch it into the recycle bin)."

I did that today, and here's what resulted:
Happy Spring Daffodils, 
made from recycled paper!

How about a tutorial, you say? OK!
Materials:
scissors. masking tape . glue stick . bamboo skewers . paper
 .
 Step by Step:
1. fold sheet of paper (music, construction, magazine page) in thirds as shown.
2. fold in half where the two sides meet in the center.
3. draw half a flower shape with four, five, or six pointed leaves at the double -folded edge of the paper.
4. cut the flower shape out - this will create TWO flowers because of the double fold.
 5. cut a strip of another kind / color of paper - @ 1" wide and 4" long.
6. fold 1/3 of the strip toward the center, lengthwise.
7. unfold the folded third of the strip, and cut slits into it (creating a thick 'fringe').
8. roll the strip over on itself @ the size of your finger, and glue the rolled portion to the flat portion.
9. continue rolling and glue the end of the strip to the roll to secure it.
 10. fold the fringed ends together and glue into place.
11. then add glue to the outside of that end, and 
12. place the rolled section in the center of the cut-out flower shape, with the glue down. 
press to secure.
Now you have a daffodil!
You can glue this to a magnet or card, or shadowbox frame.
To add a stem and leaves, continue....

13. and 14. from the leftover scraps after cutting out the flower shape,
cut a circle about the size of a quarter.
15. secure the back of the daffodil to a bamboo skewer, using a small piece of masking tape.
16. glue the circle you cut out OVER the masking tape, using the glue stick.
 17. cut a leaf-shaped strip from the leftover paper scraps.
18. push the bamboo skewer 'stem' through the paper leaf.
19. put glue on the leaf and wrap it around the bamboo skewer once.
20. wrap the other end of the leaf around a pen or pencil to give it a curling shape, 
like a real daffodil leaf.

 display and enjoy your paper daffodils!
~~~~~~~~~~~~~~~~~~~~~~~~~~~~~~
Here's another method for making them that should remind you of elementary school:
 when you get to step 5
use a cupcake or bonbon paper liner instead of rolled paper for the flower's center!
[ I cut and glued a second circle shape INSIDE the paper cup on this one ]

 using colorful cupcake papers & pages cut from magazines 
results in bright, happy flowers!