. -->
Showing posts with label Valentine's Day. Show all posts

1.20.2020

happy Galentine's day!

Valentine's Day isn't ALL about hearts and roses and romantic love.
it's also a great time to share the love with your girl friends - especially the single ones ;) 
(and who needs roses when you have rose', amiright?!)

the idea for our party decor started with a pink paint chip from the hardware store.
i had a few on hand after helping a client select paint colors for her retail shop,
and with them, this party theme rapidly became 'Paint the Town Pink!'

continue reading to see some fun ideas for a themed GALentine's dessert party...

2.08.2018

Valentine's Day Projects + Tutorials

hearts flowers jewelry and more valentines day inspiration using what you already have at home homewardFOUND decor
looking for some 'fast, cheap, & easy' TM ideas + inspiration
for making Valentine's Day gifts + decor using what you already have?

you'll find tutorials and photos for my TOP TEN best-selling and most popular original projects
- plus two inspiring valentine party themes - in the homewardFOUND blog archives
i've pulled the links all together here to make it easy for you ;)


have fun makin'! 

shared online:

funky junk interiors | diy salvaged junk projects #414

2.02.2018

Have a Heart!

happy february, everyone!
five years ago, i shared a project here on the homewardFOUND blog
that began with a simple wood moss-filled garden planter.
 click here to see the planter-turned-door wreath post

i found another way to use that wood planter:
i decided to re-create the look of a floral heart using PAPER!
it was simple enough to cut petals and leaves and spirals out of old sheet music + school paper,
to fold and bend and twist them into shape, gluing them along the way,
and then to tuck them into the chicken-wire of the planter.

these flowers are so simple to make... just remember your kindergarten 'cut & paste' skills,
maybe even enlist some kids to help!

continue reading for more details...

2.10.2016

the Language of Love

 Contrary to just about everything I share here on homewardFOUNDdecor, 
the truly important things in life aren't decorating or crafting.
The decorating and crafting have always been - for me, anyway  
the way I show people that I love them...

The kids' rooms were always cute and fun and bright and happy, with handpainted furniture and murals that expressed their own style. The house was always clean (ish!) and decorated because I wanted my family to be proud of where they lived. The birthdays and special days of the year were greeted with simple decorations and fun food at the breakfast table (like pink milk and pancakes on Valentine's Day). The 'big' holidays like Halloween, Christmas, and Easter were celebrated with fun traditions and decorating.

ALL of those efforts on my part resulted not just in happy moments and lasting memories, but in a deeper meaning that leads my now-adult offspring to do the same things for their own kids.
This has become a 'language of love' for our whole family,
and nothing could make me happier.

My Mom started it all when I was a girl, and I added to it... as have my kids. It's not about money - because we've never had a lot of that - but about using what you have, being creative, and investing time and effort into doing things for those you love. For me, the BEST gifts ever were the handwritten, handpainted, handdrawn cards made for me  by my children and grandchildren.

Sometimes, the simplest things can mean the most.

 There's another 'hand made' gift that is the very best one I ever received:

Valentine's Day 2015 came in the midst of some very hard days.

My Dad was fighting the battle of his life - FOR his life - against cancer.
He was weak, and tired, and spent a lot of time in his comfy chair downstairs. He wasn't going out of the house anymore, so I asked him if I could find a card for him to give to my Mom on Valentine's Day... he said yes, and I did. (I ended up overwhelmed by tears in the card department of the local CVS store, on the phone with my little sister to give me the strength to find a card expressing the love of a dying man for his wife of 35 years...) I gave him the card, he signed it, and gave it to her a few days later. 
She loved it. She still reads it from time to time.

And then, when I awoke on Valentine's Day, I found little notes taped to my bedroom door, my office door, my bathroom mirror, and my laptop:


... little love notes for me, from my Dad. 

He had written them on scrap paper and come upstairs to tape them where I would find them.

Handwritten love notes from my Daddy...
there isn't anything more precious to me now,
no other Valentine that could mean more than these.


Just a few short weeks later, on Easter morning, my Dad passed away.

I moved those notes to the back of my bedroom door, and I see them every single day. They are a constant reminder of his love, and of the effort it took him to climb the stairs to put them there for me. 
He gave me all he had to give... his love. And it is more than enough.

The language of love is time. It's effort. It's thoughtfulness.

Maybe to you, it's a cupcake, or a card, or a perfect door wreath and mantel. Maybe it's a date, or a diamond, or chocolate and champagne. We all want to be shown love in the way that makes us feel special and loved, and to show love to those who are special to us.
For me, it's the little things done with a caring heart that mean the most

 Whatever you do to show your love this year on Valentine's Day,
may it be from the heart.
Even if it's simple post-it notes... because you just never know.

 .

2.05.2016

Lampshades to LOVE

 I just can't leave well enough alone...
 I usually buy my home decor items - like lamps - at thrift stores and garage & vintage sales,
and they usually come with lampshades.
Thing is, I never like them! 
I love the lamp base, which is why I buy it,
but then I always have to add something or deconstruct something to do with the shade
to make it something I can live with... or sell.

Like MOST of my projects,
it's not really complicated...
The lamp on the left has a perfectly acceptable shade, right?
I thought so too, but when I sat it in the vignette in my vintage decor booth*,
all of the lovely detail of the three 'candles' beneath that shade became invisible.

I knew I had to do something, so I looked around me to see what I had to work with...
and my eyes stopped on those rusty, crusty wire garden baskets 
hanging from a chandelier over the table.
There was one more of them sitting under the table, and I grabbed it,
flipped it over, and sat it on top of the lampshade (shown on the right).

The wire brought out the metal tones of the three 'candles' under the shade,
and the whole thing looked a lot more 'vintage' - easy-peasy.
This lampshade started out as a simple wire frame from a thrift shop.
I tore strips of red ticking cotton fabric and found some vintage red velvet ribbon,
and simply tied loops of each around the frame.
I think it took me a whopping 15 minutes from start to finish.

I like my projects to be 'Fast, Cheap, & Easy'TM!

MORE inspiration:
view more of my lampshade transformations
a super-quick lampshade treatment
one of the most drastic lamp transformations ever

I've used chandelier crystals, metal shoe trees, wire waste baskets,
aprons, vintage piano player music rolls, belts, stencils, sheet music,
vintage linens, wallpaper, vintage ceramic tea cups, and more
to 'foof' up lampshades over the years...

a few that I gathered up in 2013 to share here on HWF:
 I hope you find inspiration for your own unique lampshades here!
Have fun creating!
...we'll leave the light on for ya'... ;)

shared online:
one project closer | creativity unleashed
shabbyfufu | share it one more time
 .

1.31.2016

the Romance of Pink

 I'm just gonna' leave these riiiiiiight heeeeeeere......


 I came across these beauties that I snapped a few years back
at The Vintage Marketplace show...
the show entry display, created by the very talented Miss Monique,
is so lovely and romantic
that I thought it would be a perfect way to welcome in February!

1.09.2016

Valentine's Day Sweet Tooth!

Valentines Day window display

Deb's got a sweet tooth in more ways than one, let me tell ya...
today I was searching for something on my retail visual design blog
and found a 'blast from the past' old post sharing my Valentine's Day decor.
... and since we're already gearing up for Happy Hearts Day decor,

I thought you might just want to see it!

That was my little craftsman Cottage's kitchen window shown above, 
loaded with candy dishes heaping full of yummy tidbits 
(that I'll never really eat, truth be told....my weakness is chocolate
and a few trompe loeil treats.
One of them was inspired by THIS photo
from a past issue of Mary Engelbreit's Home Companion Magazine ...
stacked ribbon cake decor
I gathered up some round cardboard containers, metal tins, fabric, ribbons, and froufrou,
and got to work making my own versions of this 'stacked wedding cake' idea.
(I know, I know, this is not WORK. Let's call it a 'Creative Exercise' then, OK?)

I came up with two of them:

original valentines day decorvalentines day decorating
It's simply a cake pedestal with boxes, tins, and even a ceramic coffee cup
stacked up in layers and embellished with ribbons, flowers, 
and even my own REAL wedding cake topper!

 I shared a similar 'stacked wedding cake'-style idea here on HWf a few years ago:
repurposing white dishes

Here are just a few more ideas for making your Valentine's Day sweet as can be....
heart-shaped candy boxes valentines day decorvalentines day decor
More clear vases, domes, and candy dishes were loaded with 
pink and red candies from the Dollar Tree, an old heart pin made from buttons,
a 'cupcake' pincushion in a mug, and red marble hearts in a heart-shaped box...
it all added whimsy and charm to that little window in front of the sink
but took no time at all to create!

The truth was that although my Cottage kitchen was a retro dream,

the view out that window was utterly hideous
it looked directly at the garage of the house next door. UGH.
(you can see it right there in the background of the top photo!)
So I always created cute little vignettes in the window to look at instead!

.
Want even more Valentine's Day inspiration?
 

See my '30 Days to Valentine's Day Countdown' posts from 2013!
View my Pinterest board: February Hearts


pssssssst..... I'm on Instagram, too!

2.11.2014

Sweet Hearts Soiree

One of my goals here at HOMEWARDfound Decor is to show you
that decorating is easy, and that it doesn't have to cost you very much, or take a lot of time.

Today I have a perfect example of that philosophy.

I had a bunch of 'stuff' ready for a post with a cute Valentine party tablescape...
but you aren't going to see that.
I ran out of time to stage it and photograph it and blog about it.

So, instead, I pulled all that stuff together and in about twenty minutes, 
created a display with a sort-of 'party' theme on the sideboard in my office/studio.
Some of this stuff isn't what you normally think of as 'decor'...
but since I don't follow any rules, anyway, it worked!

 That's my Tee Shirt Mannequin (Tutorial HERE),
and I dressed her up in a REALLY cute vintage apron and a sweater with cut-off sleeves.
Yes, cut OFF. Those sleeves became the red pom pom hats for my winter Snowmen!
This part of the sweater was the 'left over' part.

Then I took the Found Item Charm Bracelet (Inspiration HERE)
and hung it on her neck like a necklace. A rhinestone Heart pin tops her off.

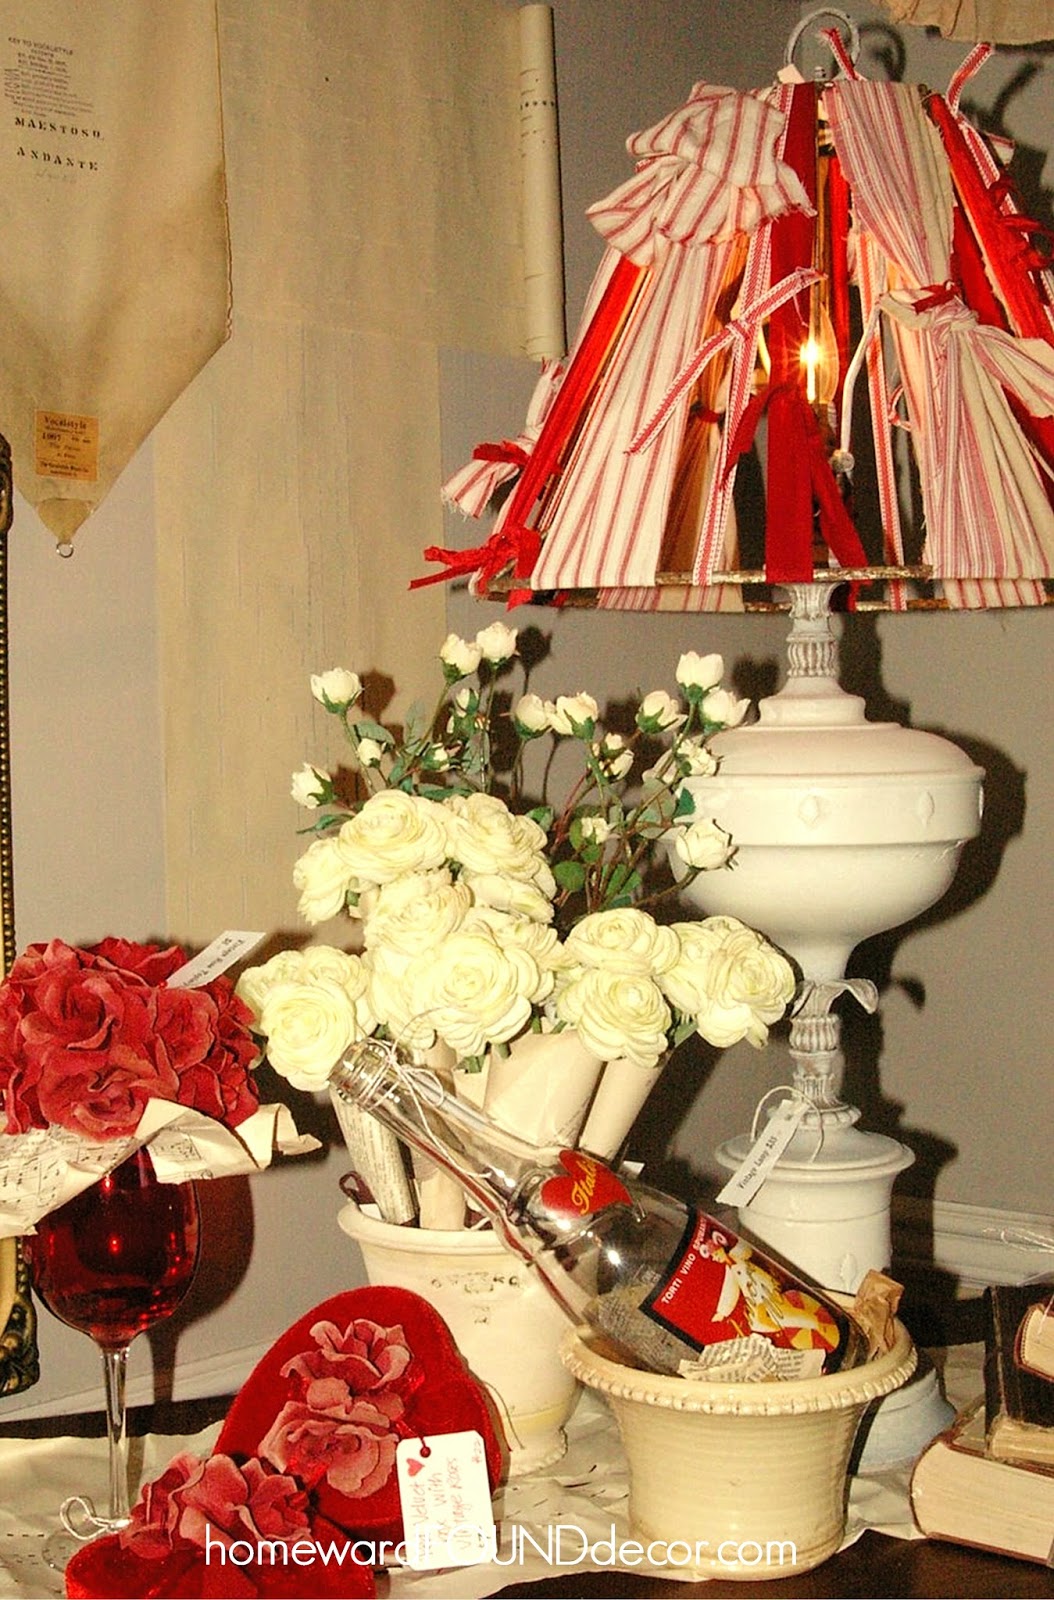
Then I played with a bunch of other stuff like dishes and party supplies: 
I stacked my white dinnerware to create pedestals to display other things on....
like tiny tinware coffee pots and my grandma's measuring spoons filled with heart-shaped buttons,
and Happy Pincushions (Inspiration HERE) . 
A bowl on its side spills out Fabric Hearts (Tutorial HERE) and a dotted gift box.

I've had this crate of old Coke bottles for several years...
and I have NO idea what possessed me to keep it and move it over 1600 miles
when I barely kept anything else at all... 
but I did, and I LOVE it, and when I dropped the striped paper straws into the bottles, 
which took all of 30 seconds... it made me SMILE.

I also added just a few hearts, cut from old magazine pages,
to my inspiration board that hangs above the sideboard:

This weekend, after Valentine's Day is over, I'll pull it all apart
and put all of the items back where they get stored.
I'll find something else for Miss Mannequin (still un-named) to wear
and will create a whole new display on the wall shelves and the sideboard
using stuff from drawers and the closet that will celebrate Spring.
It will completely change the way my office feels... and that's what Seasonal Decor is about.

It's not about time, or money. It's about Inspiration and Creativity.
I always ask myself' 'What did you CREATE today?'...
It doesn't have to take a lot of effort.
and it doesn't always have to be the equivalent of a masterpiece.
Sometimes, a simple finger painting is just perfect. 

so... What did YOU create today?!

2.06.2014

Tin Can 'Painted Pails'

Last fall, I shared a project that was a 'flashback' to something I had made long ago:
[ like, ah, WAY back in the NINETIES! LOL ]
Painted tin cans - I call them little 'Painted Pails'. 

I just found more photos of that product that I created for different seasons ;)
and since 'tin can crafts' seem to be THE hot trend right now,  
I figure why not share more inspiration?!

The photo above shows the Valentine version,
where the wire handles were bent into a heart shape.

The labels evolved from the very first Painted Pails I made in the Spring of 1995,
which looked like garden seed packets and fruit pie filling labels:

I also made versions of Painted Pails for Holiday | Winter:


The Happy Snowman versions had wire handles bent into 'top hat' shapes,
and also stackable snowmen made from several sizes of cans.

I made Painted Pails in Spring, for Easter:

... and the wire handles were bent into 'floppy ear' shapes.

and of course, there were the Pumpkin Painted Pails
 that I shared last fall in my Tin Can Painted Pail Post
 click for my TUTORIAL!...

I also made Painted Pails that looked like crayons. And Leprechauns. And Firecrackers.
But I really don't think more photos are needed for you to get the general idea.
If I were to guess as to how many tin cans I painted back then,
over a five year period that I was selling them at street fairs and in my tiny store,
I'd have to say it was about 50 cans a week. Yes, really!

I tell ya', I was pretty sick of painted tin cans by the time I was done!!!

The various holiday versions of these came about because every holiday,
I would go overboard to create a fun breakfast table setting for my four young children...

Balloons, streamers, napkins, and centerpiece would decorate the dining room.
The food would even match the holiday: 
pink milk and pancakes for Valentine's Day, green for St. Patrick's Day, orange for Halloween.
 I didn't spend a lot (I bought most of the stuff at thrift shops)
but it was so much fun to decorate the table after they had gone to bed,
and then watch them get all excited the next morning!

And at each place setting, they'd find a Painted Pail -
filled to the brim with art supplies and candy and a little stuffed animal.
It was just a simple thing I could do to make them happy.
For me, that is always the best part of crafting & decorating...

shared online:

One Project Closer | Creativity Unleashed
 

Cupcakes & Crinoline | Project Inspire{d}