when i was thinking about ideas for a terra cotta pot nativity,
i looked online - and every rendition i saw was 'cute'. and painted.
not what i wanted, which is good -
it means what i've created is different than what other people have done!
(always my goal)
i wanted the same kind of simple, modern/contemporary style i've done before
that would coordinate with the other terra cotta decor elements i've made this year.
then i grabbed a traditional nativity scene
and shzooshed it up a bit with paint ;)
dwk
many years ago, i saw the faceless figurines of the Willow Tree gift collection
and hated them. sorry, but i did. they creeped me out.
and yet for the past three years, i've created faceless nativity scenes!
many years ago, i saw the faceless figurines of the Willow Tree gift collection
and hated them. sorry, but i did. they creeped me out.
and yet for the past three years, i've created faceless nativity scenes!
i've come to love the serenity and simplicity of these kinds of figures,
not focused on the faces but a scene of peace and calm.
(i've linked to these two projects below the post)
not focused on the faces but a scene of peace and calm.
(i've linked to these two projects below the post)
thinking about how i made the stacked pot trees on my mantel,
i decided to give that method a try.
to create the 'figures' of Mary, Joseph, and baby Jesus,
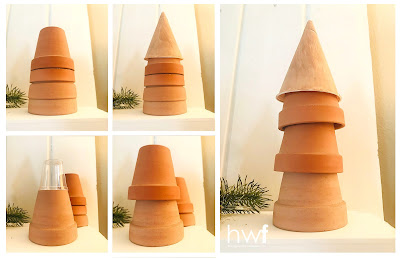
i used the smallest terra cotta flowerpots i had on hand
and stacked them with plastic cup 'spacers' between them,
to give a better effect than just straight stacked pots - as shown in my tree 'tutorial':
i also painted a small plastic cup to look like a pot for baby Jesus.
topped with painted round ornaments as heads,
they form a sweet Holy family scene:
embellished with more terra cotta pots, greenery, and ornaments
the nativity has more presence and impact on my hearth.
the nativity has more presence and impact on my hearth.
as i was digging through bins, i found my old childhood nativity scene
along with a second small set that i picked up at a thrift store a few years ago.
and i decided to give that ceramic set a new look!
along with a second small set that i picked up at a thrift store a few years ago.
and i decided to give that ceramic set a new look!
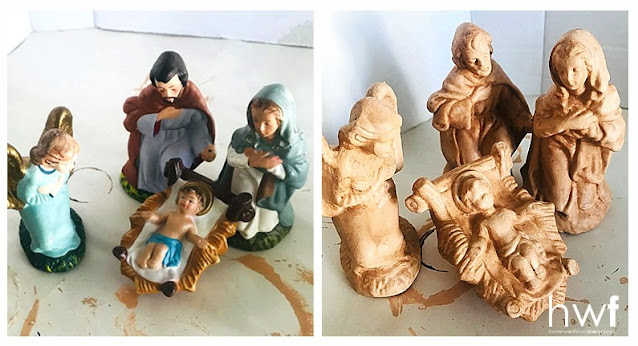
the extra small set that i found looked like this:
(and since the whole set cost me a buck, i actually SAVED money from their original prices!)
the application of my faux terra cotta paint technique
transformed this rather cheap looking set into a more elegant nativity...
just as i did with the mantel trees and ornaments shared in recent posts,
the paint is applied first, followed by glaze.
the application of my faux terra cotta paint technique
transformed this rather cheap looking set into a more elegant nativity...
just as i did with the mantel trees and ornaments shared in recent posts,
the paint is applied first, followed by glaze.
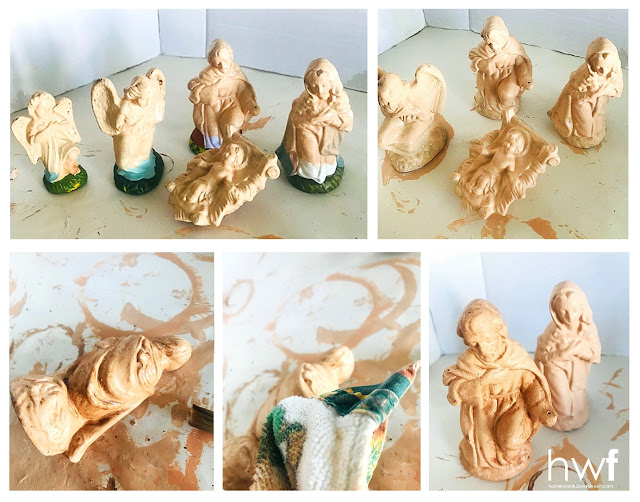
top row:
* paint figures with terra cotta color paint.
i used two coats of acrylic paint for full coverage.
bottom row, from left:
* mix a glaze with brown paint and water, and brush it onto a figure.
* immediately use a soft towel or cotton cloth to gently wipe the glaze off
of the raised areas of the figure.
the recessed areas will hold more glaze, giving more dimension
and an aged, earthy appearance to the figures.
the last photo shows the difference the glaze makes!
if the dark glaze isn't your thing,
try using a whitewash glaze instead -
it gives the effect of aged clay with a powdery white film.
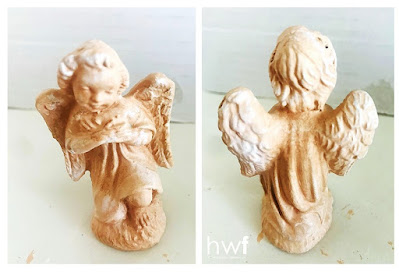
the before and after:

i love the way this makes the figures look much more detailed and elegant.
and when embellished with terra cotta pots, greenery, and ornaments,
the nativity scene is perfect:
i am excited to celebrate Christmas this year with another kind of nativity...
the telling of the Christmas story has been beautifully filmed
in two different viewpoints
by Dallas Jenkins as part of 'The Chosen' series:
The Shepherd and The Messengers
have been shown in theaters for the past two years.
the telling of the Christmas story has been beautifully filmed
in two different viewpoints
by Dallas Jenkins as part of 'The Chosen' series:
The Shepherd and The Messengers
have been shown in theaters for the past two years.
this year, those two films have been re-edited and combined into one film,
and will be in select theaters from December 12th to the 17th,
as 'Christmas with The Chosen: Holy Night'.
(click that link to view the preview on YouTube)
along with the film, there are spoken word pieces
and seven glorious musical performances of spiritual Christmas songs -
including 'O Holy Night' by Andrea Bocceli and his son Matteo!
the film is a special limited time Fathom Event - find info + tickets here
i can't wait to be in a theater watching and singing along in just a few days,
to celebrate the season that Jesus is the reason for 💖
related posts:
2022: gingerbread holiday nativity
2021: sweet sweater holiday nativity
2019: nativiTIKI - times two!
2020: paint chip creche
2022: gingerbread holiday nativity
2021: sweet sweater holiday nativity
2019: nativiTIKI - times two!
2020: paint chip creche
creatively beth | creatively crafty linky party #176
terra cotta Christmas 2023,Christmas,Christmas Decor Themes,thrifted,ornaments,Christmas Decor,holiday,up-cycling,re-purposed,painting,faux finish,tutorial,terra cotta pot nativity,terra cotta pots,nativity scenes,Christmas nativity,diy.

.jpg)


.jpg)
.jpg)


.jpg)
.jpg)
.jpg)

Amazing and so well done. Love it and love the earthy look.
ReplyDeleteI visited you via TEAM CREATIVE CRAFTS LINK PARTY #176
I linked up this week with = 31+32 It would be awesome if you care to share your own links with us M-S at SeniorSalonPitStop. You will find it under BLOGGING.
thank you so much for visiting and leaving a comment!
Deleteand thank you for the invitation to the link party, but i'm not a good fit for that one. i'm actually pulling back from joining those in the coming year as i spend less time on my computer and more time living! ;)