the old saying is 'April showers bring May flowers'...
but i'm ready for flowers NOW!
i call these 'posie pots', and the idea for them bloomed
when one of my memories met with a few images on Instagram -
i'm sharing those sources in the post below, and a tutorial
so you can make your own spring decor or maybe a Mother's Day gift
from vintage enamel floral pins!
continue reading for all of the details...
dwk
this project was inspired by my memories of the happy, colorful enamel pins
that i admired in my Mom's costume jewelry box when i was a kid,
and by two creative powerhouses on Instagram:
i follow marvelous 'Magpie Ethel' on IG,
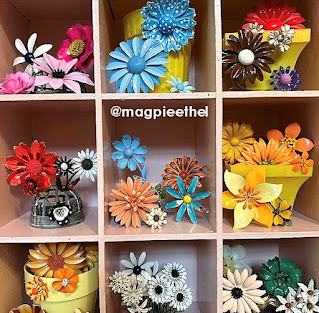
and she decorates her home for spring with her HUGE collection of
vintage enamel pins - along with mini flower pots!
Ruth found THE TREASURE of a LIFETIME at an estate sale:
boxes of 'new old stock' (brand new condition, unsold) VINTAGE PINS!
this photo certainly stopped my scroll on IG -
and she says this is less than a quarter of what she bought!
i've picked up a few enamel flower pins and earrings over the past decade,
including two new green ones at a recent vintage show in Palm Springs:
i decided to put them to work creating my own version of 'Ethel's' flower pot decor...
here's how i did it!
TUTORIAL:
i had seven floral pins to use, but two were small earrings and would be in the same pot -
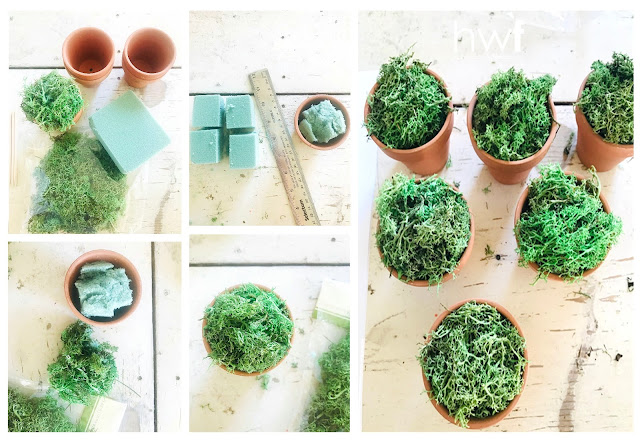
so i prepped six tiny clay pots (from Dollar Tree) for this project.
● cut a square/wedge of floral foam (also from Dollar Tree) to fit into each pot.
i use a metal ruler as a cutting blade - it slides through the foam like butter!
press the foam down firmly into the pots.
● add some preserved moss to the top of each pot - mine isn't glued,
but a few drops of tacky or hot glue would work.
next up: prep the jewelry!
MATERIALS:
wood skewers . paint pens or paint . hot glue or tacky glue
METHOD:
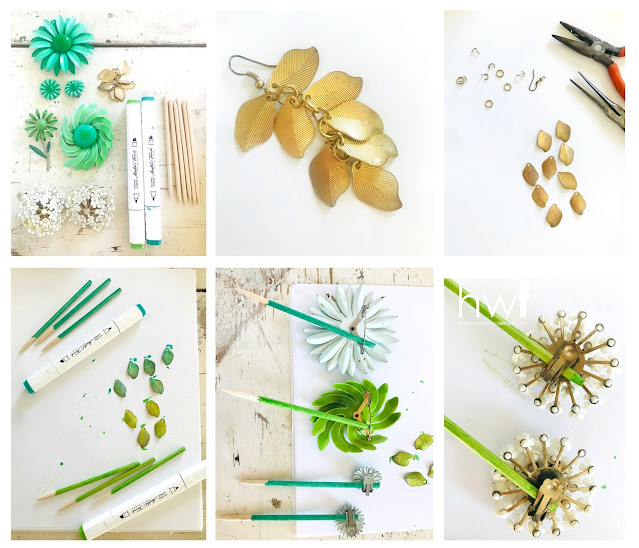
i had one old dangle earring that was made up of metal leaf shapes...
i disassembled it so that the leaves could be used on several flower stems.
● after the leaves were separated,
i disassembled it so that the leaves could be used on several flower stems.
● after the leaves were separated,
i used alcohol art pens in 2 green tones to color the gold metal.
● i used the same pens to quickly color some wood skewers (@6")
that will become flower stems.
● since all of the jewelry i am using had clips or pins on the reverse,
it was easy to push/wedge a skewer into each one.
if your jewelry is missing the backing,
a drop or two of hot glue will hold them securely to the skewer.
that will become flower stems.
● since all of the jewelry i am using had clips or pins on the reverse,
it was easy to push/wedge a skewer into each one.
if your jewelry is missing the backing,
a drop or two of hot glue will hold them securely to the skewer.
● next, simply push a skewer with flower on it into the foam in each pot -
one pot has two skewers with the two small earrings on stems.
one pin already had a stem as part of the jewelry,
so i just pushed that stem end into the foam. (you could glue them in place, too)
● i then added the metal leaves to several stems with a drop of hot glue -
they show up best on the stems of the smaller flower pins/earrings.
the largest flower pin and the pin that already has a stem didn't get leaves.
a closer look at the final details:
.jpg)
here you can see all of the green flowers, gathered together on a clay saucer
and accented with more preserved moss.
just looking at these happy posie pots in my studio makes me smile!
and isn't that what our homes SHOULD do?
related content:
make a miniature wire nest charm
adorn vintage glass bottles with vintage jewelry
make a charm bracelet with found objects
paper posies with vintage jewelry centers
shared online:
funky junk interiors | new upcycle projects #723
thank you for including my project in your feature, Donna!

thank you for including my project in your feature, Donna!

spring,DIY,diy decorating,crafting,re-purposed,up-cycling,inspired by nature,garden style,vintage style,vintage,terra cotta pots,decorating,thrifted,vintage finds,posie pots,spring flowers,spring home decor,spring decor,vintage floral enamel jewelry.

.jpg)


.jpg)


.jpg)

Oh my goodness... your jewelry flowers are precious! Such a unique way to display and appreciate the good 'ol stuff!
ReplyDeletethank you, Donna! i do LOVE the good ol' stuff! (most days i FEEL like ol' stuff.... sigh!)
Delete