it seems this fall has affected me by making me crave candy and sweets!!
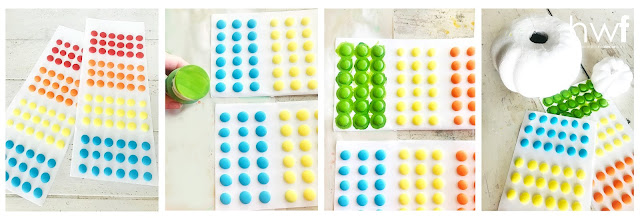
this happy project was born when i found THESE at the Dollar Tree:
'member those?!!!
'dot' candy on paper strips was one of my FAVE sweet treats as a kid
(confession: i would sometimes stop at the local Circle K market while walking to school
and spend my lunch money on candy instead. BAD little debby!!!)
when i saw these GIANT candy versions, i grabbed a package
and got right to work when i arrived home...
...continue reading to see how easy this pumpkin decor is for adults & kids alike!
dwk
before i started on the pumpkins, i changed something about the candy:
i decided to change some of the blue candy dots to green,
and i did that with a quick coat of lime green craft paint.
i also gave some styro pumpkins that i had on hand a fresh coat of bright white paint,
to make the candy colors really POP.
once those were dry, the project got underway:
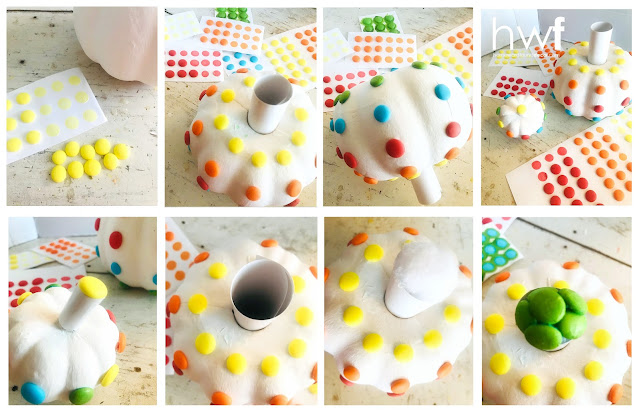
top row, from left:
*the candy dots come off of the paper easily - bend the paper and pull gently on the candy.
*i started with yellow because i wanted it at the top of the larger pumpkin...
one dot was placed on each 'rib' of the pumpkin.
(fyi: Dollar Tree styro pumpkins are NOT symmetrical.
the ribs vary in width, larger on one side and smaller on the other.
i had to eyeball the placement on the back side to keep the pattern even.)
* i worked with one color at a time, going around the pumpkin
and securing each 'dot' with a tiny dot of hot glue...
i found that placing the glue onto the back of each dot was easiest.
i used a 'roygbiv' (red orange yellow green blue - no violet) rainbow pattern,
but you could place them in any pattern you wish!
*on the small pumpkin, i created a 'roygbiv' rainbow stripe
running across the middle of the pumpkin.
bottom row, from left:
*i cut two rectangles from glossy white photo paper
and rolled them into tubes to use as 'stems.
on the small pumpkin, the tube fits OVER the existing plastic stem
and is held in place with a dot of hot glue.
one yellow candy dot was carefully glued to the top of the tube to finish it off.
* a larger paper tube fits INTO the hole on top of the larger styro pumpkin
(i always remove the short styro stems that are on these pumpkins
and replace them with something else -
twisted paper, champagne corks, ceramic stoppers, curvy curtain rod finials!)
*a large white pom pom fits perfectly inside the paper tube
to form a support for the next step...
*i hot glued five green 'dots' to the top of the pom pom to finish it off.
(i tried an orange bottle cap on there first, but didn't like the way it looked)
after i was done with these, i thought of something i would have liked better:
i should have bought a package of regular sized candy dots,
then wrapped the stems with those. i like the way they turned out anyway...
i had fun gathering up colorful bowls, pumpkins, and pom poms for the final shots
and decided to cut the big strips of unused dots into thinner ones
that would be easier to position in my setup.
i love finding easy ways to decorate - on pumpkins, and everything else ;)
_________________________________________________
okay, my friends, i'm gonna' get real with you... i had ANOTHER plan for these.
after these photos were taken, i covered the pumpkins with more candy dots.
_________________________________________________
okay, my friends, i'm gonna' get real with you... i had ANOTHER plan for these.
after these photos were taken, i covered the pumpkins with more candy dots.
then i sprayed them with gloss white paint.
i had thought i'd be creating a sort of 'hobnail milk glass' look - like this:
.jpg)
but the wet spray paint made the candy colors run alllllll over the pumpkins.
it took two DAYS for that spray paint to dry.
i painted over it with KILZ white primer, let that dry,
then spray painted the pumpkins white again. twice.
and though the paint finally covered up the mess of melted candy dots,
it didn't resemble milk glass in the least. booo.
and they ended up in the trash.
IF i were to try it again, i'd use rounded-top pushpins instead of candy
and i'd spray them with white KILZ primer before glossy white spray paint -
followed by a coat or two of clear varnish for that glassy look.
that's the thing about creating...
sometimes, the ideas don't work out. like Thomas Edison said,
"I have not failed. I've just found 10,000 ways that won't work."
i had thought i'd be creating a sort of 'hobnail milk glass' look - like this:
.jpg)
but the wet spray paint made the candy colors run alllllll over the pumpkins.
it took two DAYS for that spray paint to dry.
i painted over it with KILZ white primer, let that dry,
then spray painted the pumpkins white again. twice.
and though the paint finally covered up the mess of melted candy dots,
it didn't resemble milk glass in the least. booo.
this undertaking can only be called an epic fail.
i think it looks more like white pumpkins with chicken pox!
even tho i tried to make them look good in that photo, they don't.and they ended up in the trash.
IF i were to try it again, i'd use rounded-top pushpins instead of candy
and i'd spray them with white KILZ primer before glossy white spray paint -
followed by a coat or two of clear varnish for that glassy look.
that's the thing about creating...
sometimes, the ideas don't work out. like Thomas Edison said,
"I have not failed. I've just found 10,000 ways that won't work."
but we keep going!
related content:
shared online:
funky junk interiors | new upcycled ideas #699
thank you for featuring my project, Miss Donna!
creatively beth | team creative crafts linky party #169
southern sunflowers | home matters link party #453

fall,pumpkins,DIY,diy decorating,decorating,just for fun,crafting with kids,dollar store crafts,home decor,colorful home,dot candy pumpkins,diy pumpkins,diy pumpkin decorating.

.jpg)
.jpg)
.jpg)


.jpg)
.jpg)
.jpg)
.jpg)

I've never heard of dot candy, but now I want to find some! LOVE the family-friendly decor that dot pumpkins make. You can't help but SMILE!
ReplyDeleteit's been around since the 40's, from what i know... and is sometimes called 'candy buttons'! those colors make me smile, too! (and thanks for not laughing at my epic fail, my friend!!!!! LOL)
DeleteYour candy pumpkins are so adorable. I love the whimsical look! Thanks for sharing at the #HomeMattersParty.
ReplyDeletethank you so much, Allyson! and thank you for visiting!
Delete