what happens when a girl's been surfing Insta too much because she's hiding from the heat,
and is following five or six collectors of Pyrex?
said girl decides to let their collections and her own pieces inspire some
Pyrex pattern painted pumpkins
(try to say that three times fast!!!)
last year, my sweet lifelong friend Miss Kim
(yes, she of the Farmhouse Makeover!) sent me a thoughtful gift
of some happy 'Vintage Charm' Pyrex-inspired bowls in sunny yellow:
they sit in my studio holding miscellaneous tidbits,
and one day i looked at them and had the brainstorm to replicate them on pumpkins.
i started painting dish patterns on pumpkins a few years ago,
when the blue and white Chinoiserie trend hit...
that's not my vibe, so i made decor that IS my vibe!
this is just one more way i'm incorporating what i already have into new decor ideas.
this is just one more way i'm incorporating what i already have into new decor ideas.
wanna' see how easy this project was? continue reading!
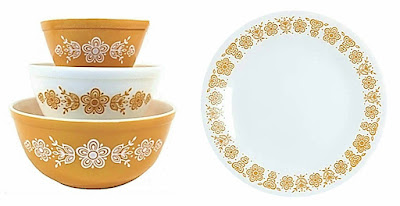
the original pattern is called 'Butterfly Gold', released in the 1970's
on Pyrex cookware + serving ware, and Corning dishes, as shown here.
the new bowls that i have use the elements of the original pattern in a new arrangement
and in a brighter yellow colorway,
and in a brighter yellow colorway,
which is exactly what i've done for my newest pumpkin design...
my 'take' on it is making the floral elements larger in scale for a crisper, more modern look:
i painted two pumpkins to match the two patterns/colorways on the bowls.
and yep, i RE-used some pumpkins i already had!
(honestly, i just keep painting over everything i already have... every year!)
last year, these two pumpkins had my faux concrete paint finish on them:
(it's so FUN to see what paint can do to change things completely!)
i began with the large pumpkin, giving it a fresh coat of matte white artist's paint.
next, i sketched out the flowers from the bowls in an arrangement i liked.
my original idea was five identical flowers, with the largest in the center
then two medium and two small on either side... but i changed it as i was working!
i needed to skip the small flowers to keep it simple.
using a yellow pencil, i sketched the new arrangement onto the front of the pumpkin.
and then i grabbed one of my U-Mark A10 paint pens in golden yellow
and simply drew over the sketched lines.
amazingly, this yellow is EXACTLY the shade from my bowls!
the paint is a high gloss, so the contrast to the matte pumpkin adds to the effect:
sitting the pumpkins inside my bowls finishes off the look perfectly.
the smaller pumpkin took a bit more work...
no, actually, it was a LOT more work - but worth it!
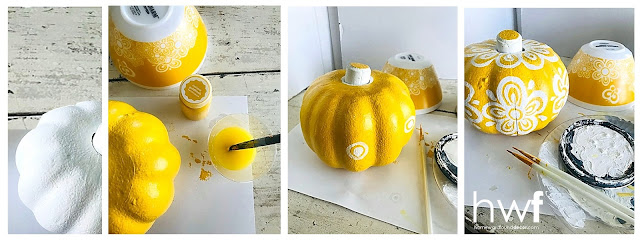
first, the smaller pumpkin got a coat of white paint.
then i put two coats of gloss-finish craft paint on it - the same color as the yellow paint pen.
for this pattern, i chose to use two of the floral elements in two sizes.
the larger size is the same flower that i used on the white pumpkin.
the smaller size is a simpler flower from the pattern on the bowls.
to be sure the details were very crisp, i used matte white artist paint
and VERY small brushes. (this is where the 'time consuming' part comes in)
after completing the flowers around the sides of the pumpkin,
i added the detail of petals on the top plus a wine bottle cork as a stem -
painted white with a yellow center to emulate the center of the larger flowers...
and for a few small areas that needed a touch-up for crisp lines,
the yellow paint pen was an easy solution.
and for a few small areas that needed a touch-up for crisp lines,
the yellow paint pen was an easy solution.
i love the mod, sunny, happy vibe! (and so does my kitchen)
so, do you think you'd try this pumpkin decor idea?
what Pyrex pattern would YOU use?
so, do you think you'd try this pumpkin decor idea?
what Pyrex pattern would YOU use?
let's be honest... i know that not everyone has the patience to paint. it's ok.
because some REALLY smart people have created downloadable graphic files
of many Pyrex patterns - including Butterfly Gold! - to make it easy
for you to use your Silhouette, Cricut, and other vinyl graphics tools
to easily decorate anything you want to!
check out chronoandleo for the downloadable graphics
and DutchVintageKing for some amazing products using those patterns!
and DutchVintageKing for some amazing products using those patterns!
( not an ad or sponsored post - just sharing helpful & inspiring resources)
resources:
find UMark A10 paint pens here
related content:
yellow rose china pattern painted pumpkins
'autumn leaf' jewel tea pattern painted pumpkins
English Staffordshire toile floral pattern painted pumpkins
faux concrete painted pumpkins
shared online:
funky junk interiors | new upcycle ideas #644
creatively beth | creative crafts linky party #111
thank you for featuring my project, Miss Beth!
shared online:
funky junk interiors | new upcycle ideas #644
creatively beth | creative crafts linky party #111
thank you for featuring my project, Miss Beth!
fall,pumpkins,painting,tutorial,home decor,colorful home,DIY,diy decorating,decorating,re-purposing,fall home decor, autumn home decor,diy fall decor,painted pumpkins,diy pumpkin painting,Pyrex,Pyrex patterns,Pyrex pattern pumpkins.

.jpg)


.jpg)
.jpg)
.jpg)

.jpg)

.jpg)
.jpg)
.PNG)
.PNG)


These are so beautiful, Debi! They look way to time consuming for me to attempt, so I'll just enjoy looking at yours! 😍
ReplyDeleteawwwww thank you SO much, TJ! i'm so happy that you are enjoying them! that's why i share - and thank YOU for sharing them on your IG story, sweet girl <3
DeleteBRILLIANT idea Debi! I had these dishes as a kid! We'll be featurung you this week at the Creative CraftsLinky Party starting tomrrow!
ReplyDeleteoh thank you so much, Miss Beth - i am honored! my Mom had the green floral pattern dishes and bowls when i was a kid!
Delete