it's that i had so much fun coming up with this idea
to turn a green faux pumpkin into a green caramel apple
that i think this sweet faux food creation deserves
another fifteen minutes of time in the spotlight!
i've just changed the color accents and am sharing it again!
the inspiration:
this tasty combo inspired me to create a fake version...
i knew that using the same method i had created faux 'honey' with in the past
would work perfectly for this project. and it did!.jpg)
that caramel looks pretty real!
let me show you how i made these...
TUTORIAL
materials:
two small styrofoam pumpkins - green if possible
clear hot glue
green, yellow, and warm tan craft paint + soft brushes
2 large cupcake papers . 2 6" thick wood skewers
two paper straws if desired
method:
materials:
two small styrofoam pumpkins - green if possible
clear hot glue
green, yellow, and warm tan craft paint + soft brushes
2 large cupcake papers . 2 6" thick wood skewers
two paper straws if desired
method:

photos from left:
*i bought two small green pumpkins at Dollar Tree - they come with attached floral elements.
* i simply pulled the florals off by hand.
*the plastic base piece holding the florals was very securely attached to the pumpkins,
*so i grabbed some small needle-nose pliers and pulled those pieces out.
*yes, it left a big ol' obvious hole in each pumpkin - but paint can fix that!
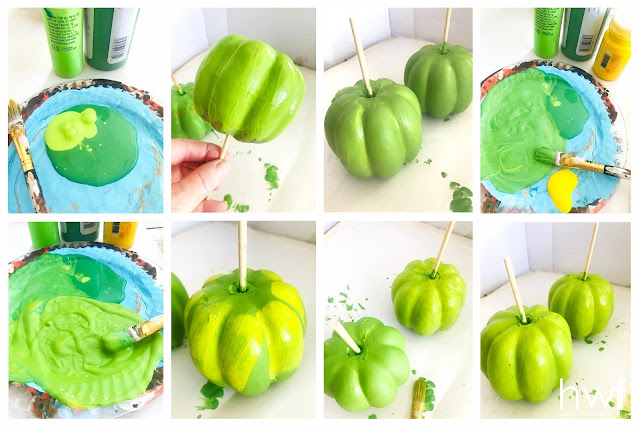
i chose green apples, but they weren't the right green.
so, i proceeded to paint the apples greenER:
top row, from left:
*leaf green and chartreuse green paint was mixed
to approximate a green apple hue.
to approximate a green apple hue.
*a short wood skewer was inserted into each apple top,
making it easy to hold while painting.
making it easy to hold while painting.
*the paint dried darker than i had expected - but it's fixable!
*adding a bit of golden yellow paint to the existing green
achieved the color i wanted.
bottom row, from left:
*the newly mixed green is much more yellow in tone.
achieved the color i wanted.
bottom row, from left:
*the newly mixed green is much more yellow in tone.
*using a wide flat brush, i swiped that intense green onto the raised parts of the pumpkins,
then blended it out over the existing paint for a sheer layer of color.
then blended it out over the existing paint for a sheer layer of color.
*the difference between the first coat of green (foreground)
and the second light coat of yellow green (background) is obvious!
and the second light coat of yellow green (background) is obvious!
*the second pumpkin got its second layer of paint.
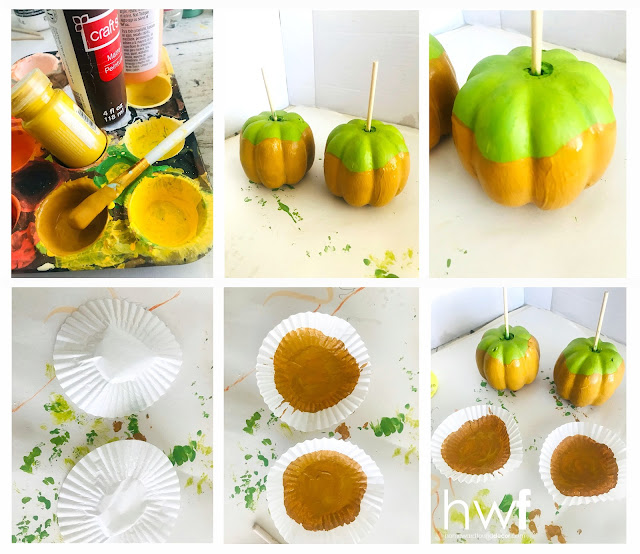
after all of the green paint dried completely, i moved on to the 'caramel':
after all of the green paint dried completely, i moved on to the 'caramel':
top row, from left:
*using a photo of the apple in the caramel as reference,
i mixed mustard yellow and golden brown paint -
and then added a touch of orange to get the right tone to match the caramel color.
*using a photo of the apple in the caramel as reference,
i mixed mustard yellow and golden brown paint -
and then added a touch of orange to get the right tone to match the caramel color.
* i painted the bottom two-thirds of each apple with the caramel color,
making the top edge wavy and uneven, as melted caramel would be.
making the top edge wavy and uneven, as melted caramel would be.
*two coats with a very soft brush (less texture) covered the green.
bottom row, from left:
*in preparation for the final phase, i flattened two white paper cupcake liners
bottom row, from left:
*in preparation for the final phase, i flattened two white paper cupcake liners
*then painted the centers of them with the 'caramel' colored paint.
you'll see why in the next step!
you'll see why in the next step!
now, we break out the hot glue...
top row, from left:
*a circle of hot glue in the center of each cupcake paper liner
holds them securely to the bottom of each pumpkin.
*a circle of hot glue in the center of each cupcake paper liner
holds them securely to the bottom of each pumpkin.
*i carefully placed hot glue around the base of each pumpkin, filling in the areas
where the pumpkin ridges caused spaces between the pumpkin and the paper liner.
*after that hot glue dried, i painted it with the 'caramel' color paint -
this created the 'puddle' of caramel at the base of each pumpkin.
now to add dimension to the caramel, making it look real!
bottom row, from left:
*starting at the top of the curved edge of the caramel color pumpkin sides,
i applied heavy lines of hot glue onto the pumpkin -
starting at the top makes the hot glue flow downward, toward the base.
the glue is clear - but the caramel color paint beneath it makes it look like caramel!
as it drips down the pumpkin, it will cover the painted glue at the bottom,
i applied heavy lines of hot glue onto the pumpkin -
starting at the top makes the hot glue flow downward, toward the base.
the glue is clear - but the caramel color paint beneath it makes it look like caramel!
as it drips down the pumpkin, it will cover the painted glue at the bottom,
giving the appearance of puddled caramel.
*after the hot glue dries completely, a quick touch-up of white flat paint with a small brush
covers errant paint marks on the white cupcake paper liner.
*the final step is a quick spray of gloss clear lacquer on the entire pumpkin
to give it all some extra shine.
*after the hot glue dries completely, a quick touch-up of white flat paint with a small brush
covers errant paint marks on the white cupcake paper liner.
*the final step is a quick spray of gloss clear lacquer on the entire pumpkin
to give it all some extra shine.
not shown:
slide paper straws over the wood skewers for a finished look.
tuck one into a clear plastic bag and add a bow for an extra detail.
then put them on display and have fun
'tricking' people with this faux 'treat'!
tuck one into a clear plastic bag and add a bow for an extra detail.
then put them on display and have fun
'tricking' people with this faux 'treat'!
last year these had yellow ribbons and straws -
this year i simply switched the straws and tied on some apple green bows
then paired them with some bright green vintage linens
for a fresh new look that fits my current 'green era'.
this year i simply switched the straws and tied on some apple green bows
then paired them with some bright green vintage linens
for a fresh new look that fits my current 'green era'.
(psssst.... i should warn you of an effect these have:
i'm having major caramel candy cravings with these in my studio!)
and YES, you COULD create GIANT versions of these
using larger styrofoam pumpkins!
related content:
faux honey pot (2021)
faux caramel apple pumpkins (2023)
i'm having major caramel candy cravings with these in my studio!)
and YES, you COULD create GIANT versions of these
using larger styrofoam pumpkins!
related content:
faux honey pot (2021)
faux caramel apple pumpkins (2023)
shared online:
funky junk interiors | new upcycle ideas #748
thank you for including my project in your feature, Donna!
my wee abode | tuesday turnabout link party
pumpkins,foofoo Faux Food,autumn,fall,DIY,diy decorating,seasonal,dollar store crafts,painting,take 2,faux caramel apple pumpkins.

.jpg)


.jpg)


From standard styrofoam pumpkins to the most adorable and delicious looking candy apples in the land?! I think the craft stores need to read your blog. LOL Another cool hit, Deb!
ReplyDeletethank you so much, Donna! they look so good, they make me constantly crave caramel candies!!!! and I'd LOVE it if some of the big craft stores would collab with me - I could sell a LOT of supplies for them! ;)
Delete