

Sweet Sweater Bunny Tails!

first up: i made a Sweet Sweater Bunny Tail from a pink sweater Santa hat:

1. cut off the fur trim on the bottom edge of the hat.
2. filled it with polyfill & closed the open end with a rubber band, and 3, cut off the excess.
when it's displayed with the fuzzy 'tail' in the front, 4., you don't see the rubber-banded end...
tuck it into a plant and you have a cute lil' bunny tail peeking out at you:

ready to make your own?
to start this project from scratch, you'll need:
a white, pink, or ivory sweater sleeve (the larger the sleeve, the bigger your bunny tail!)
some polyfill stuffing . two wide rubber bands . some fuzzy trim (or pompoms)
the process is similar to my original Sweet Sweater Pumpkins:

1. turn a sleeve section inside out, and close off one end tightly with a rubber band.
2. turn it right-side out, and fill it to overflowing with polyfill stuffing.
3. gather up the open end, pushing the polyfill inside as you go, and close with a rubber band.
4. cut off extra sweater fabric - but leave enough to not let the rubber band slip off!
5. cut a piece of furry fabric (i used the trim from the Santa hat) to cover that end. hot glue on.
6. cut a strip of furry fabric long enough to curl around the edges of the end,
and hot glue into place. then fluff the fur.

make them in several sizes and create a bunny family!
the 'Sweet Sweater Bunny Tails' product name is protected by creative copyright 2020 in perpetuity
and may not be used by any other entity.
_________________________
Wire Tomato Cage Mannequin

tomato cages are one of my fave cheap supplies for projects
and it's really easy to fashion one into a mannequin form:
just grab yourself one of those $2.99 (or less) wire tomato support cages at the hardware store,
and follow these steps:
 * sit the cage UPSIDE DOWN on a sturdy surface.
* bend two of the 'legs' (now sticking straight up) into a shape like a hanger, seen in the far left image.
(use a real hanger as a guide if you need to).
NOTE: bend slowly and gently to keep the welds on the support rings from popping.
and it's really easy to fashion one into a mannequin form:
just grab yourself one of those $2.99 (or less) wire tomato support cages at the hardware store,
and follow these steps:

* bend two of the 'legs' (now sticking straight up) into a shape like a hanger, seen in the far left image.
(use a real hanger as a guide if you need to).
NOTE: bend slowly and gently to keep the welds on the support rings from popping.
* bend the third 'leg' forward toward the other two, in a high arc, seen in the center image above.
*bend a 'hook' in the end of that arc (facing up) - again, bend gently
* cross both ends of the 'hanger'-shaped 'legs' over the 'hook', and tie into place with twine.
you now have a 'wire mannequin' form - something i used in displays at vintage shows for years.
they are easy to make and lightweight to transport,
and by stacking one form on top of a few other regular tomato cages, you can make them in varied heights!
to give the 'mannequin' stability, you'll need to 'weight' the bottom ring to keep it in place -
i used a few pieces of a broken concrete statue, but books, bricks or rocks work, too.

next, just dress your mannequin up and place her in the garden, your store, or show booth!
__________________________________________
Ivy Dome from a Wire Tomato Cage


Supplies:
one wire tomato cage . two metal paper clips . ivy branches . wire cutters . needle-nose pliers
one wire tomato cage . two metal paper clips . ivy branches . wire cutters . needle-nose pliers

1. Using wire cutters, cut the TOP circular ring off of the tomato cage
by clipping the circular wire on each side of the upright wires.
Do NOT cut the upright wires! [ and WEAR SAFETY GLASSES!]
Do NOT cut the upright wires! [ and WEAR SAFETY GLASSES!]
2. Bend the three upright wires in a 'U' shape across the cage,
causing the wires to meet at the apex.
They should meet where the 'crosses' are left from where you cut off the top ring.
 | ||
3. Bend one metal paper clip around the point where the three wires cross to secure them together. 4. Bend another metal paper clip into a 'U' shape, and attach it at the apex of the dome. 5. Wrap each of the three wires around the circular ring to secure it in place.Twist the two ends of the 'U' around the existing wire supports, to secure it for hanging the dome. Leave @4" of wire hanging below that wrapped loop. |

6. Bend the ends of each of the three hanging wires into a small open loop.
Bend the ends of each of the cut wire ring sections (that you removed earlier) into a small open loop.
Bend the ends of each of the cut wire ring sections (that you removed earlier) into a small open loop.
7. Place one loop of the cut wire ring sections over the hanging wire end,
and the other around the bottom ring of the cage. Bend them inward to close the loop.
8. Repeat until all added uprights are secured to the bottom ring using the loops.

9. Separate your cut ivy pieces into long and short pieces.
10. Begin to add each piece of ivy to the wire form by tucking the thickest end of the piece into
one of the loops on the form.
Twist the ivy around the wire as you move across the form, and overlap pieces.
11. Lay the wire form down on its side, then add & wrap ivy around the first (bottom) ring.

12. Add & wrap ivy around the second (upper) ring as you did the bottom.
13. Add & wrap ivy around each of the upright wires.
[use the thickest ivy on the uprights with the hooks, to hide them]
14. Finished Ivy Dome
Made from real ivy, this will last a few days. Mist with water to keep fresher.
Made from faux ivy, it will last indefinitely
Made from faux ivy, it will last indefinitely
[and you can always use that as a base, to add real ivy to]
Display your finished Ivy Dome on a tabletop, on a pedestal, or hanging overhead


_______________________________________________
Bunny Ears Napkin Fold
materials:
*fabric napkins, tea towels, paper napkins, fabric squares... plain or printed, both work.
*fabric napkins, tea towels, paper napkins, fabric squares... plain or printed, both work.
*ribbon or twine to tie them
*one fluffy white pom pom for each napkin

instructions, from left:
lay a square napkin flat on the table - if it's printed, print faces down.
lay a square napkin flat on the table - if it's printed, print faces down.
fold two corners in to touch points in the center. then fold each side again, toward the middle.
fold each side one more time, toward the middle. (you've folded each side THREE times now)
fold one side on top of the other, to create a 'tube' shape with angled ends.
one side is 'open' - where you can see both edges that have folded. the other side is 'closed'.
(in my photo above, the closed edge is on the right side...)
one side is 'open' - where you can see both edges that have folded. the other side is 'closed'.
(in my photo above, the closed edge is on the right side...)

instructions, from left:
bend the 'tube' in half, with the 'closed edge' facing up toward you.
bend the 'tube' in half, with the 'closed edge' facing up toward you.
tie a bit of bakers' twine or ribbon around the whole napkin as shown above.
add a fluffy white pom pom to make a bunny tail by sitting it on the bottom 'u' of the napkin.
.
that's it! you're done!

napkins can be laid on / beside the plate at each placesetting,
or popped into clear glasses to hold them upright - as shown below:

Rosette Napkin Fold

for each rosette, you need one square fabric napkin. i didn't even iron mine while doing this,
but i'm sure you're a better hostess / host than i am and will use pristine napkins!!!.
but i'm sure you're a better hostess / host than i am and will use pristine napkins!!!.
directions (photos from left to right):
fold napkin in half, then fold in half lengthwise.
start at one end, and begin rolling the napkin tightly until you reach the end.

hold the rolled napkin on one hand.
working on the unfolded side of the napkin, fold over each layer of the napkin,
'peeling' them away from the rolled layers to create 'petals' - you should be able to pull four layers.
you can also fold over the bottom edge to hold it more securely in place.
place the napkin rosette into a cup, glass, or even small clay pot
to hold the shape and show off the bloom!

____________________________________________________________
Moss Terrarium

supplies:
clear glass container with wide opening
metal kitchen spatula and cookie sheet
wooden kitchen skewer
moss, rocks, small plants
potting soil
first, you're going to need a clear glass container with a wide opening.

i am REUSING this vase that my BFF sent filled with orchids on my birthday. <3
i also grabbed a small brandy snifter on hand, just because i thought the pairing was cute.
cost? ZERO.
you can always find clear glass vases at thrift stores, dollar stores, and garage sales,
or use a large pickle or olive jar - or a GLASS LAMP GLOBE!
[just make sure your hand can fit down inside the opening]

next you will need some moss and tiny plants.
of course you can BUY them at the garden center, but WHY?
head out into the yard, or to an empty field or lot -
unless you live in the southwest, there will be moss somewhere nearby.
i'm in Southern California and there is moss in the shady corner of the front yard!
my tips for harvesting moss:
* use a metal kitchen spatula to scoop the moss up off of the ground. keeps it from breaking.
* try to find several different textures of moss for interest.
[i found fuzzy moss, flat moss, and some miniature clovers (dichondra) to use -
all within one square foot of my yard]
* when you harvest 'fuzzy' moss, shake it out a bit to remove BUGS.
* also: check for worms!
* also: check for worms!
[a seven-inch earthworm crawled out of the dirt under some moss on my tray, and onto my hand - nearly made me scream. EEW]


i use cookie sheets and metal trays to hold the moss clumps and the small plants as i harvest -
the plants are basically just offshoots and seedlings sprouting up where they shouldn't be in the yard.
[this way, i got some weeding done, too!]
you'll also need a handful of small rocks or gravel for the bottom of the vase -
just grab those from the yard or driveway, too. i washed mine, but you don't have to.
carefully place those in the bottom of your clean vase.


then add enough potting soil (or really good soil from your garden if you have it) to the vase.
you'll want the soil to fill one third of the container.
after this step, i use a paper towel to brush loose soil off of the inside of the glass.
now it's time to add the plants and moss!
first, select clumps of the moss and use the spatula to place them inside the vase -
they'll just slide right off and into place that way. no breaking.
if needed, use the spatula to cut the clumps so they will fit together in a circular pattern.
a wooden kitchen skewer helps to press the edges of the moss clumps down into the soil,
and also to create a small hole for the plants.
set the plants in place, and then use the skewer to push a little bit of soil in around them.
[it tends to crush the moss less than fingers do]


in the large vase, i added a few white rocks around the base of the largest plant to stabilize it.
in the small vase, there's one little white rock - just to coordinate the look.
you can also add a small statue or figure,
or make it a 'fairy garden' by creating a whole garden scene in miniature
[with details like tiny pebbles as a walkway, itsy bitsy flowering mosses, a dollhouse chair or bench...]
in these overhead shots, you can see the varied types of moss used,
and how they help to create a miniature 'landscape' look.


in a side-view shot, you can see how the plant matter all remains below the top edge of the container...
not only does it look better, but it helps them retain more moisture. water with a mist or a few drops daily.

btw, i spied a little glass container on a shelf and grabbed the lid...
it fit the tiny brandy snifter PERFECTLY!

a lidded container is the best way to keep the terrarium environment moist
i spent absolutely NOTHING to make these, and the project took just an hour - including the photos.
that, my friends, is my idea of 'Fast, Cheap, & EASY!'TM
...and if you are in the southwest and can't find moss anywhere near you,
here's a one-stop solution:
Moss Acres Terrarium Moss
__________________________________________________________________
__________________________________________________________________
Paper Faux Spring Blossoms

materials:
scissors, tacky glue, branches, thin paper or fabric (tissue-paper consistency)
scissors, tacky glue, branches, thin paper or fabric (tissue-paper consistency)

method:
* cut some tiny flower shapes out of whatever paper you decide to use ,
* cut some tiny flower shapes out of whatever paper you decide to use ,
making them round in shape and about the size of a 50 cent piece.
(wait, does anyone know what that even is anymore??? )
* keep some whole and bunch them up by pinching the center, forming a 'stem' in the back.
* cut some in half and roll them into tinier 'buds' with a 'stem' on one end.
* glue them onto a twig - grab one from a dormant tree in your yard or roadside.
you'll want to place the smaller 'buds' toward the tip of the branch,
with the 'blossoms' gradually getting larger as you move down the branch, for a realistic look.
* when done, stand them up in a jar, vase, crate, or whatever container you have:


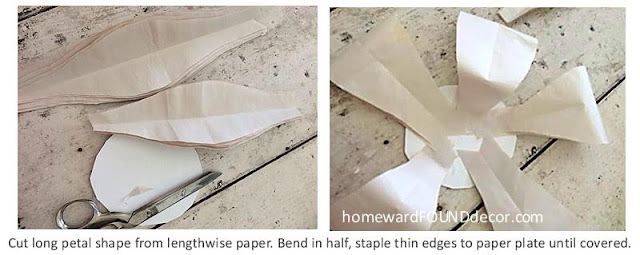
* for a super-realistic look,
cut a few teardrop-shaped single petals, squish the ends of them,
and drop them next to your vase:

___________________________________________
m
Vintage Paper Flowers


___________________________________________________
Cement Tileboard Chalkboard

1. cut the cement tile backerboard to size
2. sand well until it is smooth to the touch
3. paint the chalkboard paint on with low-nap rollers
(apply paint in horizontal stripes for first coat, vertical stripes for second / third coat)
4. drill holes in the corners and sides,
then screw into studs in your wall to hang
5. attach a length of wooden rain gutter as a chalk rail if desired
Easy Button Blossoms


#6. from the bottom of the flower, GENTLY push all of the buttons and the paper circle upward


 _________________________________________________________
Divadils chenille daffodils


Vintage Coffeepot Birdhouse


4. Drill one small hole above the pot spout using the small bit.
Feed the bottom of the other end of the baling wire down into the hole, and out the spout -
Remove the lid at the end of the season to clean out the birdhouse - just rinse and dry. __________________________________________


___________________________________________________
Cement Tileboard Chalkboard
materials:
a sheet of cement tile backer board
sandpaper & electric sander
a sheet of cement tile backer board
sandpaper & electric sander
chalkboard paint & rollers
drill and screws to hang
1. cut the cement tile backerboard to size
2. sand well until it is smooth to the touch
3. paint the chalkboard paint on with low-nap rollers
(apply paint in horizontal stripes for first coat, vertical stripes for second / third coat)
4. drill holes in the corners and sides,
then screw into studs in your wall to hang
(the version shown above has wood buttons between the board and the screwhead)
5. attach a length of wooden rain gutter as a chalk rail if desired
it ends up looking, feeling, and SOUNDING exactly like
an old slate chalkboard when you write on it!
__________________________Easy Button Blossoms
Supplies
.
assorted buttons - vintage, thrifted, pulled off of raggy clothes, or new from the craft store.
NOTE: You'll want the buttons to have holes in them - though the smallest buttons can have a shank back and will still work.
paper - scrapbook paper, sheet music, old magazine & catalog pages, anything.
pipe cleaners / chenille stems - white or green (any color, really!)
pipe cleaners / chenille stems - white or green (any color, really!)
scissors and a hole punch
#1. cut circles from the paper - various sizes, all bigger than your biggest button sizes.
#2. punch a hole in the center of each circle.
#3. slide a small button with tiny holes onto a pipe cleaner - it should fit TIGHTLY.
pull it down the stem about and inch and a half.
#4. slide on one of the paper circles, so that it fits right up tight against the button.
pull it down the stem about and inch and a half.
#4. slide on one of the paper circles, so that it fits right up tight against the button.
add more buttons, working from largest to smallest sizes.
vary the colors and shapes so that all the details show up.
#5. secure the top button by bending the end of the pipe cleaner stem over.
#6. from the bottom of the flower, GENTLY push all of the buttons and the paper circle upward
toward the top, until the buttons nestle closely together.
#7. cut pipe cleaner stems to the length you'd like.
NOTE: if you want your finished stems to be longer than @5",
#7. cut pipe cleaner stems to the length you'd like.
NOTE: if you want your finished stems to be longer than @5",
they can be wound around a length of wire or a bamboo skewer for strength.
OPTION:
#6. add tiny paper, felt, or fabric leaves to the back of the paper circle
#6. add tiny paper, felt, or fabric leaves to the back of the paper circle
or if you cut them from fabric or ribbon, you can glue them to the stem.
Display in a sweet little bouquet of button-y beauty!
Divadils chenille daffodils
*** Please note that these do use PINS, so they are NOT a kid craft project
and are definitely not for kids to play with. ***
Materials:
 'wavy' chenille stems or rope in yellow or white
regular chenille stem in green + length of baling wire for stem
yellow or white paper . scissors . glue stick to make the paper crown
yellow or white pompom . 2 regular pins . 3 floral pins with pearl ends
NOTE: wavy chenille stems are available HERE
NOTE: wavy chenille stems are available HERE
Process:
1. starting at one end of chenille stem or rope, fold two 'wavy' sections together -
and pinch the skinny section in the middle to make one petal.
then wrap the end to the next skinny section to secure the petal in place.
2. move down the chenille stem and repeat -
then wrap the next skinny section once around the petal base to secure it.
3. repeat petal process until you have 3 petals (using a chenille stem) or 6 petals (if using chenille rope).
if you have 3 petals, repeat and create another set of three.
if you have 3 petals, repeat and create another set of three.
4. if you have two sets of three petals, wrap the two remaining end sections together to attach.
with either method, leave an end section to attach the green stem to...
5. take the green straight chenille stem and wrap it around the baling wire piece to cover it.
create a small hook at the top of the wire, and slip the remaining end section of wavy chenille through it
on the back side of the flower.
6. wrap the wavy chenille around the top 1/2 inch of the green stem to secure it.
7. place the pom pom in the center of the front of the flower.
hold it in place using the three flower pins with pearl heads -
stick them through the pom pom and into the chenille flower petals.
you can use hot glue if you want.
you can use hot glue if you want.
8. cut a strip of paper @ 1" wide and 4" long.
on one side, cut out a crown shaped edge - basically really long, pointy triangles!
then use a pen or pencil to curl the edges of the points outward.
roll the paper into a tube with the points curling outward.
on one side, cut out a crown shaped edge - basically really long, pointy triangles!
then use a pen or pencil to curl the edges of the points outward.
roll the paper into a tube with the points curling outward.
use a glue stick to secure it into a tube.
9. slip the paper crown over the floral pins and pom pom.
10. push the two regular pins into the crown (one on each side),
running them through the pom pom to secure the crown to the flower.
11. bend the tips of the petals into various curved shapes - some forward, some back.
or close them in on themselves for a daffodil 'bud', as shown below...
_________________________________________________________Vintage Coffeepot Birdhouse

Supplies Needed:
aluminum coffee or teapot (vintage or new)
one tea or soup spoon (stainless steel)
aluminum coffee or teapot (vintage or new)
one tea or soup spoon (stainless steel)
one 18" length of baling wire
one small screw & nut
steel wool
one small screw & nut
steel wool
drill with small bit and 1 1/4" hole bit
screwdriver . needle nose pliers

1. Drill a hole in the front of the coffee / tea pot body using the 1 1/4" hole bit on the drill.
Use the steel wool to sand / soften the sharp edges of the hole.
2. Bend the spoon just below the 'bowl' so that the bowl angles down at a 90 degree angle.
From the inside of the coffee pot, put the spoon handle through the 1 1/4" hole,
place the bowl of the spoon up against the pot wall,
and drill a small hole through both surfaces using the small bit.
Attach using small screw, with nut on the inside to secure, to form the perch.
[OPTIONAL: hot glue the spoon into place!]
[OPTIONAL: hot glue the spoon into place!]
You must bend the spoon before attaching to the pot.
3. Drill two small holes @ 1/2 inch apart above the pot handle using the small bit.
These should be on the body of the pot - NOT on the lid.
Feed the bottom 4" of the baling wire through the upper hole, into the pot, then out the other hole.
These should be on the body of the pot - NOT on the lid.
Feed the bottom 4" of the baling wire through the upper hole, into the pot, then out the other hole.
Use the needle nose pliers to curl the end of the wire around the screwdriver shaft to create a curlicue.
[this prevents the wire from slipping back through the holes]
[this prevents the wire from slipping back through the holes]
4. Drill one small hole above the pot spout using the small bit.
Feed the bottom of the other end of the baling wire down into the hole, and out the spout -
this causes the middle of the wire to create a U-shaped loop over the top of the pot.
Use the needle nose pliers to curl the end of the wire around the screwdriver shaft to create a curlicue.
Bend it upward to look like steam escaping the spout!
Bend it upward to look like steam escaping the spout!
Remove the lid at the end of the season to clean out the birdhouse - just rinse and dry.

May Day Tin Can Flower Baskets


Supplies:
* empty tin cans with lids removed
* seed packets (full or empty)
* string or garden twine & scissors
* manual can opener (with pointed end)
* glue stick optional
* flowers clipped from your yard (or 2" potted plants)
* empty tin cans with lids removed
* seed packets (full or empty)
* string or garden twine & scissors
* manual can opener (with pointed end)
* glue stick optional
* flowers clipped from your yard (or 2" potted plants)

1. wash empty tin cans and remove paper labels [GooGone works well on stubborn glue]

2. use can opener to pierce two holes at top edge of either side of can (point down)
3. use back of can opener to roll and press punctured metal FLAT on inside of can (no sharp point)
3. use back of can opener to roll and press punctured metal FLAT on inside of can (no sharp point)

4. lay can on side, and lay seed packet over the seam of the can (or over stubborn glue spots!).
glue in place with the glue stick if you wish.
5. cut @ 24" piece of string/twine and wrap it several times around the can and the seed packet,
near the bottom of the can. Repeat with another string at top of seed packet/can.
6. tie strings tightly on the back side of the can to hold the seed packet in place.
7. cut @ 24" piece of string/twine, double it,
6. tie strings tightly on the back side of the can to hold the seed packet in place.
7. cut @ 24" piece of string/twine, double it,
and pass the ends through both holes on the sides of the can. tie ends together to form hanging loop.

8. fill can with water (@2 inches)

9. add flowers!

10. hang up on a doorknob or display on a tabletop, counter, or shelf...


You can use empty seed packets, or ones that are still full of seeds -
and if you can fill the can with the same kinds of flowers that are on/in the seed packet,
it's a doubly sweet gift!
[these pretty seed packets were found at the Dollar Tree store]... here's a NEW version of Posie Pails!
use upcycled floral images from magazine pages
to create your own 'seed packet' art for the labels!

________________________________________________________
May Day Party Hat Flower Baskets


Supplies:
* old paper party hats
* leftover gift wrapping paper in bright colors and/or prints
* some snippets of ribbon (@ 18' long)
* scissors and a glue stick
* old paper party hats
* leftover gift wrapping paper in bright colors and/or prints
* some snippets of ribbon (@ 18' long)
* scissors and a glue stick
* 1 plastic sandwich bag and 1 rubber band per basket
* flowers clipped from your yard or a field
* flowers clipped from your yard or a field

1. & 2. use the glue stick to attach a piece of gift wrapping paper to a hat - start by gluing one edge of the paper at the seam of the hat, roll it around the hat, and glue in place at the seam again.
3. use scissors to trim paper to an even depth around the rim of the hat - leave @ 1 inch for folding over.

4. fold paper into the inside of the hat, 'pleating' it neatly as you go.
5. poke a hole through the gift wrap and the hat on each side, right where the elastic chin-band is attached. the hole needs to go all the way through.
6. pull both ends of the ribbon through both holes, so that the ribbon forms a large loop above the cone. tie the ends of the ribbon together so that they sit inside the cone.

If you want to add a special embellished collar to the cone, add it now.
This is a laser-cut paper cupcake wrapper, simply taped into the inside edge of the cone -
This is a laser-cut paper cupcake wrapper, simply taped into the inside edge of the cone -
It took two wrappers to fit the cone.

7. fill the sandwich bag with @ one ounce of water. roll the edges down and slip the rubber band over the bottom of the bag - cinch it twice to hold the top closed and keep the water inside the baggie.
8. there will be a very small hole at the top of the baggie - tuck your greens and flowers into that hole. it will hold more than you think!
9. then place the baggie inside the paper cone - a great way to stabilize the cone is to sit in inside a glass to hold it upright as you work. this pilsner beer glass is the perfect shape for the cone!
Display them upright in glasses or vases or hang on a door / cabinet knob.
__________________________________________________________
Recycled Paper Daffodils  . . Materials: Materials:scissors. masking tape . glue stick . bamboo skewers . paper . Process:   1. fold sheet of paper (music, construction, magazine page) in thirds as shown. 2. fold in half where the two sides meet in the center.   3. draw half a flower shape with four, five, or six pointed leaves at the double -folded edge of the paper. 4. cut the flower shape out - this will create TWO flowers because of the double fold.    5. cut a strip of another kind / color of paper - @ 1" wide and 4" long. 6. fold 1/3 of the strip toward the center, lengthwise. 7. unfold the folded third of the strip, and cut slits into it (creating a thick 'fringe').   8. roll the strip over on itself @ the size of your finger, and glue the rolled portion to the flat portion. 9. continue rolling and glue the end of the strip to the roll to secure it.   10. fold the fringed ends together and glue into place. 11. then add glue to the outside of that end, and 12. place the rolled section in the center of the cut-out flower shape, with the glue down. press to secure.  Now you have a daffodil! You can glue this to a magnet or card, or shadowbox frame. To add a stem and leaves, continue....   13. and 14. from the leftover scraps after cutting out the flower shape, cut a circle about the size of a quarter.   15. secure the back of the daffodil to a bamboo skewer, using a small piece of masking tape. 16. glue the circle you cut out OVER the masking tape, using the glue stick.  17. cut a leaf-shaped strip from the leftover paper scraps.    18. push the bamboo skewer 'stem' through the paper leaf. 19. put glue on the leaf and wrap it around the bamboo skewer once. 20. wrap the other end of the leaf around a pen or pencil to give it a curling shape, like a real daffodil leaf.  display and enjoy your paper daffodils! ~~~~~~~~~~~~~~~~~~~~~~~~~~~~~~ Here's another method for making them that should remind you of elementary school:   when you get to step 5, use a cupcake or bonbon paper liner instead of rolled paper for the flower's center! [ I cut and glued a second circle shape INSIDE the paper cup on this one ]   using colorful cupcake papers & pages cut from magazines results in bright, happy flowers! find all of my spring home decor posts here |