it's not a party without some fun decor,
and this easy-peasy bunting project is perfect for summer fun!
whether you're hosting a backyard bbq, a block party, or a birthday party,
making cute pennant bunting banners doesn't have to be hard.
i hate hard. i love easy.
so i'm always trying to find the easy way to decorate!
i recently made these bunting banners and they came together really quickly -
without sewing!
continue reading, and i'll show you how...
i made two banners and used them as decor on the dime toss game booth
that i created for a recent fun event:
because our group of gals loves yellow, i coulda' sold these a dozen times over.
instead, i shared my easy method of making them with those who asked,
and now i'm sharing it with you!
what you need:
fabric or paper (gift wrap and napkins work well)
fabric seam binding trim (in the sewing department of your craft store)
scissors (regular OR pinking shears, which create a 'zig zag' edge)
hot glue
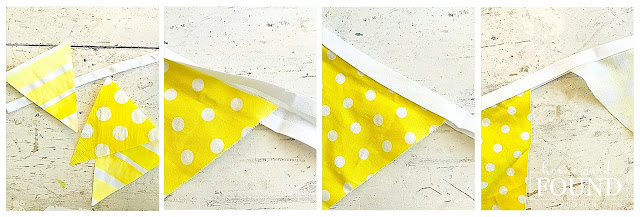
first step: figure out how large you want your pennant banner to be.
measure the seam binding ribbon to that length -
PLUS six inches on each end for tying it into place.
cut out pennant shapes from your fabric or paper.
TIP: cut one triangle out of printer paper, in the size and shape you prefer.
use this as a pattern to trace all of the triangles you need -
they'll all be the same size, and your banner will look much prettier!
btw, i do this by eye.
i don't do math (UGH) and figure out exact measurements. ever.
i'm a finicky person but perfection is overrated in my opinion.
open up the folded-over seam binding ribbon and lay it out flat on your work surface.
place two books about three feet apart on top of the ribbon
to hold it open as you work.
(photo 2)
measure off @ 6" on one end as the 'tie', and place your first triangle after the 6" mark.
lay the triangle (fabric or paper) onto the bottom half of the opened seam binding ribbon
TIP: if you have varied patterns/colors of paper or fabric,
plan your repeat FIRST before you begin gluing...
plan your repeat FIRST before you begin gluing...
and stack the triangles up in that arrangement.
as you grab each triangle from the top of the stack, you won't skip any
and mess up your repeat. ask me how i know.
lift the very top of that first triangle forward and place a bead of hot glue along the ribbon,
then carefully let the fabric fall back into the glue.
you know this, but: don't touch it! let it dry.
you don't have to wait for one to dry before moving on to the next.
grab your next triangle from the stack and place it on the ribbon, as before -
you can leave a space between each triangle, or not. it's up to you!
continue gluing until all of your triangles are in place -
moving the ribbon and books holding it open as you work your way down the length.
(photo 3)
remove the books, letting the seam binding ribbon fall forward.
starting at one end, insert your glue gun nozzle between the triangles and the top ribbon surface
and apply a thin bead of hot glue all along the front of the triangles.
let the ribbon fall forward so that it glues to the front of the triangles.
again - don't touch it! let it dry. it only takes a few minutes.
again - don't touch it! let it dry. it only takes a few minutes.
that's it. done. couldn't be easier!
you can't see the glue, it holds everything together securely, and it's fast.
what's not to love about that?!!!
okay, if you WANT to, you can sew this instead.
(my sewing machine is a beast and it's not set up in my studio,
so it's a lotta' work. i use hot glue more often than not.)
then all you have to do is hang it up and enjoy the compliments!
then all you have to do is hang it up and enjoy the compliments!
they looked fabulous and fun on my dime toss game booth,
and they look quite darling on my faux mantel in my studio for summer, too!
links to related previous content:
summer,entertaining,party,just for fun,trash to treasure,dollar store crafts,junking,thrifted,up-cycling,re-purposed,Fourth of July,DIY,street party fun,block party fun,backyard decor,party decor,bunting,banners,diy bunting, diy banners.

.jpg)
.jpg)
.jpg)

.jpg)
.jpg)

No comments:
Post a Comment