did your grandma have a button box?
mine did, and i spent many hours playing with the colorful contents as a child.
when my Grandma Ward passed, i was given her button box.
to this day just looking at it makes me smile...
mine did, and i spent many hours playing with the colorful contents as a child.
when my Grandma Ward passed, i was given her button box.
to this day just looking at it makes me smile...
i decided to start collecting buttons of my own to add to her tin,
so i grabbed them at garage sales and thrift stores
and sometimes even bought some from craft stores.
so i grabbed them at garage sales and thrift stores
and sometimes even bought some from craft stores.
when i began using the buttons in home decor projects.
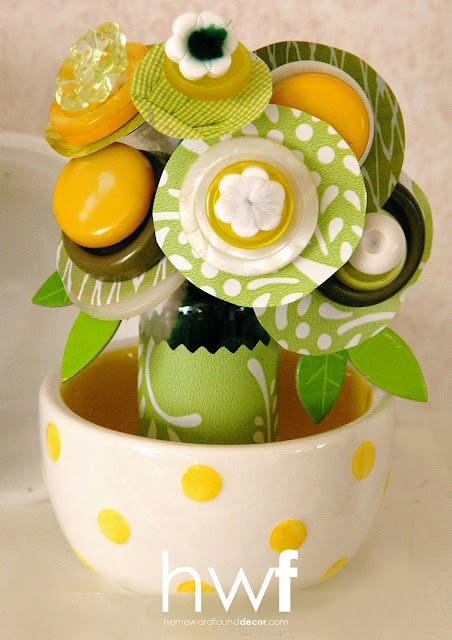
one of the projects i undertook was to make button flowers:
those were made back in the early 2000's!
it's such an easy project that kids can do it, too.
it's such an easy project that kids can do it, too.
continue reading for my easy tutorial...
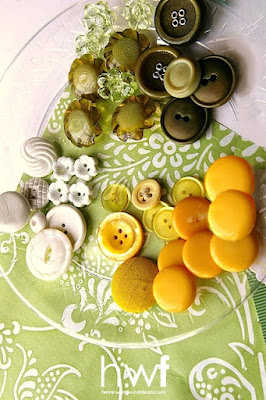
i chose a palette of white, green and yellow buttons for my flowers.
the buttons needed range from small to large, simple to ornate...
that adds a lot of interest to the finished bouquet.
the buttons needed range from small to large, simple to ornate...
that adds a lot of interest to the finished bouquet.
you'll also need scissors, a hole punch, scrap paper in your chosen color palette,
and chenille stems (formerly known as 'pipe cleaners' 😉 ).
first, cut a bunch of circles of varying sizes out of the paper -
i use pages torn from magazine, scraps of gift wrapping paper and shelf liner paper.
punch a hole right in the center of those paper circles.
note: you can see some green leaves on some of my flowers...
those are thicker cardboard printed with the leaves, and came from a craft kit.
assembling the flowers is simple - you just layer the elements.
first, slip a tiny button onto a chenille stem and scoot it down about an inch -
this button will hold all of the other elements in place.
then slide a paper circle onto the 'stem'.
then add a large button. then a medium button. then a small one.
as shown above, they just stack on top of one another -
i've shown them separated so you can see it clearly,
but once you've placed all of the elements on the 'stem'
just slide them together with no spaces in between.
the top of this flower has a fuzzy center - made by twisting the end of the 'stem'
to hold the elements in place.
if your top button doesn't have a hole on top but has a shank,
simply insert the 'stem' into the shank and then twist the 'stem' once around it.
i made my flowers on full-length chenille stems, then cut them in half when i was done
so they would fit into a tiny glass vase.
simply insert the 'stem' into the shank and then twist the 'stem' once around it.
i made my flowers on full-length chenille stems, then cut them in half when i was done
so they would fit into a tiny glass vase.
displayed at each place setting at your table,
affixed to a card or gift, or fashioned into a 'corsage' to wear,
these sweet flowers would be perfect for Mother's Day...
especially if the buttons you use are from your Grandma, Mom, and Aunts!
follow my social media accounts for more content
affixed to a card or gift, or fashioned into a 'corsage' to wear,
these sweet flowers would be perfect for Mother's Day...
especially if the buttons you use are from your Grandma, Mom, and Aunts!
follow my social media accounts for more content
shared online:
creatively beth | team creative crafts linky party #144.
thank you for featuring my project, Miss Beth!
funky junk interiors | new upcycled ideas #676
thank you for including my project in your feature, Miss Donna!
spring, mothers day, just for fun, flowers, DIY, crafting, decorating, dollar store crafts, tutorial,
garden style, diy decorating, grandmas buttons, button flowers


Just LOVELY, Debi! I still have my Gran's button tin!
ReplyDeleteWe will be featuring you starting Wednesday at the Creative Crafts Linky Party! Pinned and shared!
Creatively, Beth