last spring, when i created my new Original Sweet Sweater 'Shrooms,
i ALSO had the idea for this project. i just ran outta' time to make them!
and forgive me, but i gotta' be honest
and say that they are one of my FAVORITE creations ever!
and forgive me, but i gotta' be honest
and say that they are one of my FAVORITE creations ever!
since mushrooms are still having a moment,
and pumpkins are my JAM, i combined the two
to create these whimsical fall decor pieces
that i'm calling " 'shroomkins"
continue reading to learn how to make these -
from cheap styrofoam pumpkins and a pool noodle!
yeah, i'm STILL into yellow!
but remember, when you create your own decor, you can use
ANY color or pattern you love.
but remember, when you create your own decor, you can use
ANY color or pattern you love.
these whimsical creations began by RE-using some pumpkins i painted a few years ago:
back in 2020, i was basically spending 24/7 in my studio,
being inspired by rainbow-hued paint chips -
and these orange pumpkin designs stemmed from that.
i grabbed a large and small styrofoam pumpkin from this stash,
then added one more teeny tiny styrofoam pumpkin from Dollar Tree
and then got to work on this newest idea...
being inspired by rainbow-hued paint chips -
and these orange pumpkin designs stemmed from that.
i grabbed a large and small styrofoam pumpkin from this stash,
then added one more teeny tiny styrofoam pumpkin from Dollar Tree
and then got to work on this newest idea...
i'mma' be honest - cutting styro pumpkins is MESSY!!!
i created a virtual snowstorm in my studio doing it, so know that before you undertake this
you might want to work in the garage. (mine was 110 degrees, so i stayed inside)
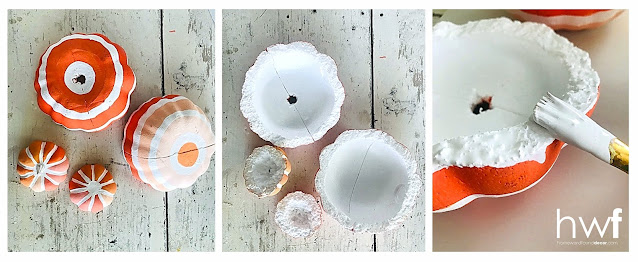
the large and small pumpkins are shown here,
and i cut them using a small serrated knife.
the big detail: don't cut them exactly in half!
i cut mine in a curving line, so they'd look more whimsical when done.
immediately after cutting, i brushed loose styro bits off
and then put a thick coat of matte white artist's paint onto the cut edges.
that stops them from 'shedding' more styro bits.
while the large pumpkin was hollow, the small and tiny pumpkins were solid styro,
so i used the knife to cut some away for a depression in the center each piece.
this made attaching them to the stems easier.
then i painted the undersides and the tops of all of the pumpkin pieces white.
next came a few coats of various yellow paint colors on each piece,
followed by some white dots that have a 'shadow' of darker yellow paint added
plus some tiny dots in a darker yellow.
i also added some light gray lines to the underside of each top,
replicating the look of the gills on mushrooms:
.jpg)
.jpg)
the stems of the 'shroomkins are basic cone shapes:
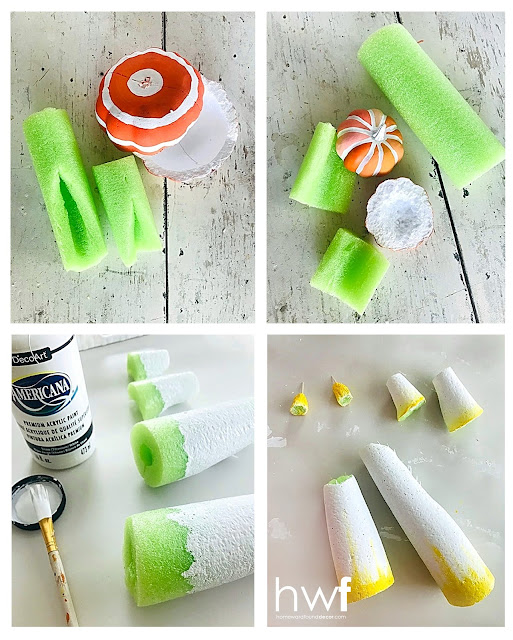
i began with a small sized green pool noodle. i cut it into several lengths,
scaled to fit the size of the top that would be used...
for the two larger tops, i used the whole round of the pool noodle,
scaled to fit the size of the top that would be used...
for the two larger tops, i used the whole round of the pool noodle,
and cut some of it away so that i could hot glue it into a 'cone' shape.
(sorry, i forgot to snap photos while i was doing that!)
tip: i used toothpicks to hold the styro in place as the hot glue dried.
for the small tops, i cut a section of the round in half,
so there was less mass to bend into a smaller sized cone.
for the tiny tops, i just cut a cone shape from one side of the noodle.
then i painted them with two coats of matte white artist's paint,
and added some yellow accents at the bottom of each stem.
i also cut a pumpkin 'stem' from the foam for the larger pumpkin top,
as the one i had used before was lost.
it's simply painted white and attached with a toothpick.
as the one i had used before was lost.
it's simply painted white and attached with a toothpick.
then came the assembly:
the vessel i chose to use is a bonafide antique chamber pot.
(if you don't know what that is and you think this looks like a giant coffee mug, it ain't!!!!)
i filled it with the left over pool noodle scraps, a wedge of floral foam,
and the styrofoam base from an old fake plant.
they provide 'lift' and a secure base to anchor the stems into.
(if you don't know what that is and you think this looks like a giant coffee mug, it ain't!!!!)
i filled it with the left over pool noodle scraps, a wedge of floral foam,
and the styrofoam base from an old fake plant.
they provide 'lift' and a secure base to anchor the stems into.
the easiest way to do this is to work with the stems WITHOUT the tops on.
put toothpicks into the base of the stems, then place and press into the foam base.
i placed the largest stems first, then the medium ones, and finally the small ones.
then use more toothpicks to secure the tops onto each stem -
place the toothpicks into the stem, then press the tops down onto them gently.
i placed mine at a bit of an angle by cutting the tops of the stems on the diagonal.
to finish it all off and hide the base,
i used my favorite moss green eyelash yarn as a forest-y ground cover
and a few tiny yellow leaves from my front yard beech tree add a final detail.
i used my favorite moss green eyelash yarn as a forest-y ground cover
and a few tiny yellow leaves from my front yard beech tree add a final detail.
these are currently sitting on my faux fireplace mantel in my studio,
and they make me wanna' go find a tiny figure to add to the vignette...
a frog? a fairy? i'm not sure.... what would YOU add?!
...and if you just can't see the 'shroomkin forest for the yellow hue,
here are two altered versions that might grab your attention:
and they make me wanna' go find a tiny figure to add to the vignette...
a frog? a fairy? i'm not sure.... what would YOU add?!
...and if you just can't see the 'shroomkin forest for the yellow hue,
here are two altered versions that might grab your attention:
_________________________________________________
FYI: as always, i did a Google image search for anything related to
'pumpkin mushrooms' before sharing my new creations.
i found only one image of mushrooms made using pumpkins:
it's been pinned on Pinterest MANY times -
including by HGTV - but there is no credit to the creator or photographer or OP.
clearly this project appeared in a magazine - maybe HGTV? - and pre-dates mine.
i didn't see it until after i came up with my idea.
and even though mine uses HALF pumpkins for a different look,
it's still the same basic concept. so mine isn't 'original'.
but it's still fun!!!
shared online:
funky junk interiors | new upcycle ideas #645
thank you for featuring my project, Miss Donna!
creatively beth | creative crafts linky party #112
thank you for including my 'shroomkins in your feature, Miss Beth!

thank you for including my 'shroomkins in your feature, Miss Beth!

fall,pumpkins,painting,tutorial,home decor,colorful home,DIY,diy decorating,decorating,re-purposing,mushrooms, 'shroomkins,pumpkin mushrooms,fall home decor,autumn home decor,diy pumpkins,diy pumpkin decor.

.jpg)
.jpg)
.jpg)


.jpg)
.jpg)

.jpg)

.jpg)
%20orange.jpg)
%20tan.jpg)

.jpg)


These pumpkins and mushrooms are so cute! I love the colors!
ReplyDeletethank you so much for visiting and for your kind comment, T'onna! i'm so happy to hear that someone else loves YELLOW!!!!! ;)
DeleteOMG, SUPER cute!!!
ReplyDeletethank you Miss Tania! i just love your enthusiasm! ;D
DeleteSimply BRILLIANT, Debi! We will be featuring you this week on the Creative Crafts Linky Party!
ReplyDeletethank you so much, Miss Beth! i am honored to be included!
Delete