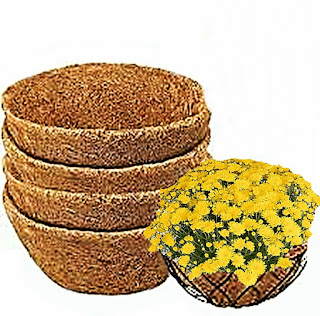
i spied this item one day at Lowes - do you know what it is?
in my endless search for things i can turn into tropical decor for our home,
i'm always looking at textures and colors that work - on the cheap -
and this looked for all the world like a giant coconut to me!
turning it into a pumpkin was easy-peasy -
so much so that creating the tutorial for this post took me MUCH longer
than actually MAKING the pumpkin!
have you figured out what i used yet??
continue reading to see the answer... plus a few variations!
yep, it's coco fiber planter liners!
you can pick them up for just a few bucks in garden departments
at Lowes, Home Depot, Walmart, and other big-box retailers.
(the large ones i found at Lowes were merely 2.49 each)
to make a whole pumpkin, you'll need two.
if you want to make a half pumpkin to hang on the wall or door, you just need one.
i used a plain wood stake (also from Lowes) for the 'stem'.
tools include a hot glue gun and some needle nose pliers.
ready? let's get started...
for the full pumpkin:
sit one coco fiber liner on a table - like a bowl.
fill it with fluffed-up plastic grocery bags -
i tucked about eight inside of one, to hold them in one place during assembly.
( i still have SO many left over from early 2020 Instacart deliveries!)
OPTION:
if you wish, you can also place a heavy object inside the liners,
like a brick or rock, to weight it for stability.
i recommend this if you're going to place them outdoors where wind is a factor.
note: these can't get wet! they'll start to fall apart.
sit the second coco fiber liner on top of the other, matching up the edges.
carefully insert the end of your glue gun between the two liners, right on that flat edge,
and express some glue onto the bottom edge.
work on sections that are about 6" for best adhesion.
pull the glue gun out, and use the needle nose pliers to hold the liners together
as the glue dries. it doesn't take long (and the pliers save your fingers from burns!)
move on to the next 6" section and repeat.
when you get around the circle and close to the start point,
leave enough space UNGLUED to allow insertion of the 'stem'.
use the needle nose pliers to hold the liners open as you insert the wood stake 'stem'.
i tilted mine a bit to give it more whimsy.
then i hot glued the liners to the stake - on the inside edge.
* note: the bags inside the liners help support the stem, so it doesn't tear the coco fibers.
to make a half pumpkin for display on a wall or door,
simply hot glue the wood stake to the back of the coco fiber liner,
then glue on a twisted loop of chenille stem or wire as a hanger.
don't try to hang it from the fiber - it will tear.
you now have a rustic or boho or tropical pumpkin
(whatever your style is!)
wanna' add some embellishments?!
let me share how i made those fabric leaves -
i had a cute sundress that just doesn't fit anymore. so, i crafted with it!
i cut out a large and partial flower from the fabric,
then used Tacky Glue to glue them to a paper bag.
when dry, i cut away all of the black fabric,
then cut out separate petals from the flowers -
and gave them a bit of a twist/bend, to add some movement to them.
they make perfect leaves, don't you think?!
to attach them to the coco fiber pumpkins,
i simply use straight pins pushed right into the fiber.
of course i had to try a REALLY tropical option, too!
related content:
shared online:
funky junk interiors | new upcycled ideas #641
thank you for including my project in your feature, Miss Donna!
creatively beth | creative crafts linky party #116
thank you for including my project in your feature, Miss Beth!
fall,pumpkins,DIY,diy decorating,seasonal,tropical style,boho style,beach style,coastal style,rustic style,re-purposed,up-cycling,coco fiber planter liner pumpkins,natural material diy pumpkins,tropical pumpkins,boho pumpkins,crafting with natural materials

.jpg)

.jpg)


.jpg)

.jpg)
.jpg)
.jpg)


You are definitely crushing pumpkins this fine fall season, because yet again, this idea is so original and it turned out so cool! Cocoa liners! Who knew?
ReplyDeletethank you so much, Donna! i didn't know if turning these into a pumpkin was possible - i just try out a lot of craaaaazy ideas and sometimes, they work! ;)
DeleteTHE MOST CREATIVE, Debi! We will be featuring you starting Wednesday at the Creative Crafts Linky Party!
ReplyDeleteCreatively, Beth
Miss Beth, you are so sweet! thank you for your kind words, and for including me in your link party feature - i am honored!
Delete