spring has sprung!
one of my favorite passages in the Bible speaks of spring the way i think of it:
"For now the winter is past; the rain is over and gone.
The flowers appear on the earth, the time of singing birds has come,
and the voice of the turtledove is heard in our land.
The fig tree forms its early fruit; the blossoming vines spread their fragrance."
Song of Solomon 2:11-13
watching nature come back to life after a long cold winter revives me.
especially in a weird weather year like this one
(endless rain. snowing at DISNEYLAND! tornado near Los Angeles!),
i am always happy when spring finally arrives...
and if it doesn't arrive soon enough for me, i just create my own kind of spring vibe!
my newest Sweet Sweater Original TM creation is a nod to springtime
that i'll be enjoying for the next few months...
continue reading to see how simply you can create my Sweet Sweater Potz!
.
sweaters are my 'thing', so when my brain starts thinking of new seasonal decor projects,
it usually starts with 'what else can i make outta' sweaters?'!
i saw a plush toy at a garden center that was a terra cotta pot with a succulent plant in it,
with a happy little face on the pot.
My mind IMMEDIATELY saw it as being made with sweater fabric - and here's the result!
while i used sweater fabric remnants to create the pot and dirt,
i decided to use silk flowers to finish them off...
i wasn't feeling quite creative enough to make sweater flowers.
(but there's plenty of the spring season left, so maybe i will at some point!!!)
my tutorial focuses on the largest pot (left photo, above)
but works for any size container.
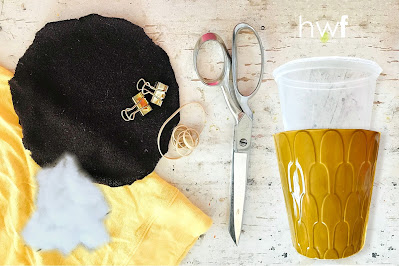
what you'll need:
one arm from a sweater in the color of your choice
(a peachy 'terra cotta' hue would be perfect with succulents for a boho look!)
a vase/container that will fit inside the 'cuff' end of the arm with 'cuff' at the top edge
a plastic container that will fit completely into the vase
some brown sweater fabric, cut into a circle larger than your vase top
some polyfil stuffing . scissors . large size rubber bands . binder clips or pins or hot glue
.
a yellow thrifted sweater in my fabric stash had short sleeves, so i cut one off
and then searched the house for a vase + plastic container to use...
the vase was just a *bit* smaller at the top than the sleeve cuff, but it worked.
that said, i don't recommend you cut your sweater arm until you've found a vase ;)
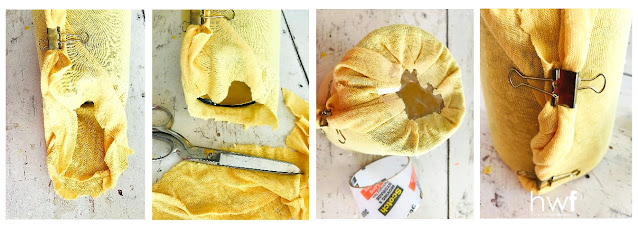
put your vase inside the sweater arm, with the cuff ABOVE the top edge.
cut off any extra fabric at the bottom of the vase, leaving @ 1 1/2 inches of fabric.
next, secure the sweater on the vase.
i used binder clips to pull & hold the fabric in on the sides of the vase,
making sure that the arm seam was at the back where i clipped.
it's easier to cut the arm open on the seam, trim off the excess fabric, and glue both sides to the vase.
but you know me, i use everything over and over, so this is good enough for me
(it doesn't show up in the final arrangement, anyway!)
so feel free to do this however you desire.
next, trim the extra sweater fabric that is beyond the bottom of your vase,
leaving about 1 to 1 1/2 inches of fabric.
gather up that fabric under the vase, and either tape or hot glue it in place.
what you want is a very smooth surface of sweater fabric on the vase -
no wrinkles or folds or sags.
the vase needs to sit level, so if there's too much fabric - or you're using a thicker sweater -
just cut a bit more off so that it gathers in well.
when finished, flip your vase/pot over...
and fold the cuff edge to the outside of the vase top,
which creates the effect of a 'lip' on the pot.
(this is why the fabric needs to be secured tightly to the vase - so the cuff won't wrinkle here)
on to the next step!
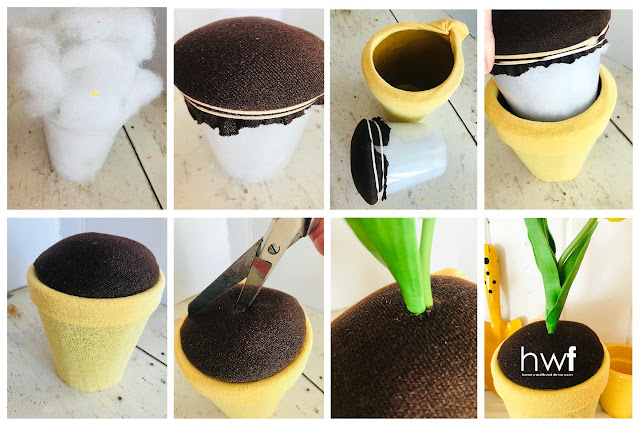
a plastic soup container (from my local organic grocer) fit perfectly inside my vase!
i filled it to overflowing with polyfil stuffing,
then held a circle of brown sweater fabric over the top of it all
and used two large rubber bands to hold the circle onto the top of the container securely.
(that mound of polyfil stuffing makes the circle rise up above the container,
looking more like a pile of 'dirt'!)
insert the container into the vase,
making sure that the sweater cuff on the outside remains even all the way around.
then snip a hole in the brown fabric and add a plant or flower.
i added some single stems of yellow tulips and mini daffodils to mine,
keeping the flowers in scale with the size of the pot.
(and look at that last image on the right -
you can't see the lumpy gathered backside of the pot at all!)
i made three sizes of pots:
the large one seen in my tutorial, a medium one that is a paper cup,
and a small one that is a plastic cup.
arranged on my faux mantel, they create a sweet spring vignette
that i'll be enjoying for a few more months!
oh, that tipped-over real ceramic flower pot with 'dirt' falling out of it?
that's more brown sweater fabric 😏
shared online:
creatively beth | creative crafts linky party #141
thank you for featuring my project, Miss Beth!
spring, garden style, flowers, DIY, diy decorating, Sweet Sweater Originals, Sweet Sweater Potz, sweaters, crafting, decorating, re-purposing, up-cycling, trash to treasure, flower pots, plant pots.

.jpg)
.jpg)
.jpg)


.jpg)
.jpg)


ADORABLE, Debi! We will be featuring you starting Wednesday at the Creative Crafts Linky Party! Pinned and shared!
ReplyDeleteCreatively, Beth
thank you so much, Miss Beth! i so appreciate the wonderful opportunity you gals have created for bringing so many makers, crafters, and decorators together - and am honored to be featured. <3
DeleteIs it possible that sweater plant pots make me want to smile and feel happy? Well yes, because these do just that! So clever Deb, and I love how the most unique places inspire you!
ReplyDeletethank you so much for your very kind comment, Miss Donna! they make me smile, too! i may just keep them up on my studio mantel and restyle them each season ;)
Delete