my last post included these leafy branches
that aren't leafy branches at all!
the trees in my yard haven't yet put on spring buds or leaves,
so i had to find a way to turn some bare branches into props for photos...
i've done that before with paper flowers and paper leaves,
but this time i used a different material to make the leaves:
thick satin ribbon saved from gift baskets.
they turned out SO much more realistic than i had anticipated,
and i'm thrilled to share this idea with you!
.jpg)
when i cut the branches from my Brazilian Mesquite tree,
they still had the delicate 'stems' that the leaf clusters were on last year.
(the leaves are lovely and tiny but when they shed.... oi vey. what a mess!!!)
those stems made attaching the faux leaves really easy
AND also add to the realistic effect.
TUTORIAL
materials:
scissors . hot glue . fabric ribbon (mine are satin) . bare branches
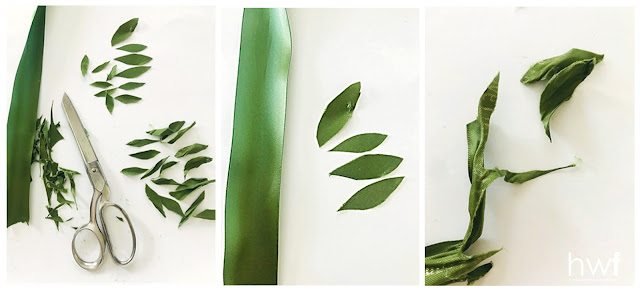
cut leaf shapes from the ribbon, varying sizes
so that you can put the smallest ones on the ends of the branches
and the larger ones toward the base.
i cut leaves from flat ribbon AND from the crinkled ribbon, from where it had been knotted -
and those 'crinkly' leaves are the thing that really gives this project a natural look!
so that you can put the smallest ones on the ends of the branches
and the larger ones toward the base.
i cut leaves from flat ribbon AND from the crinkled ribbon, from where it had been knotted -
and those 'crinkly' leaves are the thing that really gives this project a natural look!
i placed my branches firmly into a tall milk glass vase before applying the leaves.
starting at the tops of the branches, i used the TINIEST drops of hot glue
to attach one end of each leaf to the delicate stems on the branches.
my method is to put the glue on the end of a leaf,
hold it up to the stem, then pinch the bottom of the leaf to adhere it around the stem
rather than just flat to the stem. it gives a sense of movement to each leaf.
after the smallest leaves were adhered to the tops of the branches,
i worked my way down, increasing the size of leaves as i went:
.jpg)
.jpg)
you can see here how the ribbon leaves curl around the stems
and also arch and curl a bit, giving a realistic impression of unfurling spring leaves.
in my last post you saw my small 'Sweet Sweater Nest' perched in these branches...
i'm thinking of making more leafy branches to add to the wreath, too!
March 2025: Welcome to readers arriving from HomeTalk!
Thank you so much for visiting via the featured link in the HomeTalk email -
I hope you'll check out MORE of my diy projects below!
related content:
realistic paper fall leaves
scrap paper leaves
vintage sheet music leaves
pop art paper posies!
shared online:
funky junk interiors | new upcycle ideas #718
thank you for featuring my project, Donna!
pop art paper posies!
shared online:
funky junk interiors | new upcycle ideas #718
thank you for featuring my project, Donna!
spring,re-purposing,trash to treasure,natural elements,DIY,decorating,inspired by nature,tutorial,diy decorating,up-cycling,crafting,DIY leafy spring branches,faux leaves,fabric leaves.

.jpg)


.jpg)
.jpg)


Ribbon leaves?! These spring branches look like the real thing! I LOVE this look so much!
ReplyDeletehonestly, Donna, i was astonished at the result myself!!!! such an easy project with better than expected results is a WIN in my book! and i'm already planning a new version in the fall ;)
Delete