. -->
Showing posts with label shows. Show all posts

3.22.2013

sometimes, i really take the cake....

today is my birthday!
what better day to share a birthday cake idea?!

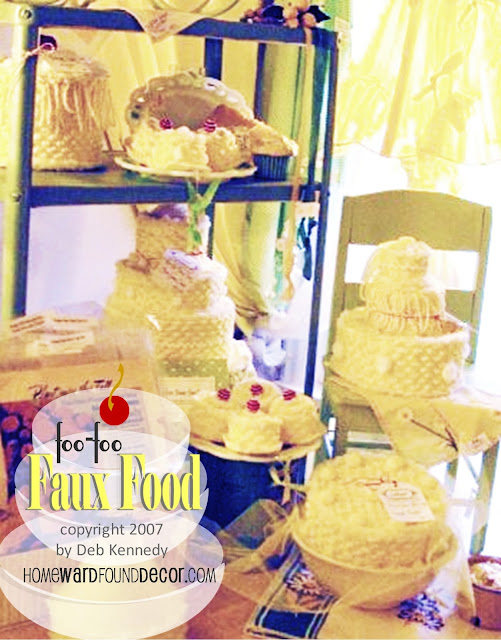
the photos here show an original product that i developed back in 2007, called
foo-foo Faux Food TM

i sold this line in my booth at vintage shows and vintage stores,
and now i'm sharing the idea with you here at HOMEWARDfound
because it's a fun craft to make, 
an easy way to decorate 
and can be customized for a birthday or holiday...
my secret
these are made using recycled metal cans and tins 
and recycled chenille bedspreads.
yup... clean fruit cans, tuna cans, cookie tins, and cracker tins in various sizes. 

here's the how-to:

* wrap the tins in the fuzzy, textured chenille fabric in any color, and glue on
 cookie & cracker tins are used with lids covered separately (so they are still usable for storage)
tuna cans and small fruit cans are used upside down

* glue on fuzzy yarn trims (like this white 'caterpillar' yarn) to the edges and tops 
 (swirl it on cupcakes, for example)
* you can use the fringed edges of the bedspread on the sides of the cake
so that it looks like piped frosting

* add a few details on the tops and sides,
using pom poms, beads, rickrack, and other trims

* stack the assorted sizes of tins to create fanciful faux cakes!

* using red pom poms or round beads gives the look of cherry toppers

i bet you'll find a bunch of ways to use them!
please note that if you make these for sale, you can not use my product name
'foofoo Faux Food'. it is copyrighted & trademarked.

___________________________________________________

since it's the first day of a new year for me,
i'd just like to offer a little 'shout out' to some very lovely friends
who have made the past year something wonderful.

in the face of huge changes in my life, they have been a
remarkable support and encouragement to me professionally,
always challenging me to
 keep moving forward...
and i could not have done that without them.

Michael at Inspired by Charm
Janet at ReStitched USA
Sharon at Launch Your Creativity

__________________________________________

2.05.2013

The Lollipop Guild


every year, the sweet-faced girl shown below
chooses an equally sweet theme for her 'Farm Chicks' antique show.
in 2011, she chose a candy theme - and i loved the graphic so much
that it was my inspiration for the little gift i made her
[just to say thank you for having me as a vendor]
i found some red and white cording at the fabric store, and used it to make two little lollipop pins.
i cut some words out of vintage sheet music and added them to the pins
['serena' was actually 'serenade' on the sheet music]
then i nestled them in a tiny box and embellished it with vintage trims.

this craft is so very simple, and makes a perfect accent on a gift tag, place card, 
or greeting card. here's how it looks on a manilla gift tag:


 and here's the easy 1-2-3-4 to make your own:
i used cotton baker's twine for the tags. a drop or two of glue is all it takes!
make 'em small for tags and larger for pins, like the ones i made for serena.
just cut out a circle as the backing for a pin, instead of using the whole tag.


1.27.2013

On Lucky Street

Welcome to Day 13!

as expected, the event i attended yesterday in the San Diego, California area
was OVER THE TOP INSPIRING!

the building has been transformed from an old printing company warehouse to a vintage mecca,
the perfect location for vintage markets, craft classes, photo shoots, and event prop rentals.

here are just a few of my photos of the amazing sets, decor, and props:
the next event will be held February 22-24 and even more details will be in place then:
the interior is being built out to resemble a charming country hamlet!
the marketplace hosts @ 20 vendors of vintage and re-purposed furnishings, decor, and apparel.

i could LIVE there. seriously!

visit Lucky Street Productions on facebook for more information about events, classes, and rentals.

1.26.2013

Pretty In Pink

Pin It


Welcome to Day 12!

 i am off on an adventure today, 
attending a local vintage show that promises to inspire me to no end!
this one:
while there, i'll be meeting up with a few friends 
who have all been vendors in the vintage industry...
[my peeps, my girls, my tribe!]
and i expect there will be a lot of great fun & laughter, 
as well as rapid shutter-clicking to capture it all in photos!

i can't wait to share it with you in an upcoming post!

in today's countdown post, you'll see some inspiring photos
of pretty pink Valentine's Day decor in my own home, from years ago.

you'll find today's post on
 

facebook!

[click button above for link to the HOMEWARDfound facebook page,
and look for the link to the newly-posted photos in 
the Valentine's Day Countdown Album!]


 stay tuned for the next post in our daily countdown, coming up tomorrow
here on the blog or on ONE of these social networking sites:


1.25.2013

Spell It Out!

wanna' share the love?
with a few straight cuts through wood and a sharpie marker,
you can create your own sweet giant lettered tiles!
.
before i share this tutorial.... 
remember this photo of my cement tile backerboard chalkboard from this previous post?
 see the part at the bottom that says
"use OLD WOOD GUTTER as chalk rail" ?

that's where this story begins!
we were hanging that chalkboard in our new home,
and discovered that the chalk rail just wasn't going to work there.
[it was in a hallway and the rail would have been ankle-height - need i say more?]

so i was holding the piece of old gutter, turned to walk into the family room...
and right on the enamel table in front of me was a Scrabble game tile holder with Scrabble letters in it.
they spelled out our last name. we've all seen this done, right?

i'd seen them sitting there every day,
BUT THAT  DAY
with the big ol' wood gutter piece in my hands
a big light bulb went off in my head as i thought of something NEW:
"the gutter looks like the game tile holder. just - bigger.
why not make letter tiles - BIGGER!?"

and so, we did:
we sold a LOT of them at vintage shows in the Pacific Northwest that summer!
i still have some of my own, and have a lot of fun making different words for various seasons.

*nope, there are no numbers on my versionsthey are not called Scrabble tiles. 
this product is 'inspired by', not a copy.


now you can make your own versions of these giant letter tiles  
with my quick & easy tutorial!

supplies: 
a piece of wood (details below)
sandpaper (fine grit)
sanding sealer spray
a black Sharpie fine point marker
clear varnish spray

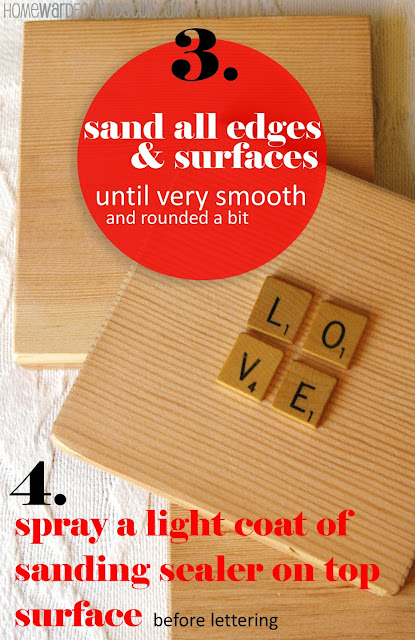
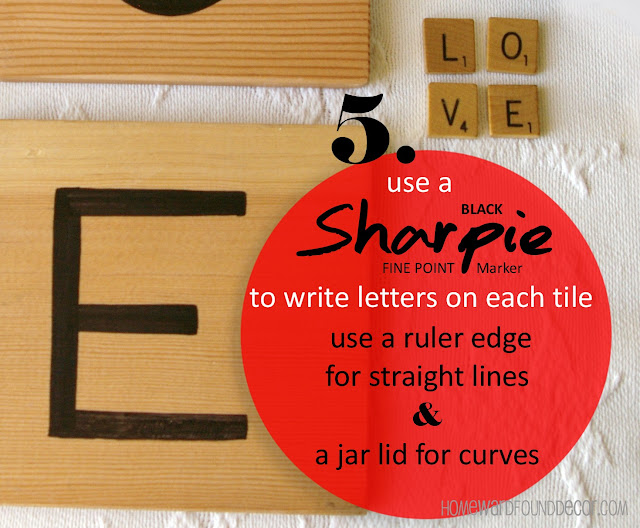
please READ THE INSTRUCTIONS IN THE PHOTOS
and then the notes under the photos...

 finish grade vertical grain douglas fir runs about $1.50 per linear foot - 
less than $10 for a 6 foot board, which yields 14 letter tiles.
[if you want to have a LOT of letters, grab two boards or a longer length]

quick note:
yes, you CAN use reclaimed lumber, old flooring, old fencing, 
or whatever you want to use to make your letter tiles.
the douglas fir grain & color gives the best 'just like the game pieces' look, though.

and yes, the guys in the lumber department at Lowes & Home Depot WILL cut it for you!
all you have to do is ask them to, and give them the 5" measurement. 
[you may be charged 50 cents per cut, but hey, it saves you the work!]

 sand the edges FIRST, then the tops - the tops look better that way.
then spray the sealer on the side that you will be lettering, and let dry.
[you can seal the whole thing if you want, but it's only necessary to keep the Sharpie marker ink from bleeding into the woodgrain.]

figure out what you want your letters to spell out, 
and add a letter to each tile using the black Sharpie marker.
 a straight ruler and a smooth curved jar lid will help keep your lettering crisp.

seriously, let the marker dry - if you don't, it will run when you spray the varnish on!

let the varnish dry 30 minutes, then flip & spray the back. spray the edges, too.
let dry at least an hour in a warm place to 'cure' the varnish before you use them.
now you have letters to make a sign with, or a trivet, or coasters
you can adhere hooks to the back and hang them up, or....?

and if you head to a salvage yard or the ReStore, you might just find a length of old wooden gutter to display them in:

feel free to PIN this image below for the whole tutorial!


shared online:


1.19.2013

Chalk It Up to Inspiration!


this particular post could not have been planned for a more perfect day...
Donna over at Funky Junk Interiors has a great link party every Saturday
and as i was preparing to upload my images, i saw that this weekend, her topic is...

well, if this isn't a marriage made in heaven, i don't know what is!
 so, if you are visiting me via Funky Junk Interiors, WELCOME!

over the years, i've made chalkboards out of some interesting materials:
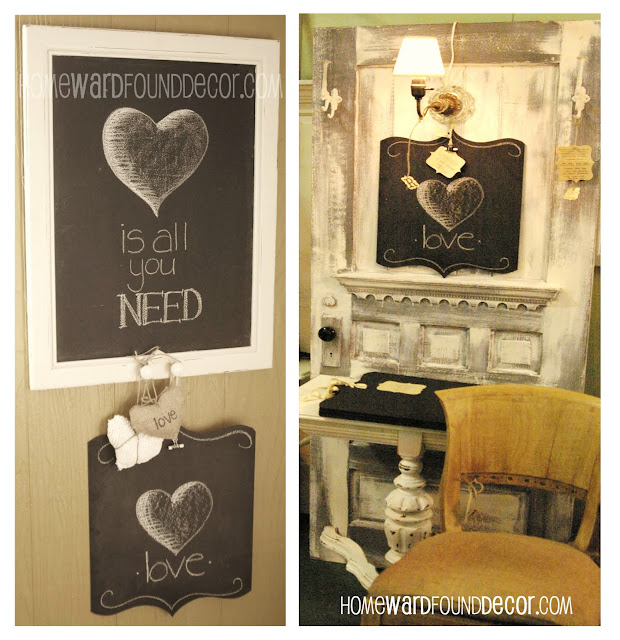
the one with the curvy edges? it's made from heavy cardboard! yup. 
the boards were stacked up six at a time and jigsawed to cut the ogee curves,
painted with chalkboard paint, had a hole drilled in the top, and hung from bias tape loops.

the one in a frame? it's a cheap thrift store painting!
it was really ugly, too... one of those where the print won't come out of the frame.
by painting right over that ugly scene with black chalkboard paint
and then painting the frame white, it looked brand new and totally fresh!
of course you've probably seen old doors used as chalkboards, like the one on the right above.
SO many uses for them, in just about every room in a home or business.
[top tip: great place to find inexpensive doors for this? 

 the chalkboard door with a table on the left above?
the hubs came up with the idea to use half of a drop-leaf table and an old door
to create a space-saving and very handy fixture for entry halls, landings, or small kitchens.
we made a lot of those over the years, in many different styles -
the old gray front door shown in the previous photo is one, too, using part of an eastlake table.

but hands-down, the BEST IDEA i EVER had 
for making chalkboards is this:

yep! use a sheet of cement tile backer board!
sand well and paint it, then drill holes in the corners and screw into studs in your wall.
it ends up looking, feeling, and SOUNDING exactly like 
an old slate chalkboard when you write on it!

i needed a chalkboard for my barn store, and saw that tile board sitting in the shop -
BADDA BING! an idea was born!
i also had some old wooden rain gutters on hand, 
so a piece was cut and attached to the wall just below the board to hold the chalk and eraser.

9.13.2012

Pumpkins, Remnants, and A Beautiful Mess


I am so very pleased to announce that my Original Sweet Sweater Pumpkins
are being sold by Kymberley Fraser in her beautiful retail shop, A Beautiful Mess!
Located in Agoura Hills, California, 
this 2-year old retail boutique is a mecca for stylish shoppers
including celebrities, designers, and media decorators.
It's just undergone a refresh for the season, and is loaded with fall bounty!

Kymberley will ALSO have a full harvest of my pumpkins in her always STUNNING booth
at the Remnants of the Past Antique Show in San Luis Obispo, CA in October! 

This show is produced by my friend Judy Watkins, 
and has been featured in many magazines and publications (recently in 'Where Women Create').
Rachel Ashwell named it one of her Top Five Shows to attend, 
and it is host to the very best dealers of antique, vintage, and artisan goods on the West coast.

That's a photo of Kymberley's booth from the June show... see what I mean?
Such inspiring presentation and stylish goods.
[I can't WAIT to see what she has planned for the fall show!]
I am honored that she wants to include my pumpkins in her lovely setting,
and I'll be heading up there with a van FULL of them for her!

I've also volunteered to be her slave during setup for the show, 
and will be in her booth for the event on Friday night and Saturday. (not Sunday, though).
I am looking forward to being at this absolutely wonderful show once again...

A Beautiful Mess
28875 W. Agoura Road Agoura Hills, CA


Remnants of the Past Antique Show
October 19 - 21 2012
Alex Madonna Expo Center
San Luis Obispo, California
www.RemnantsofthePast.com

 booth photo courtesy of 'A Beautiful Mess' by Kymberly Fraser