. -->
Showing posts with label Project HOMEward. Show all posts

8.04.2016

'pretty up' the pantry

The other day I went to the pantry to grab a snack, and just stood there staring. 
It was ugly. And disorganized. And did I say ugly? I was tired of looking at it.


It was TIME to DO something about it.


But there's no money to just go buy a bunch of containers and jars. Nope. 
So I did that thing I DO: I went foraging around the house looking for things to use!

PRETTY things. Things like baskets and trays and containers that would corral items
while bringing some style to the pantry - without spending a CENT.


What I found was baskets. Lord, does my Mom love baskets!

I found an entire wardrobe packing box and two other large moving boxes FULL of baskets out in the garage.
Up on the top of some shelves, I spied the wood harvest baskets
that I used to stage photos of my Sweet Sweater Pumpkins TM over the years 
along with a wood fruit crate.

I grabbed them ALL and got busy....


Here's how it went
(which is par for the course on anything relating to this house, I swear...):
I took a 'before' pic of the messy pantry. Then I emptied it, and took another photo.
THAT photo has disappeared. It's just....GONE. 
So the only 'empty' photo I have to show you is from earlier in the building process.
It took two tries to get the pantry the way I wanted it...
I ran out of containers the first time around, so I used the white plastic bins. HATE them.
Went into the guest room, the linen closet, the party supply boxes 
and found a few more baskets holding other things.
Swapped them out for the plastic bins, and was much happier with the result here.
There were items that I consider to be 'messes waiting to happen': molasses, syrup, honey.
To head off a disaster, I searched around for trays that I could put them in...

and I found some metal baking pans that don't get used very often. So I used them!
(why NOT? they are just gonna' sit in the cabinet doing nothing....)

On the top shelf, which has a TON of space, I wanted something really pretty...
So I arranged the crate, two large baskets, a few kitchen pots,
and a funky branch in a wood bowl up there to add some interest.
This isn't one of those high-style pantry photos you see staged to within an inch of its life
on Pinterest, or in a glossy magazine photo.
It's not the result of a bank-balance-breaking shopping trip at The Container Store.

It's just a pantry prettied up by using what was on hand... baskets. crates. baking pans. 

I'm not decanting the pasta into jars with chalkboard labels. 

I'm not covering the cake boxes with paper to match my color scheme.

I'm just opening those doors and smiling my head off 

at the order, organization, and style that I was able to add in about an hour
without spending a single cent.

7.22.2016

Paper Flower Power!

  Don't know what it is lately, but apparently I have blossoms on the brain!
I recently saw some gorgeous photos of brightly-colored paper flowers on Instagram,
posted by 'BloomBox_oc' - I tried to save an image to share here, but it wouldn't work.

Their photos reminded me of a paper flower that I won at an event, 
so I dug through some of my (still packed) boxes and found it...
it's the middle flower in that image above, made from old book pages and tissue paper
by a very creative vintage show vendor named Becky, from 'Whimsies'.

All that flower power inspired me,
 so I dug out a bunch of my own vintage paper and made myself some:
It was fun!
I haven't spent a lot of time doing creative things for myself lately, 
and this was a nice way to spend the hottest part of the day - 106 degrees. YIPES.

And when I was done, I had a buncha' blooms to put on my studio/office wall:
I haven't made time to do many creative things for myself lately, 
and this one just made me smile.
Just in case that photo above doesn't make the scale clear, here's a reference shot:
Yeah, these babies are HUGE!

This project was was fun, easy, and I already had everything I needed to make them -
which is pretty much how most of my projects come about, anyway:
I get inspired and then dig through what I have to 'make it work'!

Through the process, I snapped some photos and put together a simple tutorial:


Looks like I'll be making more in the near future, too...
my Mom saw these on my wall and asked
"I think these are exactly what I need for the wall over my bed!
Can you make some in aqua and tan and white, to match my linens?
"
Why, yes, Mom, I sure can!  see more of these here!

Shared Online:

Cupcakes & Crinoline | Project Inspire{d}


4.25.2016

A Funny Thing Happened on the Way to the Kitchen....

I've been documenting the progress of our house all along - from bare ground to finished home.
One day, I was looking through my images to find something I needed,
and I suddenly realized that there was something VERY VERY WRONG going on.

I actually flipped back and forth through a few particular images several times, 
furrowing my brow and wondering what was catching my eye - 
because I literally couldn't figure out what was bothering me.
I looked for a while more and then
BAM!
I saw it. and I laughed.
Because.... well, it's kinda' hard NOT to see.

But the thing is a LOT of people didn't see it.
Not the installers, not the construction lead, not the supervisor, and not the customer service rep.
Honestly, *I* didn't even notice it when I was standing IN THE ROOM in front of it.
We've been in this house all along, sneaking in after hours and on weekends
to keep track of the progress...
dancing with joy as every phase was completed and it became more and more 'real'.
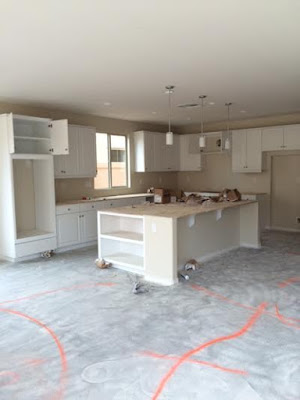
I even snapped that photo used with the Project HOMEward logo and didn't see it!!!
It took the perspective of comparing several photos to reveal the problem...


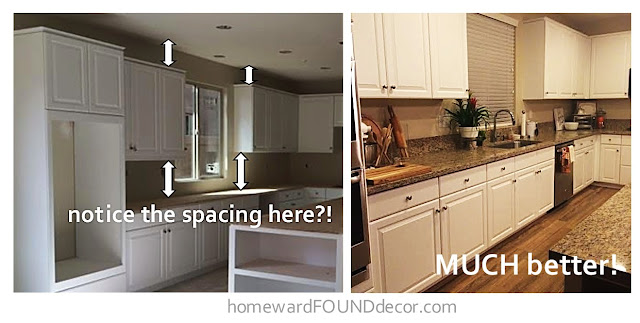
Let's see if YOU can see it:
Well??? Didja' SEE it?
Let's try one more time:

dear heavens.
THOSE CABINETS!
yeah. somehow, one entire HUGE section of upper kitchen cabs was installed WRONG.
Like, 'six inches too high' wrong!

After seeing the photos, Mom and I went back out to the job site.
Looked at the left side, then the right side.
Yup. WRONG.
The right side was hung closer to the ceiling. 6" closer!
Heck, I could barely reach the microwave handle... and Mom just looked up (WAY up) at it forlornly.
I stood in front of the sink to make sure I wasn't seeing things... nope.
BIG problem. HUGE. (ThankyouJuliaRoberts)

Then we went to the model, and I measured the cabs there. uh huh. no problems:

SO we went to our sales rep, showed her my photos of our cabs,
and she screeched. Then she laughed.
Then she got on the phone and called the supervisor and said 'We gotta' FIX THIS! NOW!'
You see, our final walk-through was the next day.

We went home, assured that they would address the issue in time for our walk through.
And when we showed up the next day, they had lowered the entire bank of cabinets by 6",
which included cutting the granite backsplash behind the gas cooktop AND repainting the upper wall.
All in one day.
And it looked AMAZING:

Our customer service rep, Chip (yeah, really... and his wife is Julie, so he calls her JuJu: Chip and JuJu ;) ) 
was completely, utterly stymied by the fact that I had caught a mistake that over five people had missed.
THIS is one more reason why we are so impressed with Pardee Homes...
if there's a question, a problem, an issue... they FIX IT. Promptly.

So... let's see if I can't follow that lead and get back in the groove here on the blog,
to share more of this new house process with you in the coming weeks, OK?!
Thanks for hanging in there with me!

4.18.2016

Orange You Glad?!

My friends, I just can't EVEN begin to tell you
what a pain some parts of this move have been......
and I won't try. You don't need to hear me whine. (WINE, yes. Whine, no.)

Suffice it to say that I am bogarting wifi from a friend right now just to write this post.
Rather than be rude and take up her time, I'm just popping in here to say
"Hi, everyone! I'm still around! 
     Hang in there with me and the hWf blog will be back as soon as possible!" ;)
Until then, I thought I'd share some of the photos from my design files 
that are serving as inspiration for our Project HOMEward decor scheme.
 Yep, that's ORANGE!
Paired with neutrals and some industrial farmhouse style, 
things are shaping up slowly but surely...
As soon as I have internet service I will gladly share more photos!
(Don't ask about the way Verizon handed things over to Frontier on April 1
and left customers in the lurch...)
Until then, make sure you follow me on Instagram and Facebook!

3.30.2016

It's Moving Week!

It's finally here...
Today, escrow closed and Mom got the keys to the new house!

We popped the cork on a split of bubbly and toasted her new digs, 
our new adventure, and spoke a blessing over the house.
(that blessing has a story, and I'll be sharing it in a later decorating post)
We also offered a heartfelt 'Thank You' to Dad, for making sure Mom was taken care of
so that she could make sound decisions - like buying this house and selling the old one.
I am so grateful that he made sure she'd be financially okay without him.

...and then we walked around the house, and smiled, and talked about decorating.
 I just can't say enough good things about Pardee Homes. Seriously.

The sales rep we worked with, Linda B, was a ray of sunshine straight from the heart of Texas. The woman has a way with words and her sweet voice that gets things DONE.
There were no major issues with the house, but there were a few things along the way that we noticed and asked about. Linda clarified the process for us, and handled any glitch with grace and efficiency. The company addressed them immediately  - done, and done.

Our project manager/supervisor, whom our designer Lissa dubbed 'Super Scott', was simply amazing. The man was on top of EVERYTHING and when a glitch did come up, there he  was, making sure things were up to snuff in record time. I don't think he ever goes home.

Even our customer service rep, Chip H (He told us that his wife's name is Julie, so he calls her JuJu, instead of JoJo! Chip and JuJu!) was on totally top of things. As we did the walk through on Monday, Chip tagged little things like paint drips, a dirty window, some grout visible on the floor tiles... and I swear to you, within half an hour there was another CS agent - Alan - on site doing all of the pickup work! By the time we finished the walk through paperwork, the pickup list was done! The one thing we missed was a crack in one of our gorgeous floor tiles - but Alan caught it and called the tiler, and as we walked out of the house, the tile guy was already replacing the tile! This level of customer service is phenomenal anywhere, but from a production builder? Color me VERY impressed!
So now, we're packing the last boxes so that when the Bekins moving crew arrives at 'the old house' on Wednesday morning, everything is ready for them to load up. They'll be packing up the kitchen, too, because we trust them to pack it well for transport. And Thursday, they'll deliver to and unload into the new house!

Speaking of that unloading part...
I've been watching Joanna Gaines carefully, to master a maneuver she does that I have always had trouble with: 'The Designer Point'. I've never been good at it. I just jump in and grab things and start moving them myself. Well, not any more! I'm going to utilize 'The Designer Point' - paired with a smile, of course! - to direct the crew as THEY move the heavy stuff: "Yes, that table will go right over there in the corner of the living room... oh, the other corner. A bit closer to the window, maybe? Yes! Thank you!" ;)

3.24.2016

On The Surface...

 One of the best things about a brand new house?
You get to pick EVERY surface and option!

I shared recently that Mom is an avid fan of HGTV's Fixer*Upper
and of Joanna Gaines' decor style.
Mom's catching the fever and has made decor choices that will give the house
a wide-open farmhouse/beachhouse feel with some industrial touches...
and her palette choices are warm neutrals with texture.

We have more texture to add in the future, but this is what the builder will supply:

*The kitchen counter tops and island [top left]
are a tan, brown, black and white speckled granite.

*The wall paint [middle left] is tan/sand
(almost exactly what she has in the current house, and what I had in my island home).

*All of the trimwork is a crisp white.

*The counter tops [tiny white square]
in baths and laundry are solid white Silestone.

*The cabinets [top right] in kitchen, baths, & laundry room are solid white raised panel.
 .
Then there's the FLOOR


Mom wanted all of the flooring to be the same throughout the house - 
that was the approach in the model of our plan,
and it really made the space look bigger because the rooms don't have different flooring.
We knew from prior experience that there would be no Pergo. No bamboo. 
No hardwood designs on pressed mdf. And NO CARPET.

Which left real hardwood, or tile.
Only the builder won't put hardwood in baths, laundry, and kitchen.

Tile - the only option left - was very unappealing.

Until we found something called 'wood look tile'. 
Skeptical, but intrigued, we went to the showroom for our 'Options Design Appointment' 
with a list... and about a million questions.
The lovely designer there pulled about a dozen samples of 'wood-look tile'...
and my Mom IMMEDIATELY chose this one:
 Do you hear angels singing???! ;)

It looks more like 'real' hardwood than some of the hardwood samples.
It's the perfect tone - warm, not gray, not yellow.
It coordinates with the warm tones in the granite counter tops,
and there's even light beige/white in the pattern to match the cabinets and walls.
The grout (not shown in the photo above) is a medium-tone found in the grain, 
so the planks will not have dark lines separating them.
It will look for all the world like a rustic hardwood floor throughout the entire house!

It's very VERY Magnolia Homes/Fixer*Upper style, don'tcha' think?!

Last week, the contractors installed that tile in the house.
We approved the tile in the showroom and they started laying it the next day.
We gave them three days and then we drove out to take a peek... 
they were still laying tile on day four, but the crew let us in!
I screamed when I saw it. I really, honestly screamed.out.loud. 

I. Love. This. Floor.!
It is so far beyond perfect - and it wasn't even grouted or cleaned yet!
I just know that when I walk in there with Mom next Monday for the walk through,
I'll scream again. I may need a defibrillator, to be honest.

Once we are in the house, we'll be making plans for the backyard -
and Mom is thinking that she wants this tile to continue out there to connect the spaces.
We'll be checking on the logistics of that in weeks to come!

In the meantime, we're full steam ahead with packing and prep.
After inspection, we'll do our walk through, get the keys, and move in...
IN ONE WEEK!

shared online:

One Project Closer | Creativity Unleashed