. -->
Showing posts with label makeover. Show all posts

9.29.2016

Perfectly Imperfect

This is so easy it's ridiculous...
but that's the best part!
Because whether you have old fall decor pieces that have lost their appeal
or you ran across a steal of a deal at the thrift shop,
paint covers a multitude of sins... and a whole lotta' UGLY.

Like, um, those badly-painted ceramic pumpkins in the 'before' shot.
Sorry, but those be UGLY!
But at a buck each, I couldn't pass them up. I have a weakness for a bargain.

My PLAN was to paint them to look like galvanized metal.
Great idea - but I am just really short on time right now.
They sat on the floor in my studio (see before shot, again) for two weeks,
staring at me as if they were demanding to be 'fixed'. 
One day, I'd had it. I was really sick of looking at them.
So I went to the garage, grabbed a can of semi-gloss white paint, 
and slapped two coats of paint onto the pumpkins.

LO and BEHOLD: fall decor  - that looks like I just got it at HomeGoods or Target!

I just used some leftover trim paint. Not a new can of spray paint.
(tho if I had HAD a can of that, I probably would have used it instead).
Craft paint would work, too - heck, FINGER paint would work!

The thing is, it's not perfect. 
I can see the imperfections and bumps from the OLD paint job,
and the brush marks from my 'slap-dash' paint application.
However, I.DON'T.CARE!

Once those freshly-rejuvenated babies were put into a display in my entry,
the flaws aren't apparent at ALL. They look absolutely FABulous there:

... and that's a lesson I apply to life, as well as decorating:

Nothing's ever going to be perfect. 
But it can still be fabulous when we make the most of it.

I'm far from perfect or flawless, and most of my projects and decor aren't, either!
I'm not in this to impress anyone or monetize my blog, 
but to share and inspire you to just TRY your hand at new things.
It's probably not gonna' turn out perfectly.... 
but if you don't tell anyone, they probably won't notice anyway!

So, dear readers, dig out the ugly decor stuff you're hiding
and give it a simple coat of white or black or neon orange paint - 
because sometimes you can make a big change in just five minutes.

PS: read the story of 'Jack', my other white-painted ceramic pumpkin

One last thing:
Thank you to the lovely ladies who ordered pumpkins yesterday...
I appreciate your enthusiasm and support over the years, 
and am happy that you were able to snag the last of the Originals!
Bless you all <3 

9.09.2016

Easy Chalkboard Makeover!

A year and a half ago, I discovered a HAUL of FREE stuff behind a store...
(don'tcha' love it when that happens?!)
There was a HUGE 12' tall 4' wide white hutch with shelves
which I donated the hutch to Laura's House ReSale Store, where I was creating visuals.
(the store ceiling is over 20' high so that thing works perfectly in there!).

And then there were THESE babies:

Two chalkboards that were a bit worse for the wear,
with peeling paint and dirt for DAYS.
I kept them anyway! They've been in storage ever since.

I got inspired recently, and pulled them out of the garage for a makeover...
after I cleaned them, repainted the black chalkboard surface with flat black paint,
and covered up the dark red trim with flat white paint,
I got to work on the lettering.
Here's a simple way to do the lettering:

Determine what you want to say, and what font to use, and how large it will be,
then print or draw it onto plain white paper - use pen or pencil.


Flip the paper over, and use a white crayon to color across the back 

of entire area where the words are on the front.
(Make it a pretty thick coat of crayon for it to work best.)
Flip the paper back over, carefully set it in place on your chalkboard surface -
wherever it is that you want the words to be situated - 
and then use a pencil or ballpoint pen to trace back over the original lettering.


Put as much pressure as you can on it without tearing the paper OR moving the paper.
When you've traced the whole word, carefully lift the paper straight up.
You'll have a perfect outline in white crayon of your lettering.

Now just fill it in with white paint (if you want it permanent) or with white chalk.
I used very small brushes to apply flat white paint on mine,
then I added detail using a black fine-point sharpie marker:
The 'Menu' chalkboard now hangs next to our kitchen pantry,
and the 'home SWEET home' one is in our entryway.
They add a crisp counterpoint to all of the neutrals in the decor,
and offer a place to personalize greetings for our guests! 

(pinnable images)

Want another easy chalkboard project?

Check out my tutorial for creating a chalkboard, below:
my secret? use a sheet of cement tile backer board!
sand well and paint it with several coats of flat black or chalkboard paint, 
then drill holes in the corners and screw into studs in your wall.

I used a piece of an old wood gutter as a bottom rail, to hold chalk!


It ends up looking, feeling, and SOUNDING exactly like 
an old slate chalkboard when you write on it!
(RETREAT was my former business in the vintage industry)

shared online:


Cupcakes & Crinoline | Project Inspire{d}

8.18.2016

project homeward: coffee table makeover

In the course of our move to the new house, we had to decide what to keep.
The coffee table was a keeper, simply because we needed one and didn't know what we might want later.
Later, we discovered that while the glass top was totally out of character for the room,
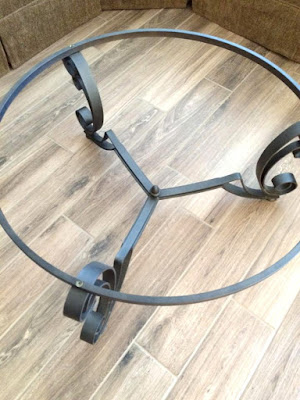
the nicely-shaped wrought iron base was pretty cool, even if the charcoal color wasn't.

So what can you do with a pretty cool metal table base that's the wrong color?
First, you paint it!
I chose an aged rust faux finish because it coordinates with another decorative element
that I can't share yet (because it's not in the house yet).
I use a particular process and products to achieve this effect,
but I'm not sharing that.
Read my comments at the end of this post in regard to that....

Moving on....


...after the base was painted, I brought in a cable spool top that we had purchased.
(tearing these cable spool suckers apart is a hefty job,
and I was happy to pay someone else who had already done the hard part)

I cleaned it and thought about sanding it down (for all of ten seconds) then had a better idea:
paint it! 
It's easier, yes, but also - look at that photo on the right above:
Everything is BROWN. Floor. Table. Sofa. SOOOOO much dark brown.
On the other side of this big open room is the kitchen with white cabinets....
so I needed to pull some white over here into the living room to balance it.

Some flat white paint dry-brushed onto the wood took care of that in short order -
applied heavier in some areas (so it would cover up the stamped words) and lighter in others.
I didn't sand this, I just applied the paint with varied pressure.

In the end, it's got a kind of vintage beachy farmhouse worn look that I love.
Actually, years ago, I found a table top that looked very similar washed up on the beach...
I hauled it home to my island farmhouse, and put it on a pedestal as a table.
I loved it. And I love this.
(My dining room table is gonna' get this same treatment soon!)
The paint dried quickly because it was such a thin, dry application...
so I was able to put the succulent planter in the center.

Then I looked at the holes where the bolts had held the cable spools together,
and thought 'votive cups would fit in there'....
and when I located an old candleholder that we had,
it held exactly SIX votive cups with rounded bottoms
that fit into the SIX bolt holes so perfectly
that it was like they were designed for each other!
I love it when a plan comes together!

shared online:
Cupackes & Crinoline
| Project Inspire{d}

So.... let me say this about my aged rust faux finish 

*just so it's clearer here than on my fb page 
and will not spark a controversy with anyone*:

Over the course of fifteen years or so,
as I was refurbishing furniture and accessories to sell at vintage shows and painting murals,
I learned a lot about paint and techniques. I invested a lot of time practicing the art of faux painting.
I developed some of my own processes & mixtures that are my own 'secret' formulas, so to speak.
Big companies like Disney, Coca Cola and Chateau Ste. Michelle Winery refer to this as 'proprietary information'  - and it is basically highly sensitive and guarded stuff.

That's my faux rust technique/process/procedure/products, folks.
Proprietary, Secret, and highly guarded information. Mine.


Sorry, but I'm not sharing it.
Someday, I may develop it into a class, or a book, or even a product line.
Gee, I'd love to make money from one of my ideas!!! ;)
Anyway, that's the reason I refer to it as my 'secret formula/secret weapon' etc. -
 because it's a secret, and I'm not telling.
Not to be rude to anyone out there, but just to protect my own interest.
( I have shared my faux concrete painting technique -
including my 'secret ingredient' for realistic effect -
and y'all loved it. It's a really popular post! And I am glad you like it! )

But this is different, and I just want to be clear about not divulging the specifics of it.
Being up front here, and asking you not to ask me to -
AND requesting that if you think I'm greedy or mean for not sharing it,
just.keep.it.to.yourself.please
Not interested in hearing any rants about how I owe it to the public to divulge all of my secrets.

8.11.2016

project homeward: lovin' the laundry room

Since there are limited projects I can undertake right now, 
I'm focusing more on the 'organizing' part than the 'decorative'.
I try to work some decorating into everything, though ;) 

That was the case with the laundry room project... 
make it work well, AND make it pretty!
...and can I just say first what a JOY and a BLESSING it is to HAVE a laundry room?!
To not have to schlep everything out into the garage where the dust bunnies reign?
After spending a lifetime doing just that, my Mom is positively giddy over having this room!

Up above you see a 'before' on the left and an 'after' on the right.
It's small stuff, really it is - it just all adds up to a big change. And I did it all in one day!

I cleaned up the exposed shelves, arranging the contents as uniformly and neatly as I could,
many of them contained by function in simple plastic containers from Dollar Tree.
Then it was time to make it LOOK good!
I began with the tall cabinet... three coats of some white semi-gloss paint 
(which was the trim paint that we brought with us from the old house)
and it looks fresh and new - and also looks less 'heavy' in the small laundry room.
It now holds reusable fabric shopping bags and stuff we take to the pool!

You may remember that cabinet from this Thrifty Tropical Makeover post,
where it's shown out on the back patio at my parent's old house:
We're just re-purposing what we already have, saving money and being creative!
(Yes, we brought the patio furniture and the swing, too... more of them soon)

So as long as I had the paint out, I decided to get creative...

That space over the shelves is HUGE and needed a decorative touch.
I went into the garage and grabbed one of four vintage cabinet doors that I've had for a few years
(found them by a dumpster near my former storage unit!)
and painted a vintage-looking sign:
blank door, cleaned up                                   measured & penciled lettering  

 painted lettering first coat                           second coat, with more detail added

...and my BIG TIP? Use a 'Magic Eraser' sponge to erase the pencil marks! ;)
It won't leave marks or affect the paint finish like an actual eraser does. 

PS: yes, I freehand stuff like this. 
I've had years of practice painting things - from signs to furniture to murals - 
and I frankly don't want my signs to have a computer font that everyone else uses from a template.

The sign took me about half an hour, start to finish.
It fills in this big space, adding some contrast, visual punch, and graphic interest to the room.
It's actually the first thing you see when you look through the doorway...
Because I knew that there would be items sitting in front of the sign here,
I didn't make it complicated. Just simple letters.

After that sign was done, I made another one... using an old sign from one of my show booths...
 I repainted it white, sanded the edges to rough it up, and added the letters and graphic. 
I like the way it LOOKS - but I like the way it WORKS even better:
The hand towels hanging on it cover the unsightly box where the water hoses connect! 
(The washer & dryer sit opposite the shelves shown in the other photos.)

In a plastic storage bin out in the garage
(you've figured out that the garage is basically a storage unit filled with boxes, right?! No cars yet!)
I found bags of  heavenly handmade soaps and bath products from Tamila at Urban Farm . 
These were in my beautiful island farmhouse - in storage since I left it five years ago. 
They smell SO good, and look so gorgeous -  I knew I wanted them on display again.
And then I remembered the jars! Mom saves jars. BIG jars.
(we eat a lot of Kalamata Olives, what can I say?!)
I grabbed the jars, and quickly cut some stickers to cover up the original labels.
No, it's not cheating to not remove the original labels, OK?! 
It's lazy, but it's not cheating!


When I filled the jars with the soaps and bath salts, and put them on the shelf,
the room just bloomed with beautiful scents. It really does smell as good as it looks!
Plus, dig that sweet little label that was on one of the bath salt bags - JOY. uh huh.

You see some wrapping paper in there, along with a few plastic bags too...
AND a tiny tin can  - this is his backside. 
His front is a Pumpkin Face - one of my original Painted Pails.
The 'bucket' holding the plant on top of the cabinet is a stack of plastic pumpkin buckets, facing backward.

This stuff is here simply because it's orange...
I'm a sucker for a color story!

shared online:

cupcakes & crinoline | project inspire{d}

8.04.2016

'pretty up' the pantry

The other day I went to the pantry to grab a snack, and just stood there staring. 
It was ugly. And disorganized. And did I say ugly? I was tired of looking at it.


It was TIME to DO something about it.


But there's no money to just go buy a bunch of containers and jars. Nope. 
So I did that thing I DO: I went foraging around the house looking for things to use!

PRETTY things. Things like baskets and trays and containers that would corral items
while bringing some style to the pantry - without spending a CENT.


What I found was baskets. Lord, does my Mom love baskets!

I found an entire wardrobe packing box and two other large moving boxes FULL of baskets out in the garage.
Up on the top of some shelves, I spied the wood harvest baskets
that I used to stage photos of my Sweet Sweater Pumpkins TM over the years 
along with a wood fruit crate.

I grabbed them ALL and got busy....


Here's how it went
(which is par for the course on anything relating to this house, I swear...):
I took a 'before' pic of the messy pantry. Then I emptied it, and took another photo.
THAT photo has disappeared. It's just....GONE. 
So the only 'empty' photo I have to show you is from earlier in the building process.
It took two tries to get the pantry the way I wanted it...
I ran out of containers the first time around, so I used the white plastic bins. HATE them.
Went into the guest room, the linen closet, the party supply boxes 
and found a few more baskets holding other things.
Swapped them out for the plastic bins, and was much happier with the result here.
There were items that I consider to be 'messes waiting to happen': molasses, syrup, honey.
To head off a disaster, I searched around for trays that I could put them in...

and I found some metal baking pans that don't get used very often. So I used them!
(why NOT? they are just gonna' sit in the cabinet doing nothing....)

On the top shelf, which has a TON of space, I wanted something really pretty...
So I arranged the crate, two large baskets, a few kitchen pots,
and a funky branch in a wood bowl up there to add some interest.
This isn't one of those high-style pantry photos you see staged to within an inch of its life
on Pinterest, or in a glossy magazine photo.
It's not the result of a bank-balance-breaking shopping trip at The Container Store.

It's just a pantry prettied up by using what was on hand... baskets. crates. baking pans. 

I'm not decanting the pasta into jars with chalkboard labels. 

I'm not covering the cake boxes with paper to match my color scheme.

I'm just opening those doors and smiling my head off 

at the order, organization, and style that I was able to add in about an hour
without spending a single cent.

7.07.2016

Singin' the Blues...

Nope, I'm not sad that it's summer!
It's just that as the days heat up, the color blue can REALLY cool off our homes...
a shot of blue hues can bring calming energy and a cool (literally!) vibe to your decor.


Find some true blue hue inspiration for your summer rooms here:

Don't be blue, baby! Just use it to decorate with ;)