. -->

hello! don't miss all of my sidebar content - click 'view web version' on your screen!

Showing posts sorted by date for query dream. Sort by relevance Show all posts

4.02.2013

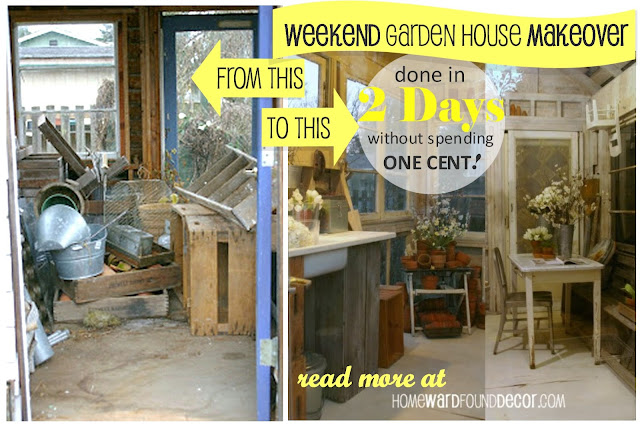
Garden House Makeover!

Yes, i REALLY did do this makeover in two days!
i think if that you see it and realize how absolutely possible it IS,
then you can take on a Spring Cleanup Project like this one, too!

here's what happened last winter (2012):
it was january. in seattle. COLD. rainy. gray. depressing.
i was ACHING for spring.
 and when i looked out into the backyard of the sweet little cottage i was renting,
there was a little garden house (potting shed, she shed, garden shed)
that the talented owner had made from salvage.
and it was full of junk. 
some of the junk was the house owners, and had been there for years.

some of the junk was mine, and had been dumped there the month before when i moved in.
the space was totally unusable.
but i knew that with a good cleaning job,
it could be a FABULOUSly usable space - and a stylist's DREAM!

so i asked myself these questions:
* what junk that is thrown in there can be used in a new way for storage or decor?
* what junk/stuff that i have in storage or in the garage can be used in there?
[and let me tell you, i had a LOT]

on Friday, i gathered up all the stuff i was going to use, and sat it outside the garden house.
i was ready to begin the project on Saturday morning
and DETERMINED to have it done by Sunday afternoon.

a lofty goal, especially considering that it looked like THIS inside on Friday:
Saturday morning, i began by emptying out the garden house...
which made it look a LITTLE bit less awful:

the old screen door that i had was hung on the INSIDE of the back doorway
[with the glass door swinging open to the right, outside of the garden house,
this was the only way to make a screen door work there.
and i had one, so i wanted to use it.]

after that, i grabbed two partial gallon cans of white paint left from painting furniture,
and watered them down to a 50/50 mix.
i used that to paint all of the window edges and door trim and doors, and floor.
there was about a half can of the whitewash left, so i added more water
and used that really thin mix to wash all of the walls and beams.
the wood was SO dry that it literally sucked up all of the paint/whitewash!
i sat one small heater inside the garden house, just to be sure it would dry.
and left the heater on overnight with the doors closed.
[NOTE: this was a very safe contractor's heater on a sturdy base, not a household heater.]

on Sunday morning, i started moving in the furniture...
on the left side of the entry door:
one tall old crate [that had been in the garden house] and
two of my own large wood crates, stacked on their sides
formed the supports for my enamel kitchen sink
[been hauling that around for about ten years...]
there was no running water, but the sink and it's attached counters worked great for potting plants.
had i stayed there, i would have run the garden hose through the wall and into the sink.

a pegrack made from old fence boards and ceramic pegs for electric fences
was hung over the sink for storage.
and an old aluminum light pendant was hung above it all
[attached to a heavy-duty construction extension cord, that ran to an exterior plug on the house]
in the back corner, an old wooden chair that i 'rescued' from a dumpster
[and have subsequently used for years in retail store & seminar stage displays]
holds my medium and large terra cotta plant pots in unusual ways:
there's a metal industrial bread pan on the floor holding pots,
and there's a metal industrial muffin-top pan sitting across the arms of the chair holding pots.
a few others sit on the chair seat under the muffin-top pan.

all of the tiniest pots sit up on a beam between the studs.
[i saw that idea at Christiansen's, one of my fave nurseries]

on the right side of the entry door:
there had been a long wood park bench inside the garden house (the owner's),
and i placed it under the large window. over the window, i hung another one of the pegracks.
it's not shown in the photo below, but i later hung a large white lace bedspread from those hooks
to block out the VERY ugly view of the neighbor's yard. it still let the light in, which was perfect.

i sat an old enamel-top table (roadside find!) in front of the bench,
and added one of my metal chairs to the other side.
(the other four matching metal chairs were at a patio table in the backyard)

 above the table, a metal floral chandelier that i have used for YEARS was hung from the rafters.
[you've seen it painted bright green in a past office post!]
the chandy's electrical cord was connected to another heavy-duty contractor's extension cord 
that ran to an exterior plug on the back of the house.
[the cord ran down the fence line to the house]

with all of the major pieces in place, it was time for the details...

here's a photo of the finished interior on Sunday afternoon:
everything that had already been inside the garden house was used.
i added a LOT of my own stuff - furniture, lighting, decor & garden elements.
but i did not spend one single cent on this project!

 here's what i did a day later:

the garden house's exterior didn't really need much work - 
nothing more than a removal of some old hops vines that had grown up the side
and the addition of a 'porch light' under the existing glass window 'awning' over the door.
[the light was a plain metal worklight from Home Depot that i had on hand,
and the cord ran under a board into the extension cord already inside]

i also hung two small metal 'shelves' from IKEA, one under each window,
and loaded them up with some terra cotta pots.
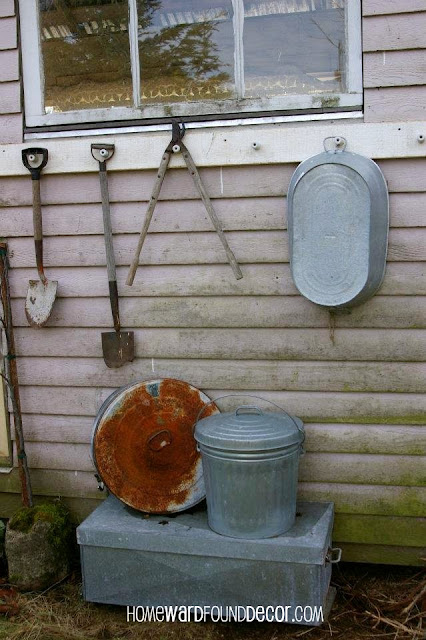
around the side of the garden house, another one of my original peg racks was hung outside
to hold large galvanized buckets and old garden tools.

and later that same day
i got busy shooting photos for upcoming magazine and blog projects:
 ...and more that i'll share in an upcoming post!

Then the NEXT day, THIS happened:

yup... it SNOWED!(pretty, isn't it?)
i don't live in that little cottage in Seattle anymore, 
but i sure have fond memories of this project and the photo session.
thank you, Todd, for the freedom to do this to your place!

so what are YOU doing this coming weekend?
maybe it's time to look at that garden shed or back porch in a new way...
there's a LOT you can accomplish in just two days!

shared online:

cupcakes & crinoline

green willow pond 

jennifer rizzo's fabulously creative fridays

2.10.2013

Stop the Presses!

Pin It


Welcome to Day 27!

i had a completely different post ready for today...
then i went to Barnes & Noble yesterday, and spied something SO FABULOUS
that it is just too good NOT to share!


i don't know why they do it, 
but Barnes & Noble offers reprints of the original 
1800's - 1900's Sears, Roebuck & Company catalogs!
yes, the same ones that used to be dropped with a THUMP onto your porch each summer,
just in time to pick out 'back to school' clothes and dream over toys for Christmas. 

i spied that volume on the sales shelf and grabbed my phone to take a shot to share
[while an older gentleman on the same aisle looked at me suspiciously...]

inside the book are hundreds of pages with thousands of vintage images 
and words in antique typography
that would be PERFECT for paper crafts! 
do you create collages? mixed media art? 
are you like me and wrap everything that's boring in paper of the vintage variety?
this is just a fabulous solution that saves you the time and trouble
of rooting through boxes in barns, antique stores and thrift shops 
to find old magazines for your projects.

those paper crafts shown in yesterday's PARTY post
you could totally make that stuff with these catalog pages - instead of sheet music.
for any holiday or season!


1.16.2013

More Office Organization Ideas!

 WOW! I can't begin to tell you how much traffic my office organization post
has generated!
it seems EVERYONE is looking for ideas and inspiration
to make their creative spaces work for them...
i want to thank you ALL so very much for coming to visit me from hometalk and pinterest!

I've located MORE ideas & images to share from my archives!

In that post shown above,
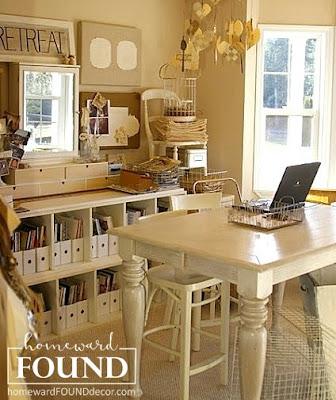
you saw images of my neutral color vintage-style office/studio space in dream house C.
the images i found are of farmhouse B, and cottage house A.
[i know that's confusing - i moved a lot! imagine how i felt!]

the great thing about moving a lot is that i discovered many ways 
for the fixtures and accessories that i had 
to work in ALL of those rooms, in ALL of those houses:
the IKEA shelf unit, the tall work table, the old shutters, the shallow IKEA drawers
were workhorses that i could fit into almost every one of my offices.

by using inexpensive paper from dollar tree and target, or thrift stores, 
i could create a whole new look in each room... sometimes in the SAME ROOM
[what can i say? i'm a decorator. stuff HAS to change! that's why i like doing it on the CHEAP!]

here's how my office in house B looked for awhile:


 the dollar store is a terrific place for cheap supplies to spiff up your office!
from wrapping paper and gift bags to file folders, stickers, scrapbook paper and tote bags,
there are a lot of paper and fabric items there that can be used to 
contain, separate, organize, cover, and decorate your office supplies...
it's also the easiest, cheapest way to take a bunch of old things like  boxes, tins, and clipboards
and make them beautifully usable again!

 by coordinating the color and patterns of the components, 
you'll instantly add a visual update AND a cleaner look to your office!
the selection of paper and fabric goods was gathered up at Dollar Tree stores 
[and also from the 'sale'-item aisle endcaps in the stationery department of Target]
the common theme here is black and white glamour, and every item has many uses...
[granted, items shown were not found there this year...
but the selection is always good this time of year]

*shown in the first photo above, i took the wrapping papers from Target 
and covered small boxes with them.
they hold post-it notes, pencils, and other small items on my desk and worktable.

*i also covered the drawers on two slim drawer sections from IKEA (had those already)
my mouse pad, and several composition books for notes - all it takes is a gluestick!

*several pieces of corkboard were covered with scrapbook & wrapping papers
for my inspiration board backgrounds [not shown],
and the waterproofed totes from the Dollar Tree store hold craft supplies, trims, etc.
elsewhere in the office, other black and white accessories add more interest:
*clear jars hold vintage bobbins, bingo cards, and white flowers
*paper-covered shoe boxes stack up to hold craft supplies or project components

of course, you can also use vintage sheet music and book pages
to cover everything in an office to coordinate the decor...
I've done that, too!

let's take a look at a few details from my House B office/studio space 
in a whole new color palette and style :
above is the office/studio in house B
[which was also shown in the black & white decor images in the other post]
only instead of being black and white, now it's filled with cozy neutrals.
it's simply a change of the paper that is covering containers & inspiration boards,
a wardrobe change for the mannequin, new paint on the chandelier,
and a few small accessory switches to make the room look completely different!

things that i really liked about that office:

* it felt bright all the time because of the mirrored closet doors (see in reflection)
and because i put MORE mirrors on the opposite wall.  
light bounced EVERYWHERE
[and in Seattle, you need all the light you can GET]

* this was the first time i had the tall work table and high barstools in an office,
and they worked SO well for me.
i stand up a lot and move around when i am working, making everything more accessible.

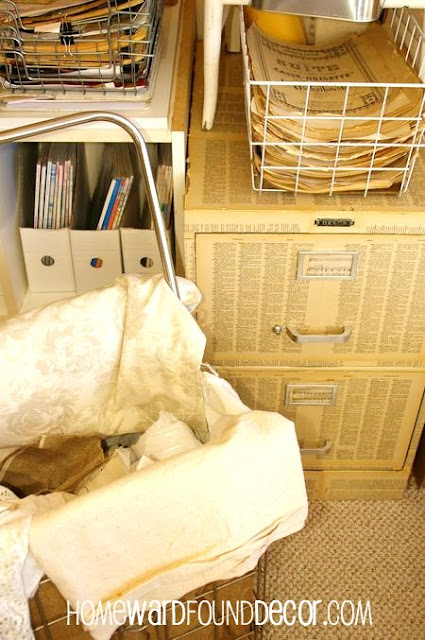
* you can see the dictionary-page-covered file cabinet 
[shown below in an image from the other post]
under the work table. i LOVED this piece!

below is the office/studio in house A
it's one you haven't seen yet...
[though other posts have shown the beautiful huge white mantel in this tiny cottage!]

tiny would be the operative word here - this room was only 11X9.
nevertheless, i fit a LOT of storage in here [used the vertical space!]
and even took the closet doors off so that built-ins could be used in there, too. 

and, okay, you may notice that at the time, i was heavily into chartreuse green. and pink.
[i am not preppy. i swear i didn't know that was 'the uniform' for Lilly Pulitzer fans!]

 but even though now i think i would go bonkers in that room, 
the happy, bright pink and green papers [yes, dollar tree and target!]
really went a long way in coordinating a bunch of haphazard elements in here.
it's REALLY important to reduce the LOOK of clutter as well as the ACTUAL clutter
when your space is only a hundred square feet
 things that i really liked about that office:

* the green damask paper was FLOCKED. uh huh! 
target. that was in 2007 - i think it's all gone now, girls!
it covered pinboards that were nothing more than simple squares cut from 4X8 sheets of rigid insulation! yes, building supplies!

* the glass jars holding colorful crafting supplies... and yes, candy

* the hot pink cards hanging from the wire mobile
tearsheets from O magazine, with encouraging quotes on them.

*
the wonderful enamel-top farm table.
i used that table in dozens of ways for over 18 years!

* did you see the chandelier?! it's green in this room.
it was about twelve colors in the twenty years that i owned it!

i hope these ideas inspire you to see what you can do 
with what you already have on hand and can get inexpensively!

1.09.2013

get organized - on the cheap!

 organization, office, studio, creativity, decorating, diy, home decor, office decor, farmhouse style, vintage, use what you have, repurpose, fall, back to school
here's the story of how I created my absolute dream office / design studio... 
using reclaimed + thrifted items + what I already had, without spending much! 
In winter of 2011, I moved into my dream house,
and enjoyed the opportunity to design a whole new studio/office for myself
I undertook this project exactly as I would one for a client: 

start with what you have and look at it in a fresh way.

continue reading to see how i get organized!

9.26.2012

simple solutions: easy fall table decor

[photo credited to Chez Fifi http://fabulousfifi.typepad.com/chez_fifi/page/20/
Here's what she said about this and other photos: "I took the photos below at a wonderful press event held this past weekend at Moss Mountain Farm, outside Little Rock, Arkansas, the home of P. Allen Smith (www.pallensmith.com) the fabulous host of the PBS series: P. Allen Smith Gardens."]

if i could choose anywhere to host a fall dinner party or a thanksgiving dinner,
it would be in a setting like THIS one shown above! 
what a delightful way to create a memorable autumn event. 
this is a wall built with straw bales that fronts a party tent. brilliant.
can't you just picture this at dusk, with candles glowing and soft music playing?
ahhhhhh....

oh, sorry... that's not a 'Simple Solution' at ALL, is it?! enough dream sequences...
let's get back to the real world of trying to fit decorating into our already busy schedules!

one thanksgiving arrived and i had been so busy at work that i forgot about the table decor.
that sounds completely AWFUL, doesn't it??? well, life happens sometimes... we've all been there.

after a mad dash through the house ensued,
with me grabbing anything and everything that looked remotely like it would work....
amazingly, it DID work!
 no one ever knew that i threw the decor together in minutes...
here's how it worked:
*used a fabric scarf - very large, almost sari-like -as the tablecloth.
it allowed the golden wood of the table to show, and created a garden lattice effect.
to continue that unexpected 'fall garden' theme, 
*filled some white ironstone bowls and platters with 'natural' elements i had on hand:
a faux acorn vine, creamy white resin and my sweet sweater pumpkins,
bleached leaves, and dried hydrangeas right from the yard.

*white pillar candles placed in tall glass vases added lots of sparkle
AND kept the flame away from little fingers

*place markers are Scrabble tiles arranged on each salad plate 
to spell out the name of the guest who would be sitting there.
the little plate above was for my sweet almost two year old grandson.
no, he didn't eat from it ;0)

after getting rave reviews on the decor, a little light bulb went on:
stop fussing over the table, Deb! keep it simple and make your day a whole lot easier...

the next year, here's what i did on the table for thanksgiving:
*folded a white linen tablecloth and used it as a runner.
*filled some glass italian yogurt jars with water and CHEAP white carnations
*scattered some bleached leaves and votive cups with tealights in them down the runner.
*set placesettings with my white dinnerware, linen napkins, glassware, and silver.

it only took me about FIFTEEN MINUTES to do this whole thing!
the flowers still smelled good, the candles still glowed and flickered warmly...
it still said 'fall' and 'thanksgiving' and 'family'...
it just WHISPERED it instead of shouting.

(and instead of last-minute fretting, fussing and foofing of the table,.
i was sitting in a chair with a glass of wine, visiting with my daughters and grandsons.
now THAT is something to be thankful for!)