. -->

3.29.2013

Switch It Up!

 one year, on the day before Easter, i awoke with a wild idea.
[which, truly, isn't that unusual]
the family was coming the next day for Easter dinner, and i wanted to do something different.

and no, i'm not talking about making a new dish for the meal.
i'm talking about the place where we'd HAVE the meal. i was ready for a big change!
 this photo shows my lovely seven-foot-long pine dining table in the dining room. 
which is fine, but the sunlight never really reached this part of the house.
 and i wanted a sunny Easter gathering
[since the weather in Seattle was cooperating that year!]

so... i pulled the dining room table out into the living room,
and moved the round farm table from the living room to the dining room...
sadly, while i don't have a photo to show the whole dining table in its new location,
i do have this one with GLORIOUS sunshine pouring in the windows onto the pine. 
it literally glowed with warmth, which was exactly what i wanted!

with two windows facing the front yard (south) and a glass door from the porch (west),
the table was a bright and happy place for our holiday meal.
 the round farm table made a charming addition to the dining room space.
 i pulled a park bench and two garden chairs from the front porch, 
which completed the seating area.
the room offered a more sunny and open look - much like a 'breakfast room',
which is exactly how it was used for months afterward!

[and when the kids showed up on Easter, 
everyone gathered here for pre-dinner drinks and conversation!]

here's a floorplan sketch to show you how it played out:

i left the tables this way all through spring and summer that year, 
and loved the way that we used the space differently.
i used the large dining table as a desk on many days,
since i was able to look out onto the sunny yard and porch awhile working.

remember: it didn't cost me a thing - just some muscle and a little time - 
but the Cottage was renewed and refreshed!

what about YOUR rooms?
is there a switch you can make that will revitalize your space
 and give your rooms a new look and functionality for the season?
give it a try!

[i know, it may be hard to convince your hubby that this is worth doing...
just remind him that it's a free way to redecorate!]

3.27.2013

Nesting


i'm going to share a little secret with you:
accidentally discovered a 'Fast, Cheap, & Easy' TM way to make realistic bird nests!

one day while weeding some flowerbeds,
i grabbed a handful of [dead] daylily foliage right outta' the ground. just yanked it up.
it was in my hand and i looked at it, and then...
 i held onto one end, and wrapped the length of it around my hand a few times.
when i got to the other end, i tucked it into the wound-up stuff.
[don't you love the technical terms i use?!]
and even though it sort of looked like a donut,
i thought 'yep, it looks like a nest!'
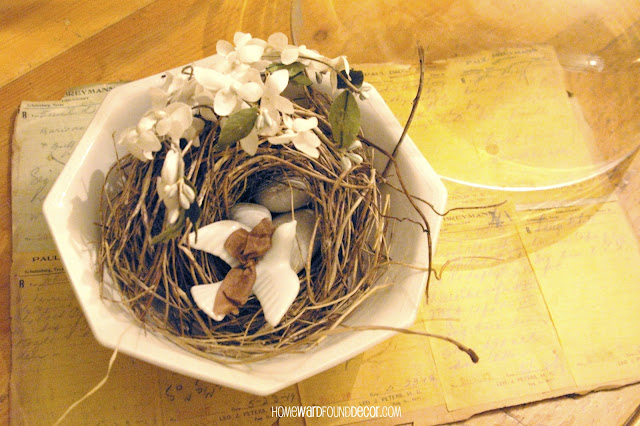
... and i carried it inside and sat it in the bowl you see in the photo above.

i added some vintage fabric flowers and a ceramic bird, and three white stones as 'eggs'.
nothin' fancy. i liked the way it looked.
 so i went outside and i made more!
[my flowerbeds were SO clean when i was done...]

and when i later decided to make these nests to SELL, i added stuff to the nests:
 * papier mache' eggs sit on a bit of moss glued to the nest as a bottom,
accented by a strip of vintage sheet music and a tiny dried stock blossom.

* a bed of moss holds a nest and a faux bird inside an armillary sphere lamp base
*a small nest sits atop a pedestal bowl, topped with another faux bird and a clear glass lamp globe

* miniscule nests sit inside glass salt cellars, adorned with vintage fabric millinery flowers and book clippings
[these would be fabulous place markers at an Easter table!]

* i've also used the bitsy ones as adornments on packages
[as seen in holiday issues of 
Creating Vintage Charm & FOLK Magazines]


* a HUGE nest in a display at a vintage show holds pretty lemons from the nearby trees,
covered with a rusted wire garden planter as a 'dome'
[this nest started out much neater.. it was handled a LOT that day!]

you can do this! 
try it using raffia. or field grass. or beach grass.
or daylily foliage. i've even used daffodil foliage.
 and my flowerbeds? they have never looked better! ;)

3.25.2013

Be a Good Egg!

so many fabulous egg-related decor ideas are floating around the internets right now:
literally hundreds of ideas for coloring Easter eggs and making patterned Easter eggs 
and ideas for making wreaths and topiaries from plastic Easter eggs. 
LOVE the creativity i see out there!

but.... what if you don't celebrate Easter
or what if you just want a more subdued palette?

you're in luck! 
(and good company, to be honest... pastel eggs are NOT my thing. 
the closest i got to them was when i brought home 
two dozen brightly-colored 'Cascarones' from a visit to Texas one spring.)

so today, i offer up some inspiration 
for creating spring decor with un-decorated eggs!
some are real, and some aren't.... use papier mache', clay, wood, or ceramic eggs.
first up, an ostrich egg (HUGE) embellished with a strip of vintage sheet music.
[the title 'Song of the Bird' was a perfect fit!]
i nestled the finished egg into a handmade birdsnest, 
then sat the nest on a 'pedestal' of an upside-down milk glass lamp shade (with the narrow end up).

here's a photo of the same egg standing UP in the nest, without the glass base:

another idea is to create a small vignette inside a glass jar...
and this works perfectly when you are using real (blown) eggs, because they are protected.
[note: do not - under any circumstances - 
forget to blow the eggs, and then seal them in a jar. 
BAAAAAAAD side effects :( ]

a little nest of grass is placed in the jar and an egg nestled into it.
a scrap of vintage sheet music or a poem with a Spring theme might be inserted as a 'backdrop',
and a strip with an appropriately 'Spring-y' title is glued onto the jar as a label.
i also covered the jar tops with a scrap of burlap, tied with twine.

[i use pickle or olive jars from thrift stores. 
they come in medium and large sizes, are wider than mason jars, and have no embossing on the sides to blur the contents]

this LARGE handmade nest sits atop an aged garden urn.
[i used ivy and hops vines from the yard to make it]
moss from a corner of the yard fills the center of the nest,  providing a soft resting place for a few eggs.
a glass garden cloche finishes off the look perfectly.
[you could also tuck in some gardener's gloves, hand tools, and some bulbs 
for a perfect Spring gift!]

then again, you don't really have to have a nest...
a simple egg presentation:
a glass salt cellar or napkin ring can hold an egg,
and a clear stemless wineglass as a 'dome' will finish it off with style.
if you write each guests' name on the egg, these are perfect place cards!
_________________________________

those last two shots are a bit of a sneak-peek - 
they are part of a garden-theme project and photoshoot last winter in Seattle
that i'll be sharing here on the HOMEWARDfound blog later this week.

i am delighted that photos from that shoot are featured
in the Spring issue of Creating Vintage Charm magazine!

3.22.2013

sometimes, i really take the cake....

today is my birthday!
what better day to share a birthday cake idea?!

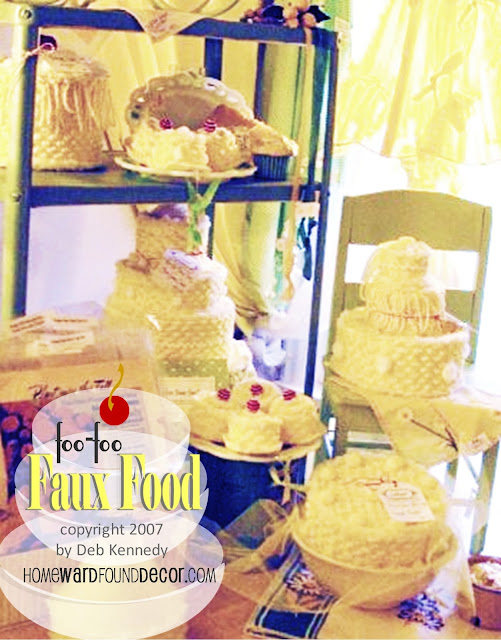
the photos here show an original product that i developed back in 2007, called
foo-foo Faux Food TM

i sold this line in my booth at vintage shows and vintage stores,
and now i'm sharing the idea with you here at HOMEWARDfound
because it's a fun craft to make, 
an easy way to decorate 
and can be customized for a birthday or holiday...
my secret
these are made using recycled metal cans and tins 
and recycled chenille bedspreads.
yup... clean fruit cans, tuna cans, cookie tins, and cracker tins in various sizes. 

here's the how-to:

* wrap the tins in the fuzzy, textured chenille fabric in any color, and glue on
 cookie & cracker tins are used with lids covered separately (so they are still usable for storage)
tuna cans and small fruit cans are used upside down

* glue on fuzzy yarn trims (like this white 'caterpillar' yarn) to the edges and tops 
 (swirl it on cupcakes, for example)
* you can use the fringed edges of the bedspread on the sides of the cake
so that it looks like piped frosting

* add a few details on the tops and sides,
using pom poms, beads, rickrack, and other trims

* stack the assorted sizes of tins to create fanciful faux cakes!

* using red pom poms or round beads gives the look of cherry toppers

i bet you'll find a bunch of ways to use them!
please note that if you make these for sale, you can not use my product name
'foofoo Faux Food'. it is copyrighted & trademarked.

___________________________________________________

since it's the first day of a new year for me,
i'd just like to offer a little 'shout out' to some very lovely friends
who have made the past year something wonderful.

in the face of huge changes in my life, they have been a
remarkable support and encouragement to me professionally,
always challenging me to
 keep moving forward...
and i could not have done that without them.

Michael at Inspired by Charm
Janet at ReStitched USA
Sharon at Launch Your Creativity

__________________________________________

3.15.2013

decorating by the book!

have you ever considered BOOKS to be a decorative element?

for an inexpensive way to bring color into your decor each season, 
try looking at what's on your bookshelves.

the shelves shown above show a few books chosen by color for the display:
  green and yellow covers coordinate with a few simple accessories
to express the seasonal freshness of Spring,
while everything else on the shelves is white and neutral.

[no, i didn't get rid of all of my other books! i just left them in my office!]

another easy way to use books in your decor is to choose them by subject for a display:

the stack shown in these photos includes books about the garden and flowers
[with a few decor books thrown in for good measure - and because they were green!]

adding them to a tabletop vignette of items from the garden
tells a story and brings Springtime inside...

having a book displayed open to a beautiful photo or poem 
never fails to make you stop and look, too!


here are a few more ideas for decorating with books this Spring:

* grab books cheap and do a good deed by shopping at your local library bookstore!
[your purchases of books for 50 cents to $5 helps provide library services]

* do you already have a bunch of books, but the covers aren't pretty enough to feature?
cover them up! grab scrapbook paper, gift wrap paper, or even fabric, 
and create 'envelope'-style book covers.
[we all did this back in junior high with grocery bags, remember?!]

* if you want to get really crazy, PAINT 'EM!
a wash of thin paint on a canvas book cover can change the look completely.
OBVIOUSLY I am not suggesting you do this to VALUABLE or RARE books!
we all have books we bought long ago and just don't use anymore...
this is a way to turn unused items into decorative elements.
[and if you paint carefully, the book itself is still readable]

you can also use a wash of paint to create a faux 'aged' effect

using my tutorial here

* create 'pedestals' using books by stacking them up and tying together with twine or ribbon.
then display a special item on top of each stack... 

* and finally, use your bookshelves as display opportunities!
check out this post for tips on how to arrange accessories and books
for balance and visual impact 

3.13.2013

floribundance

 in my last post, i shared images of this painting made entirely from flowers.
which i think is a really fun idea... and then i realized that it reminded me of something...

long before i ever saw that, i created something a bit similar.
and it all happened because of a very ugly painting...
 i'm sorry, but that's ugly.

i realize that the woman who painted the orange poppies did so in the 1970's, 
when orange and avocado and harvest gold were all the rage.
not so much in 2009, when i was given the painting.
[it wasn't a gift, it was a 'it's going in the trash, or you can have it' thing]

i stared at the thing for a few days as it sat in the corner of my studio,
often wondering of there was ANY hope at all for it.
[if i faced the same dilemma today, i'd slather the thing with chalkboard paint, like i did here !]

as happened regularly in my studio, things got placed in piles and baskets
to be used in future projects...
and one day, i moved a basket filled with vintage flowers and sat it in front of the ugly painting.

i walked away, then turned back to grab something...
and it looked like the flowers were arching forward off of the canvas.

and a light bulb went on in my head!
 why not attach the flowers TO the painting,
like a 3-D sculpture?

so here's what i did, using what i already had on hand:
 no way that orange was workin' for me,
so i painted OVER the orange poppies with white acrylic paint.
i left the dark centers alone, though.

i also went over the 'tabletop' in the painting with a wash of white - 
just enough to change the color, but let a bit of the 'wood' effect show through.
 then i took some vintage sheet music and book pages, 
and cut them to fit OVER the shapes of the vase and pitcher in the original painting.
[i used regular white glue to attach them]
 
above that, i added some lovely flower seed packets and a snippet of a song.

then i glued on some paper lace trim and some vintage gold wallpaper scraps - 
a medallion on the vase and some torn strips at the top of the 'wall' behind the flowers.

and then, i used hot glue to start adding the floral elements: 
flowers made from vintage crepe paper, moss, tiny silk blossoms & leaves, and pearls

 berries, more moss, tiny blossoms & leaves, and vintage-look flower buttons

all of the elements were added in a placement that made it look like 
they were spilling out of and over the edges of the vase in the foreground
and rising out of the pitcher in the background.

 the floral details were all in a pale green & white and 'gold' palette,
so that the background and leaves of the original painting coordinated.

 this side-view shows how the flowers pop out of the canvas.

and the finished painting looked like this:
 

 just because we ALL love 'before and after' shots
let's look at them side by side:

wow!
it's a great way to give a new look to something old - perfect for Spring!

 i don't have that 'refreshed' painting anymore,  
[so please excuse the questionable lighting - i couldn't re-shoot]
but just looking at this project makes me want to get another old floral still life painting
and do it again, in a different style!


3.11.2013

Go to Where it's Spring!


it's been said that 
"If Spring won't come to you, 
then GO to where it's SPRING!"

since so many of us are SO READY for Spring,

 I thought this might just be the perfect time to share some inspiration...
last Spring, my sister and I took a short trip.
[i'll share where at the end of this post-
and it's not where you expect from these images!]
while there, we viewed enchanting outdoor scenes of a windmill, bike, and boat...
we also saw these very happy daffs and bees.
these oversized sculptures of daffodils were @15 feet tall!
it felt very 'Alice in Wonderland'-like to be standing beneath them.
those 'Bumble Bees' were made of chrysanthemums, making the bees look fuzzy!
[the bees were as big as three people]

 and then...
I was stunned to walk around a corner and see this floral masterpiece...
the 'painting' on the easel was approximately 10 feet wide and five feet tall!
[The easel itself was ten feet tall or more!]

This was created entirely from flowers, to replicate Claude Monet's
'Fisherman's House at Vargentville'
Above is an up-close detail shot of the floral painting...
I love the texture and the way that they have captured 
Monet's impressionist paint strokes using flower petals.  
Amazingly creative! 

Below is an image of the actual painting by Monet:
[ image found on www.canvaz.com ]

 these beautiful floral creations were not found outdoors.
nor were they at a flower & garden show.

nope.
they were inside the atrium at 
the Bellagio Hotel in LAS VEGAS!

you just never know where you are going to find inspiration, 
so keep your eyes open for beauty like this in unusual places...
large resorts & hotels, flower farms, and home & garden shows
are all possibilities!

Spring is out there. Go find it!