. -->

11.08.2014

Garden Planter = Wire Dome

bring the beauty of nature indoors with
a dome made from a wire garden planter!

It's perfect for every season...
* over a nest with leaves tucked into it, resting on a wood round for autumn.
* over a branch of evergreen with some vintage ornaments or pine cones for winter.
* over a nest with wood or stone eggs and tiny daffodils for spring.
* over a white ironstone plate filled with shells from the seashore in summer.

 You aren't going to believe how easy this ONE STEP PROJECT is!
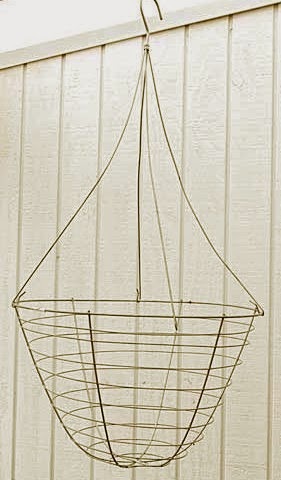
 Start with a simple wire garden planter from the home center:
Disconnect the hanging wires. Turn the planter upside down,
 ... and voila, you have a wire dome!

You can also cut a short length of the hanging wire
and then attach it as a loop at the top of the planter as a handle, as I've done here.

The planters will come as new, shiny metal from the home center -
but if you look for them at garage sales and thrift shops, 
you just might find some nicely rusted ones like these!

You can also make a wire dome from a tomato cage too!

Way back in 2008, I sold these in my booth at Faded Elegance Antiques in Everett, Washington -
and I kept having to make them because they sold so fast!

Fun Fact:
This photo is of my very first 'vintage' booth,
a little space that was a mere 2 feet deep and 8 feet wide in the back of the store.
It was the first stop of many wonderful years as a vendor in the vintage world.
This is where 'Retreat' started, 
and you can see how my former business reflected my love of nature 
and of using everyday items as decorative elements -
just as I do here at homewardFOUND decor.

shared online:

cupcakes & crinoline | Project Inspire{d}


funky junk interiors | diy salvaged junk projects #420

11.05.2014

The Holiday Tree: for Every Season

Let me tell you a story...

Monday, I was trying to come up with an idea for a post for today.
I had NUTHIN' - no how, no where. The well was DRY, my friends.
I was, frankly, 'too tired to be inspired'!!!
I posted on my facebook page and asked my HOMEees there to chime in, 
sharing their best tips for getting their creative MoJo back... and I got some great replies!

Carol took a very practical and restful tact:
'Take a day off from being creative... 
I find house cleaning to be very therapeutic and lets my brain rest.'
 
I joke that I only clean so I can decorate, 
but the truth is that cleaning is for me a bit like 'priming the canvas' is for a painter. 
It starts the creative engine running so ideas can flow!

Emily offered a virtual hug and a wide perspective:
'
Awww... we've all been there! I usually just take a break and/or head outside.'
 
Great advice - because, really, is it ever possible to head outside into the beauty of nature
(where ever you are) 
and NOT be inspired?! I don't think so. 

Lilliam spoke words of a sage:
'
Take a moment to just sit still, in silence and the inspiration for the right Idea will come to you. 
.Still.'

Oh, Lil, I try. I really DO. I'm just not a 'still' girl. 
I can walk on the beach for hours/miles. I can sit and read for hours.
But just sitting.... doing nothing.... waiting..... I just can't do it.
I hear the Jeopardy theme song every time I try!! 
(I CAN lie still for a massage, though!!)

So, after I read these words of wisdom, I decided to take a break.
I headed downstairs to the kitchen, to grab a fresh glass of ice water and then head outdoors...
and on the way into the kitchen, I walked past something.
I see it every day - in my peripheral vision.
I KNOW it's there, but it never really 'registers', if you know what I mean. It's just.... there.

But at THAT moment, I stopped.
I backed up a few steps and looked at it. For a good long while.
And while I did, I remembered something important.
That's when I KNEW that I had the content for this blog post!
So I ran upstairs, grabbed the camera, and went back down lickety-split
to snap a few images.

Aaaaaaand here we are.... today.

Do you want to know what I remembered?
That this small, inexpensive, simple decor element is something that I grew up with.
I remember it well from throughout my childhood.
And when I had my own children, I replicated it for them.
Now that THEY have children, they have replicated it, as well!

It's what we call 'The HOLIDAY Tree'.
(And it's not a Christmas tree by another name!)

It's a little tree that is decorated every season, for every holiday.

The idea is SO simple: It's a branch.
 As in, a branch off the tree in the yard or the nearby forest
or even purchased at the local craft store.
Not a BIG branch, just a lil' branch. Two feet tall or so.
It sits in a pot or planter or tin or box...
held in place by rocks or plaster of paris.

And there's pretty 'stuff' on the branches... 
little stuff, not heavy stuff:

We've used silly things like happy meal toys and action figures for Halloween,
vintage ornaments and mini candy canes at Christmas, 
bright plastic eggs for Easter, woven paper hearts for Valentine's Day, miniature flags in Summer,
everyone's favorite personal treasures for their birthday week, 
and some multi-colored plastic mini lights that look like the M&M characters.
 

Small things all, but the important thing was that every month there was a day 
when we all worked together to create & find fun things to decorate the Holiday Tree with.

I still have those colored plastic M&M light covers, BTW ;)

Mom uses Dollar Tree garlands and tiny ornaments 
and in this photo, she even used a felt coaster owl!
Anything goes.

The tree always sat somewhere we'd pass by it every day, 
so that the enjoyment was constant...

When I was a kid, the Holiday Tree sat on the HiFi (yes, I am OLD!) in the living room.
When my kids were young, our Holiday Tree sat on top of a cabinet on the stair landing or in the family room.

Right now, my Mom's Holiday tree is sitting on her buffet,  next to the kitchen door - which is where I saw it on Monday.
It's been in the room all along, decorated differently each season... but until Monday, 
I had completely forgotten about how much this tradition is a part of me. A part of my family.
A huge part of why decorating for every season is what I do. 


Now that I remember, I am so thankful for the simple ways 
that my Mom taught me about creativity. 
They've stayed with me... and my kids and grandkids. It's 'Generational Creativity'!


shared online:


Practically Functional | Creativity Unleashed

11.01.2014

Welcome, November!

I DO love Autumn, but it seems incredible to me that it's already November, 
and Christmas is just WEEKS away... Truthfully, it SCARES me!
Time to ramp up the Holiday quotient!

See more of this Thanksgiving tablescape here..


10.31.2014

Happy Halloween!

 Sometimes, great decorating is the result of restraint.
Without much ado or effort, these simple white pumpkins have Halloween holiday spirit
and all I did was tie two (STUNNING) plastic masks onto them.

No carving, no paint, no hours of effort and mess were involved....
just a simple one-step 'Fast, Cheap & Easy' TM decor detail that REALLY makes an impact.
This is a perfect solution for those of you who haven't decorated yet
with just HOURS to go before the Trick-or-Treater Invasion!

I paid just one dollar EACH for those masks at a local flea market,
but you can still find great ones at local party supply stores.
Wishing you all a very Happy & SAFE Halloween!
I'll be handing out treats at Disneyland tonight :)

shared online:
Practically Functional | Creativity Unleashed

10.29.2014

Happy HalloWEEK! Part 2: A Skeleton Crew...

When I walked into Roger's Gardens 'Hauntingly Beautiful' Halloween BOOtique this fall
and saw THIS decor element, I laughed out loud.
Last year, their decor made me think of the Haunted Mansion at Disneyland.
THIS year, it makes me think of Pirates of the Caribbean!
(Yes, I am an unabashed Disney Kid!)

If you've ever looked at cheap plastic skeletons 
and thought there is NO way those will EVER look good,
think again....
 because used as an overhead 'trellis' for climbing ivy, these old bones have full-bodied style!

The skeletons hang from the ceiling and dangle down at the edges of rooms & doorways,
creating arches overhead.
Faux ivy twines through and around them, looking ever so creepy.

I could also see using REAL ivy - DEAD, brown, shriveled ivy - for this project.
Or maybe BLACK faux ivy - with gray spanish moss dangling down!
 (Sorry, bad pic - but I love his face!)
This is a great decor idea for a front porch, entry hall, or over the dining table.
Just think of all of the 'helping hands' you'd have around!

See ALL of my Halloween posts here
Find Roger's Gardens here

10.25.2014

Happy HalloWEEK! part 1

Everyone knows that the celebrating lasts longer than one night :)
so for the whole week, I'm posting fun ideas and inspiration EVERY DAY on
the homewardFOUND decor facebook page!
(Did you know that you don't have to be a facebook user to see that page content?!
Click over and check it out! )

.and 
 I've rounded up my six BEST pumpkin ideas for you:
 
for making stale old pumpkin decor look shiny and new

Go on, get your spooky on!

PS: like that 'spider web-by' embellished umbrella in my photo? see more here

shared online:

Yesterday on Tuesday | Project Inspire{d}


10.22.2014

Painted Paper Lanterns

I saw this idea at Roger's Gardens Hauntingly Beautiful Halloween BOOtique...

Take accordion-style tissue paper lanterns, fans, and other decorative accessories
( like the ones you can get CHEAP from Oriental Trading Company )
and paint the edges BEFORE you open them!

TIP: paint using a soft brush (not spray), then open immediately.
If you don't, the paint may stick the whole shebang together!


Paint black on the edges of white or cream, 
for a dramatic contrast.

Paint glittery silver or gold on the edges of black or white,
for elegant sparkle.

Tissue paper shapes can be really gorgeous decor...
I found a bunch of old tissue paper 'parasols' in a thrift store years ago,
and used them to fill in an empty overhead space at a show:

 Find More HOMEWARDfound Inspiration for Every Season of the Year:

10.20.2014

Bonus Post: Faux Statuary!

I'm posting today because I JUST finished a quick project and am THRILLED with it!
I used my faux concrete paint treatment
on a plain old styrofoam head form,
 and the result is what you see above!
She looks for all the world like a real concrete statue....

Here's the before and after:
 BEFORE                                                 AFTER

 This project took no more than ten minutes to paint.
Then I added my own original Junk Queen Crown to her regal head,
( I made and sold them back in 2008/9)
and placed a few bleached leaves on it for seasonal detail.

I am looking at things with a new eye today...
because I can picture some old tchotchkes and brick-a-brack painted like this,
transforming weary old decor into elegant classic accessories!

i've used this same paint technique in several other projects...
no, it's not cement / concrete! post here
nope, not this stuff, either! post here

Find my faux concrete paint tutorial HERE

shared online:
 

Yesterday on Tuesday | Project Inspire{d} 

Practically Functional | Creativity Unleashed