. -->

hello! don't miss all of my sidebar content - click 'view web version' on your screen!

Showing posts sorted by relevance for query christmas tree decor. Sort by date Show all posts

11.05.2014

The Holiday Tree: for Every Season

Let me tell you a story...

Monday, I was trying to come up with an idea for a post for today.
I had NUTHIN' - no how, no where. The well was DRY, my friends.
I was, frankly, 'too tired to be inspired'!!!
I posted on my facebook page and asked my HOMEees there to chime in, 
sharing their best tips for getting their creative MoJo back... and I got some great replies!

Carol took a very practical and restful tact:
'Take a day off from being creative... 
I find house cleaning to be very therapeutic and lets my brain rest.'
 
I joke that I only clean so I can decorate, 
but the truth is that cleaning is for me a bit like 'priming the canvas' is for a painter. 
It starts the creative engine running so ideas can flow!

Emily offered a virtual hug and a wide perspective:
'
Awww... we've all been there! I usually just take a break and/or head outside.'
 
Great advice - because, really, is it ever possible to head outside into the beauty of nature
(where ever you are) 
and NOT be inspired?! I don't think so. 

Lilliam spoke words of a sage:
'
Take a moment to just sit still, in silence and the inspiration for the right Idea will come to you. 
.Still.'

Oh, Lil, I try. I really DO. I'm just not a 'still' girl. 
I can walk on the beach for hours/miles. I can sit and read for hours.
But just sitting.... doing nothing.... waiting..... I just can't do it.
I hear the Jeopardy theme song every time I try!! 
(I CAN lie still for a massage, though!!)

So, after I read these words of wisdom, I decided to take a break.
I headed downstairs to the kitchen, to grab a fresh glass of ice water and then head outdoors...
and on the way into the kitchen, I walked past something.
I see it every day - in my peripheral vision.
I KNOW it's there, but it never really 'registers', if you know what I mean. It's just.... there.

But at THAT moment, I stopped.
I backed up a few steps and looked at it. For a good long while.
And while I did, I remembered something important.
That's when I KNEW that I had the content for this blog post!
So I ran upstairs, grabbed the camera, and went back down lickety-split
to snap a few images.

Aaaaaaand here we are.... today.

Do you want to know what I remembered?
That this small, inexpensive, simple decor element is something that I grew up with.
I remember it well from throughout my childhood.
And when I had my own children, I replicated it for them.
Now that THEY have children, they have replicated it, as well!

It's what we call 'The HOLIDAY Tree'.
(And it's not a Christmas tree by another name!)

It's a little tree that is decorated every season, for every holiday.

The idea is SO simple: It's a branch.
 As in, a branch off the tree in the yard or the nearby forest
or even purchased at the local craft store.
Not a BIG branch, just a lil' branch. Two feet tall or so.
It sits in a pot or planter or tin or box...
held in place by rocks or plaster of paris.

And there's pretty 'stuff' on the branches... 
little stuff, not heavy stuff:

We've used silly things like happy meal toys and action figures for Halloween,
vintage ornaments and mini candy canes at Christmas, 
bright plastic eggs for Easter, woven paper hearts for Valentine's Day, miniature flags in Summer,
everyone's favorite personal treasures for their birthday week, 
and some multi-colored plastic mini lights that look like the M&M characters.
 

Small things all, but the important thing was that every month there was a day 
when we all worked together to create & find fun things to decorate the Holiday Tree with.

I still have those colored plastic M&M light covers, BTW ;)

Mom uses Dollar Tree garlands and tiny ornaments 
and in this photo, she even used a felt coaster owl!
Anything goes.

The tree always sat somewhere we'd pass by it every day, 
so that the enjoyment was constant...

When I was a kid, the Holiday Tree sat on the HiFi (yes, I am OLD!) in the living room.
When my kids were young, our Holiday Tree sat on top of a cabinet on the stair landing or in the family room.

Right now, my Mom's Holiday tree is sitting on her buffet,  next to the kitchen door - which is where I saw it on Monday.
It's been in the room all along, decorated differently each season... but until Monday, 
I had completely forgotten about how much this tradition is a part of me. A part of my family.
A huge part of why decorating for every season is what I do. 


Now that I remember, I am so thankful for the simple ways 
that my Mom taught me about creativity. 
They've stayed with me... and my kids and grandkids. It's 'Generational Creativity'!


shared online:


Practically Functional | Creativity Unleashed

12.12.2019

copper 'junk' trees

upcycled, repurposed, diy, home decor, thrifted, junking, Christmas decor
paper trees aren't enough for the 'tree' Christmas decor theme i dreamed up, oh noooo...
i had to go rummaging through the kitchen cabinets (and, i admit, a few thrift stores)
to find MORE STUFF to make trees out of!
and THIS is where my crazy imagination took me:

stacking copper kitchen molds (usually used for gelatin, ice cream, cakes, even meatloaf)
into tree shapes.
although there was one that didn't need to be stacked... it already looks like a tree.
so i topped it with a snowflake cookie cutter.

i call 'em 'copper junk trees', even though this isn't really JUNKY junk.  

cled, repurposed, diy, home decor, thrifted, junking, Christmas decor
from the bottom of this stack, we have:
a copper cookie tin (from Costco, two years ago)
a large copper fluted ring mold
the LID from the copper cookie tin, flipped upside down
two medium-sized copper fluted molds
a copper funnel

i admit to gluing the funnel on with a dot of hot glue
because it just would NOT stay on there!!

on glass cake stands on the kitchen island,
they add the perfect bit of whimsy to the room.
(that wood fencing is just there for the photos)

OH! here's a thought... if your style is totally kitsch,
you could make these with shaped Tupperware pieces, too!
or use tiny little tart pans & containers to create small versions of these,
and hang the lil' trees ON your real Christmas trees.

yup. deb's really gone over the edge with this one, friends...
but hey, it's fun. and i think decorating should be fun.

shared online:

funky junk interiors | diy salvaged junk projects #505 

featured!


oh my goodness, thank you Miss Donna - TWO features!

diy salvaged junk projects #506

12.01.2016

Elegant Holiday Inspiration

elegant holiday decor
I have the extreme good fortune to have some really remarkably talented friends
who inspire me on a regular basis...
one of them, Miss Sylvia, is a stylist and decorator extraordinaire.
She owns Madam Palooza Emporium
a vintage prop rental house and styling company in Southern California.

The weddings and event settings that she creates are so intricate and detailed, 
so personalized and delightful, that they appear in magazines every month!
(she's currently featured in the newly-revived Flea Market Style Magazine
which is run by two MORE of my incredible friends!!!)

Sylvia called me up last week and asked me to help her 
to create some simple but inspiring holiday decor in her studio/showroom,
as it was to be the setting for an event industry holiday party.
Of course I said yes! We've worked together before, and it's always fun!

continue reading to see the beautiful results...

12.17.2014

Black & White & Winter All Over!

It's finally beginning to look a bit like Christmas around HOMEWARDfound central!
I've been so busy working that I didn't even remove the fall pumpkins from my office until SUNDAY.
Yes, you read that right.
I debated even decorating at ALL, but the urge got the best of me and I went for it - 
although in a different way than I usually do.

This year, I decided to focus on decorating for the winter season
rather than just for Christmas...

I don't have tons of bins of Holiday decor anymore, just a few with special items,
so I selected some things from there
and then added in everyday 'stuff' that helped me create a color scheme.
I went for a crisp black, white, and silver look:
.
The shelves on the wall in the office are rather triangular,
so when filled they remind me of a tree shape.

Along with my growing black & white coffee mug collection,
I used sparkly paper bags from the dollar store, two of my Original Sweet Sweater Snowmen,
a glass nativity scene, white tissue snowflakes, sparkly glittery metal branches, a lace mask,
and the rare white candy canes that I have been hauling around since 2009
(and OH are they STALE!)

Here are a few of the other elements I used:
 I do still collect white Santa china & ironstone mugs...
I wash all of the red paint off of them, though, so they fit my pale neutral color scheme!
This year, I found these tiny little tophat ornaments at Dollar Tree,
and they sit perfectly on top of the smallest size mugs!
 You've seen this truck before... it has a place of honor every season, 
because it reminds me of my Grandpa Ward's truck.
And the castle ornament.... well, I don't really need to explain that one, do I? ;)

Across the room, a breakfront/dresser is a large display space,
and I have been putting the tree here each year...
This year, I decided to create a DIFFERENT kind of tree...
 and used my wire tomato cage dome instead!
I could have used a plain ol' wire tomato cage tree,
but I was lazy and in a hurry and so I used what was already in the room.

 I placed the dome on a platter on top of a china pedestal bowl to raise it up,
and my special vintage ornaments in silver hang delicately from the wire crosspieces.
A birdsnest that I made cradles a broken ornament at the base of the dome,
and a mini-sized tophat that I bought at Disneyland serves as a jaunty dome topper.

 White china & ironstone holds more ornaments across the vignette,
and some black accents really POP against the white... especially that Chanel box :)
 Last Christmas, when I was having a blast with my kids and grandkids in Seattle,
I bought the white ceramic Space Needle salt & pepper shakers.
(They were the least cheesy souvenirs I could find down at Pier 39!)

Then this year, I found the white ceramic Sleeping Beauty Castle at Disneyland.
(I love the way the snowflakes show up behind it in the flocked black shadow box frame here...
they remind me of the Disneyland fireworks!)

As I worked, I realized that I have a growing collection here - figures of the places I love best!
Now my plan is to find a ceramic figure of the Alamo in San Antonio
(even if it's not white, I can paint it white)
and then some other places that are really special to me.
I can use them in my decor all year long, instead of just at Christmas!

 Just a few more detail shots of little decor touches...
I don't have the light strands for the clear bubble lights anymore,
so I just piled them into an enamel pail. They still make me smile!

Another handmade nest found a home in an ironstone chamber pot,
hung by its handle on an old wood gate section.

...and my vintage wire shopping cart corrals all of my gift wrap supplies!

SO, even though I waited a REALLY long time to get my decorating mojo on,
it was worth the wait.
Mostly because I don't have to take it all down in two weeks!!!

LINKED UP:
Practically Functional | Creativity Unleashed

1.14.2014

Creative Winter White Decor

My recent 'Winter Whites Inspiration' post is BLOWING up my stats!
Since you liked that so much, I thought I'd share a little MORE on that subject...
featuring some of the current white decor in my office.
[some of it can't be revealed yet, as it is scheduled to appear in print soon!]

Before we focus on the decor, here's a little 'New Year' development:
I don't make resolutions. I choose a 'Word of the Year' instead...
it works much better for me to have a word as a 'touchstone' of sorts,
to help me stay on track with the goals and pursuits that are most important to me.
[While resolutions just seem to feel like never-achieved, guilt-inducing lists]

My Word of the Year for 2014 is CREATE.

Not just due to the long-overdue revelation that 'I can Create the Life I want to live',
but also the pursuit of FUN. 
As in, Creating just for FUN instead of always as content for publication or this blog.

My post about the mannequin form made from a tee shirt was part of that approach:
I just made it for ME and had fun in the process.
Then when it works, I can go ahead and share it here on the blog!

When I removed all of the holiday decor from my office last week,
I replaced it with vintage-inspired winter white decor, using things I had around the house:

 I enjoy creating seasonal tableaux on these small display shelves.
Let's take a look at the elements I used -
and I know it won't surprise you when you realize that you've seen MANY of these items before!

 On the top shelf shown up above, there are three photo frames...
You've seen the one on the far left in my post about framing a sweater remnant.
The large and small baroque frames holding my word 'Create' used to say 'Dream' -
 as they did in this post.
This is a great way to focus on my Word of the Year.

The two white ceramic Space Needle figurines are salt & pepper shakers - 
I bought them in a schlock-y souvenir shop on the Seattle Waterfront at Christmas,
because I wanted an ornament to commemorate this Christmas with my family.
Problem was, every ornament in the shop was just plain TACKY. Not my style at ALL.
These shakers fit right in with my white and neutral decor scheme for everyday enjoyment,
and will easily be made into tree ornaments next Christmas!

The white ironstone creamer and mug are among the last few remnants of a HUGE collection.
[ I shudder at the thought of how many pieces shattered when the new kitchen shelves fell off the wall.
Priceless, special sentimental pieces - gathered and given to me by friends.
I posted about that project on HOMEtalk.
Or how many pieces I gave away when I moved from Seattle to California.... ]
I snuggled a rhinestone crown around the mug, just to add some icy sparkle.
The NeSt is one I made myself from daylily foliage, shared in this post,
and the branches are the antique glass-glittered ones that mysteriously appeared on my front steps!
I've used them in this years' Christmas tree and tee shirt mannequin.

On the lower shelf, I assembled some small items...

The snowflake-pattern plate showed up in this post last Winter.
The little white truck is very close to the same truck style that my Grandpa Ward used to drive...
and even without tires, it takes me on many sentimental journeys.
That little truck has been around for a LOTTA' years...
The glittered 'D' and crown way up on top came from a Michael's Crafts bargain bin last year,
and the Monopoly playing pieces are just something I love to collect when I find them.
[ I love galvanized metal and these just fit right in with that! ]

On either side of the truck are two of my funny little JUNK Snowmen.
Sweet Sweater Snowmen are the new creation that I sold this past Holiday season.
Thankfully, I was smart enough to grab two of these for myself before they were all gone!
I have happy memories attached to the little tin cans they are made in,
as well as the Cliquot Club soda caps that adorn them.

So, anyway, you can see that very nearly everything I used in this vignette
is something I already had and love.
Actually the hardest part for me is editing, because I always unearth more stuff than I need!
But the point is that it doesn't cost me anything but time, 
and it's time spent creating and having fun.
Sounds like a great way to start the New Year to me!

So, what's YOUR word or resolution?
What decor projects are you planning for this new year?


 As you read this post today, 
I am busy taking a HUGE STEP forward in pursuit of a life-long dream...
please send good thoughts and prayers my way, won't you?
I'll share more as soon as I can!


UPDATE: I interviewed for a job that I have wanted for over 30 years.

and I GOT IT!

.... at Disneyland!


12.24.2019

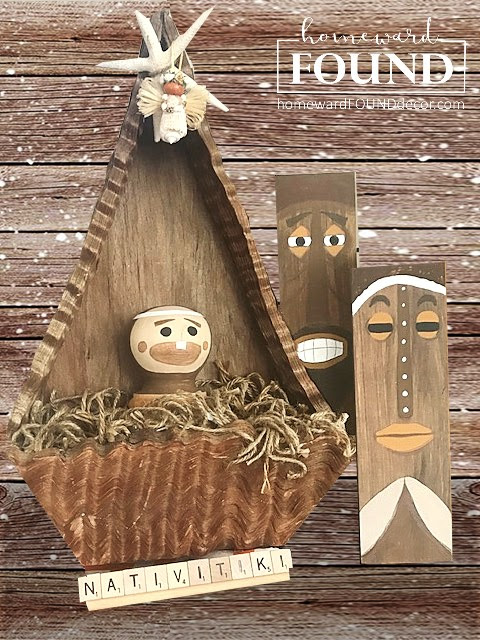
nativitiki - times two!

tiki bar, tikis, tiki culture, tiki hut, tropical decor, happy HULAdays, home decor, diy decor, holiday home decor, holiday, nativity
my thinking is: if you're going to do a Christmas theme, do it all the way.
the TIKI tree in my last post was just the beginning of our 'happy HULA days' theme...
i also created TWO incredibly cute nativity scenes with a tiki vibe.
(oh, and that name? well, as i was painting them, 
i thought to myself 'a tiki nativity. wait! nativi-tiki!' ... and it stuck!) 

i laugh out loud every time i look at this nativiTIKI in our living room! it's so happy!
grab a handful of macadamia nuts and continue reading to see all the tropical details...

12.21.2020

rainbow paint chip table runner

art,art class,DIY,diy decorating,color,color palettes,colorful home,paper crafts,re-purposing,tablescapes,entertaining,party,holiday,Christmas,Christmas Decor,Christmas Decor Themes,winter,rainbow aesthetic,roygbiv,colorful Christmas,Christmas tablescape,table runner,diy table runner,paint chip crafts, paint chips, paint chip decor,tutorial
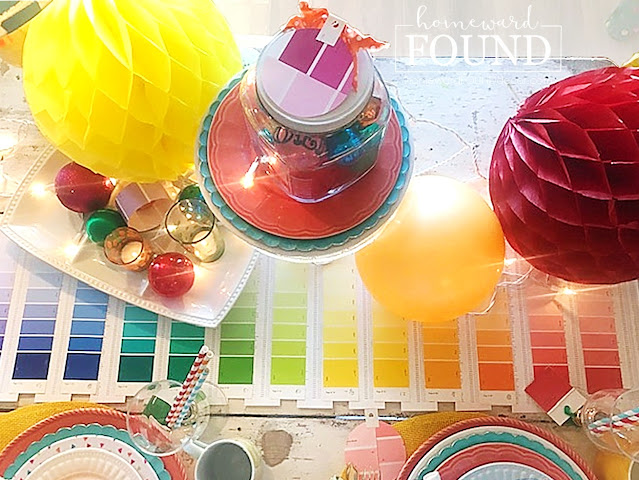
the two bright, colorful tablescapes featured in my last post
are built on top of this rainbow-hued runner.

made from paint chips and freezer paper and a glue stick. SO easy!
and right about now in the holiday season....easy is good.


continue reading for the super-simple 'how-to'...

11.28.2016

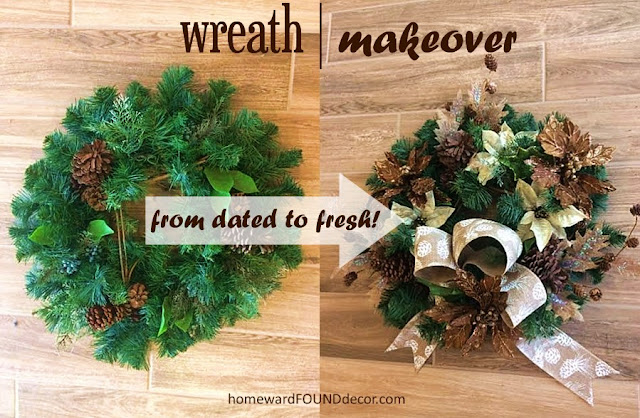
Easy Christmas Wreath Makeover

christmas decor
Welcoming people to our homes is important every day - especially during the Holiday season.
A wreath for the door or front porch is something that we almost all include in our decor... 

Like you, I gaze longingly at the beautiful wreaths and garlands 
displayed at elegant home decor shops and garden centers
And THEN I look at the price tags... not happenin', folks!!

Fortunately, those inspiring creations can lead the way to making what we already have BETTER!
I'm always up for taking something old and making it look new
(okay, well, not always - sometimes I take new things and make them look old!)
...and the wreath that my Mom has been using for about 20 years now was due for an update.

continue reading for my secrets...

12.04.2013

Bird in a Gilded Cage!

.
Years ago, I had the pleasure of presenting Holiday decorating workshops
at 'Girlfriend's Weekend' events in a gorgeous lodge, located in the wine country near Seattle.
 At each annual event, I created several vignettes...

[okay, I must digress here for a moment...
as I was typing the word 'vignette', I typed 'Viognette'.
If you know wine, you are smiling right now!  
I may have just coined a phrase there....]

back to our story...
vignettes to illustrate inspiring Holiday decor ideas and themes.
This 'Bird in a Gilded Cage' theme was one of them.
Since Gold is once again a hot decor trend, this is a perfect opportunity to share it!
I began with the hydrangeas...
Found in my own yard, they had aged to soft green and tan hues.
When I popped them into a gold metal cachepot that I had on hand, the theme came together:

greens, tans & browns, copper, and gold
with natural elements from the garden
and the nest I had nearby inspired me to incorporate birds...

The tabletop elements above include:
*a ceramic sculpture that looks like wood with two birds - it holds the real nest and twigs.

*a gold damask stripe tablecloth and green embroidered placemats with a leaf motif.
*gold charger plates, paired with a white china plate and a transparent amber glass dessert plate. 
*A vintage bar glass has green and gold embellishment.
*gold flatware

continue reading for more details...

12.18.2013

A Christmas Mystery!

Two weeks ago, I went out to get the mail - and discovered a surprise on the front step:
 
It was a large ziplock bag, filled with what at first glance appeared to be Fourth of July Sparklers.
with a thrift store price tag on the bag.

On closer inspection, I realized that they were not sparklers after all - 
but vintage Christmas decor parts!
They are old metal branches, 
covered in a heavy coat of thick black and silver German glass glitter!

I'm pretty sure that I have seen these in antique stores, assembled into trees
by inserting each branch into an upright metal 'trunk' with holes in it.
But of course I can't find an image of that online to show you :/

In ANY case, as soon as I realized what they were, 
I set to work adding them to my Christmas decor here at HOMEWARDfound Headquarters!
I simply stuck them into the diminutive white tabletop tree that I have
their bold, dark forms stand out against the white perfectly,
and the extra length of each branch allowed me to hang more ornaments on my little tree:

These ornaments are truly vintage, collected over the years.
I adore their tarnished silver/gold hues...
Mixed with modern crystal snowflakes, circa 1970 thread-wrapped balls, 1950's glittered balls,
a half-dozen wire stars from the late 1800's, and some of my hoard of pure white candycanes,
the old ornaments add depth and interest to a tree created in a limited and pale neutral palette.

Every single ornament stands out - just the way I like it!
The tree topper is a combination of elements
 centered around a tall glass figural spire from the 1960's that I've had for years.
It has a very long 'stem', and I don't like how it looks on a tree.
So I always 'hide' the stem with other things, grouped together.
Here, I used one of my original wire 'Junk Princess' crowns,
some old seam binding ribbon, and a few large crystal snowflakes...
it sparkles and shines and glimmers in the light.

About those vintage tree branches:

I've checked with my parents, and with several neighbors.
No one admits to leaving the bag on the front steps.
I have NO IDEA where it came from...
it's a Christmas Mystery!