. -->
Showing posts sorted by date for query dream. Sort by relevance Show all posts

1.14.2014

Creative Winter White Decor

My recent 'Winter Whites Inspiration' post is BLOWING up my stats!
Since you liked that so much, I thought I'd share a little MORE on that subject...
featuring some of the current white decor in my office.
[some of it can't be revealed yet, as it is scheduled to appear in print soon!]

Before we focus on the decor, here's a little 'New Year' development:
I don't make resolutions. I choose a 'Word of the Year' instead...
it works much better for me to have a word as a 'touchstone' of sorts,
to help me stay on track with the goals and pursuits that are most important to me.
[While resolutions just seem to feel like never-achieved, guilt-inducing lists]

My Word of the Year for 2014 is CREATE.

Not just due to the long-overdue revelation that 'I can Create the Life I want to live',
but also the pursuit of FUN. 
As in, Creating just for FUN instead of always as content for publication or this blog.

My post about the mannequin form made from a tee shirt was part of that approach:
I just made it for ME and had fun in the process.
Then when it works, I can go ahead and share it here on the blog!

When I removed all of the holiday decor from my office last week,
I replaced it with vintage-inspired winter white decor, using things I had around the house:

 I enjoy creating seasonal tableaux on these small display shelves.
Let's take a look at the elements I used -
and I know it won't surprise you when you realize that you've seen MANY of these items before!

 On the top shelf shown up above, there are three photo frames...
You've seen the one on the far left in my post about framing a sweater remnant.
The large and small baroque frames holding my word 'Create' used to say 'Dream' -
 as they did in this post.
This is a great way to focus on my Word of the Year.

The two white ceramic Space Needle figurines are salt & pepper shakers - 
I bought them in a schlock-y souvenir shop on the Seattle Waterfront at Christmas,
because I wanted an ornament to commemorate this Christmas with my family.
Problem was, every ornament in the shop was just plain TACKY. Not my style at ALL.
These shakers fit right in with my white and neutral decor scheme for everyday enjoyment,
and will easily be made into tree ornaments next Christmas!

The white ironstone creamer and mug are among the last few remnants of a HUGE collection.
[ I shudder at the thought of how many pieces shattered when the new kitchen shelves fell off the wall.
Priceless, special sentimental pieces - gathered and given to me by friends.
I posted about that project on HOMEtalk.
Or how many pieces I gave away when I moved from Seattle to California.... ]
I snuggled a rhinestone crown around the mug, just to add some icy sparkle.
The NeSt is one I made myself from daylily foliage, shared in this post,
and the branches are the antique glass-glittered ones that mysteriously appeared on my front steps!
I've used them in this years' Christmas tree and tee shirt mannequin.

On the lower shelf, I assembled some small items...

The snowflake-pattern plate showed up in this post last Winter.
The little white truck is very close to the same truck style that my Grandpa Ward used to drive...
and even without tires, it takes me on many sentimental journeys.
That little truck has been around for a LOTTA' years...
The glittered 'D' and crown way up on top came from a Michael's Crafts bargain bin last year,
and the Monopoly playing pieces are just something I love to collect when I find them.
[ I love galvanized metal and these just fit right in with that! ]

On either side of the truck are two of my funny little JUNK Snowmen.
Sweet Sweater Snowmen are the new creation that I sold this past Holiday season.
Thankfully, I was smart enough to grab two of these for myself before they were all gone!
I have happy memories attached to the little tin cans they are made in,
as well as the Cliquot Club soda caps that adorn them.

So, anyway, you can see that very nearly everything I used in this vignette
is something I already had and love.
Actually the hardest part for me is editing, because I always unearth more stuff than I need!
But the point is that it doesn't cost me anything but time, 
and it's time spent creating and having fun.
Sounds like a great way to start the New Year to me!

So, what's YOUR word or resolution?
What decor projects are you planning for this new year?


 As you read this post today, 
I am busy taking a HUGE STEP forward in pursuit of a life-long dream...
please send good thoughts and prayers my way, won't you?
I'll share more as soon as I can!


UPDATE: I interviewed for a job that I have wanted for over 30 years.

and I GOT IT!

.... at Disneyland!


8.29.2013

I'm in the Bloglight!


Welcome to my guests from hometalk and the blogtalk group on facebook -
Thank you, Miriam Illions for featuring me and HOMEWARDfound today!
 hometalk is a FABulous community website where you can share, discuss, learn, and be AWED
by EVERYTHING having to do with creating & keeping houses. It's AMAZING!
I'm Deb and I'd like to welcome you to my blog!
 I'm a retail and home stylist, designer, and published writer.
[more on my 'Start Here' page]

Sweet Miriam Illions had this to say in the Blogtalk post:
"This week, the beautiful & graceful Deb Kennedy of HOMEward Found Decor is in the Bloglight!
Deb's story is inspiring and uplifting. She applies her creativity and fresh perspective 

not only to design & decor, but to all aspects of life. I am honored to feature you in the Bloglight today, Deb!"
[wow! she really makes me sound much better than I am!]

Miriam also asked a few questions to help you get to know me, 
so let's get right to those:

continue reading...

8.19.2013

'as seen in BHG!'

 A few weeks ago, I received a very nice message from LuLu Tapp,
owner and photographer extraordinaire from DustyLu Interiors & Photography in Los Angeles.
She let me know that my little pumpkins were going to appear
in the feature on her lovely home
in the Better Homes & Gardens Halloween Tricks & Treats 2013!

After I picked myself up off the floor, I thanked her. Profusely!
And I've been on the lookout for the issue ever since.

Monday, she messaged me "Hey Deb!!! Its out its out!!! On newsstands now!!!Woot woot!"
At nearly the same time, a friend sent me the cover shot shown above,
then another friend sent me an interior image that includes my 2012 Harvest pumpkins:
This is one of Lulu's photos of her gorgeous home from the magazine... LOVE!

Being able to use the words 'As Seen in BHG' is just a dream come true -
I am so very thankful for the opportunity.
I originated this design, and have been making and selling them for many years,
and it's nice to finally be 'noticed' this way.

I saw a comment that Lulu made on Instagram and it made me do backflips:
"Better Homes and Gardens editor was flipping over the pumpkins and botanicals  -
I think she wanted to take them!!! Lolol"

Lulu discovered my original Sweet Sweater Pumpkins last fall, at Kymberley Fraser's store 'A Beautiful Mess'.
They looked like this in her display:

Thank you again, Kymberley, for your support!

6.20.2013

Photo Finish

I love capturing scenes, light, nature, and settings in photos.
Wherever I go, I have a camera with me. Even if it's just my iPhone.
And I take a LOT of photos!

But it took me YEARS to realize that my own photos would be 'worthy' of being displayed in my home.

I'm not a trained photographer, I just photograph what I LOVE - 
and what better images to display in my own rooms than that?
Each season, I try to capture new images of natural colors and settings 
to add to my collection, and to display on my inspiration boards and in frames.

continue reading for more tips!

5.13.2013

Sweet Summertime Front Porch

it's time to start thinking about SUMMER!
To me, summer brings to mind front porches...

I love front porches, and dreamed all my life of having a home with one.
The swing was my favorite spot to sit on the front porch
of my island home in Washington state...

smelling the field grass and the sea air, all at once.
Watching the birds and eagles and deer and horses.
Enjoying the sunshine - and the rain - from this safe little perch.
Looking out across the fields where my antique show was held...
 I was lucky enough to have this one for just a while.
It really, truly was my Retreat ;0)
[My friend Elise of Elise Marie Photography took these two photos and I am SO GLAD she did]
 
I don't live in this beautiful farmhouse on five acres 
on Camano Island, Washington anymore...
but I still love the memory of it. 
 No, I didn't prop and style the heck outta' my porch for these photos - 
this is how it looked every day, all summer long. Simple.

 You may find that really funny, coming from a decorator, stylist, and writer
who is photographing her porch for a magazine story, 
but my thing is I just wanna' be REAL.
That's why I loved writing for FOLK Magazine back then...
It was all about Real. American. Living. Not photo sets.
[ then I found out more about what was going on, 

and quickly stopped writing for that publication ]

You can create a simple front porch setting, too:

* Gather up a bench or a few chairs
[check craigslist, thrift shops, and of course curbs on trash day!]
 

* Add a table to hold a drink 
[what about an upside-down crate, or plant pot?]
* Finish with a few pillows and colorful decor accents.

Whether it's sprawled across the whole front of your house or is a small covered entry,

your porch can become an oasis of relaxation this summer.

I had another small covered porch on the back of this house, just off the dining room.
I tucked a vintage metal folding bed out there, positioned like a lounge chair
(with the back up at an angle) piled it with pillows,

and hung curtains on the porch posts to enclose the space a bit.
It was a lovely, private place to greet the morning sunrise...


I love this photo!
If I do a decor book, this will be the cover.
The quilt on the swing was a family heirloom. 
The flags popped into a Coke bottle were a last-minute thought -
see more easy summer decor ideas like this in this post!

To change the look of the porch,
it was easy to replace these simple colorful accents with something else.
 Since we are working with a Red, White and Blue theme here today,
I thought I'd share a 'Fast, Cheap & Easy' party tip:

A refreshing and very patriotic version of flavored water
Just put layers of frozen blueberries, ice cubes, and fresh strawberries 
in an old glass jar, then fill the jar with water.
They flavor the water ever so subtly - SO refreshing on a hot day!

Below is a shot of my 'Sweet Retreats' column
that appeared in Issue V of FOLK Magazine in 2012,
using some of the images I am sharing here...
 My post is also featured in a hometalk e-newsletter!


What about you? Where is YOUR favorite place to relax and while away the summer?

EDITED 6/15 TO ADD:


In Spring, 2015, three and a half years after I moved out of my dream house
and even after I stopped posting new content here on my blog,
I came across a piece of art that I quite simply HAD to buy: 
This piece is called 'Shore House', by artist Zhen Huan Lu.

Do you see why I had to get it?
 It's very nearly the exact same setting as my own front porch,
right down to the 'stop sign'-shaped window beside the front door.
Amazing.

4.21.2013

Re-Framing Your Dreams

On Saturday, I had the honor of being part of a remarkable event:
Launch Your Creativity.

If you were one of the guests in attendance,
I would like to thank you from my heart for your warm reception, your trust, your attention, 
and your grateful responses to the message I shared.
(more about my message later in this post...)

This inspiring gathering is held each Spring in a gorgeous Parisian-themed tearoom, 
and attended by 45 women who are seeking guidance, support, and encouragement 
as they pursue their own creative dreams. 
Most dream of launching a new business – a store, a fashion line, a business service – 
and there are women who attend as a 'jump start' to a new life.

I am one of those women, too.

My friend and LYC founder Sharon Hughes had been asking me to speak at her events for two years. 
My background in retail visual styling and store design 
was a great addition to the other subjects covered by the experienced and successful speakers, 
and I was honored to be asked to participate. 
Yet because the events are held in Southern California, and I was based in the Seattle area, 
the logistics just never worked out. 
I was busy running two businesses, and couldn't get away from them.

Well, all that changed in the fall of 2011.
Everything about my life changed then...

Without sharing the 'Lifetime Movie' details of what happened,
I'll say that the result is that I am single (separated, then widowed) after 32 years of marriage,
 live in Southern California again, and am rediscovering who I am and what I want to do.

I attended this beautiful event last April as a guest.
I went because my life had undergone radical changes over the preceding seven months. 
I needed to be surrounded by positive energy to assist me in shifting my own perspective, and to heal. 

And my friend Sharon knew that I would find what I needed there. I did.

This year, I was able to finally accept her request to speak at the event!
But I didn't talk about retail visual concepts or displays or stores or brands...

In the 19 months since the awful day that everything changed for me, 
I have been on a journey of release, recovery, healing, rediscovery and rebirth. 
And it is from that journey that I learned some valuable lessons...
those are the lessons that I shared in my presentation on Saturday.

Titled 'Re-Framing Your Dream', my presentation asked this question:
“What do you DO when your dreams don't work out the way you planned?”

Because I have been an artist all of my life, I presented my subject wrapped in a metaphor:
'Dreams as a Masterpiece'. A one-of-a-kind Masterpiece that only WE can bring to life.
Just as an artist begins with a vision in his head 
then transforms a blank canvas with color and brushstrokes, light and shadow, depth and perspective, 
our lives give us the opportunity to create something from our vision:
Our Dream.

And as we do, that 'canvas' finds itself in many different 'frames'...

With the visual aid of eight very different picture frames, 

I talked about the process that a Dream takes as it is being created
and how situations affect it - and us.
Not every journey is the same, but the cycle is similar and most people can relate...
 dream a little dream

This is your secret 'hidden in my heart' dream.
The one that begins as a thought like 'what if...'
(there's a WORLD of possibility in those two little words!)

The frame is tiny, but valuable and beautiful.
We cherish it, hide it away, and keep on dreamin'...
 a growing dream

 This is the phase when your dream begins to grow.
You think about it constantly, you doodle and make lists, 
you start your research, and you can't sleep at night
Because the dream has you SO excited!
The frame is more detailed, a little bit bigger, more clear.

At right about this point, you want to tell everyone about it.
DON'T!!!!!!
Tell your mom, tell your BFF, tell your sister. maybe your husband/partner.
Do NOT tell the neighbors and the gals at church or work, 
and definitely not the lady behind you in line at Target!

Protect this little dream! It's like a baby bump...
because once you start showing, it seems like everyone on Earth has questions and advice for you.
All of that will overwhelm you and confuse you. It will make you question every choice and decision.
Only the people that can support you and help you need to know about it right now...
Don't let strangers touch the baby!
 a grand dream

You've spent time researching and preparing, making a business plan and lists,
finding resources and continuing to add to your 'idea files'.
You have people you trust around you to give advice and answer questions.
The more you grow it,
your dream becomes the GRAND dream:
Your way to share what you value with others, with the world.
The frame is larger, very detailed, elegant, beautiful, and ready to be revealed.

Whether it's a product or a service, small or large,
will impact five people or five million people, 
it is a worthwhile dream
because it comes from your heart, your passion, your own unique talents and skills. 
It is your heart on display!
When you reach this point, you're sharing your dream with everyone.
But now, it's strong enough to hold up under the questions and doubts and opinions of others.

Sometimes, other people even share it FOR you...
 a spotlight on your dream
Sometimes this happens, and sometimes it doesn't:
 You become 'noticed'. You get media attention.

the frame for this is large - but plain. 
because the focus of any spotlight needs to be what it is SHINING ON.

Here's what happens:
Your facebook LIKES and Twitter followers are growing astronomically.
Your photos are shared all over facebook and Pinterest and Instagram.
Bloggers are talking about you, linking to you, and asking you to write guest posts.
Popular magazines start calling and want to run feature stories on your or your business or your home.
Ellen wants you on her show!

Yes, the spotlight is FUN! It can be a great experience,
and it CAN help you grow your business awareness and reputation.
...But it should never be the POINT of your dream.
It should be a by-product of your dream growing and moving forward according to your plans.

Never exhaust yourself pursuing the spotlight.
Never let reaching or being in the spotlight be the focus of your dream.
(unless your dream involves acting!)
 a messy dream

This happens to everyone, to every dream, so get ready...
At some point, something is going to go wrong and get VERY messy.

The frame that I used here has a great story:
It was gold when I bought it at a thrift store.
I brought it home and spray painted it white, so it would match the other white frames I already had.

I don't know if you can tell from the photo above, but that frame is not white.
It's ivory. And the paint is drippy, runny, separated from the base coat in cissed spots
and it looks like it's got smoke damage from a fire.

After my momentary frustration over the dismal results,
I realized that it was the perfect visual for this part of the presentation...
Because that frame is a HOT MESS.

Life, business, and dreams can  - WILL - get that way, too.
Things won't always go according to plan.
You are going to face some whopper messes along the path to your dreams.

Bad marketing campaigns, products that are ill-timed (or copied!), 
supplies that don't arrive, clients that don't pay, 
illness that causes you to miss a huge opportunity...

Need I say more?

What do you do? You clean up the mess the best you can.
You fix it, spin it, recall it, refund it, repair it...
eat crow if you have to.
and then move on to the next step.
live, learn, apply, go forward.

forward to the next phase:

Have you ever heard of an 'underpainting'?
That's when an artist paints OVER an existing work with gesso
to create a clean canvas.

And then they start over...
a revised dream

There are points in the growth of a dream and business
that force you to stop, take notice, and then take action.

Perhaps you've spread yourself too thin and are overwhelmed.
Maybe your sales are down and you don't know why.
Maybe this dream just doesn't reflect your vision anymore.

what do you DO?

STOP.
Get those trusted advisors together for a pow-wow.
Look objectively and honestly at what's happened and why.
Then make hard choices and necessary changes...

Usually, that means scaling back. Cutting things away. Slowing down.
A step back or a step sideways is NOT FAILURE! It's EXPERIENCE!

The frame is smaller than the frame around your Grand dream, but it's more valuable.
You can see the swirls and curves that reflect the Grand dream frame, even though it is smaller.
What you can't really see is that it's made from a far more valuable material!

Redefining and restructuring your dream may just make it more valuable.
 a destroyed dream

Sometimes, due to something that comes out of nowhere,
our dreams are destroyed...

A natural or other disaster. A pile-up of factors that just can't be cleaned up.
The choices and actions of others who impact our lives and our dreams.

Unbidden, those things come like missiles from out of nowhere, and destroy our dream.
(And sometimes US in the process.)

The frame is broken, cracked, damaged,
and the dream is torn, dirty, and unrepairable...
There comes a point, my friends, that you have to stop fighting for it.
A point where you have to accept that the dream is no longer breathing.
It's gone.

And that is the point when you have to release it. Let go.
Grieve the loss, celebrate the memories, learn from the experience, 
heal from the hurt, and move forward in a new direction. 

My own story is that my cracked, broken, and unrepairable frame
held not only my dreams, but my whole life.
Moving on is hard work... but you can do it.

and when you do, you have to remain open and ready for the arrival of
 a NEW dream

It may just turn out that the new dream you dream -
another one that is born out of your heart, your passion, and your purpose -
will be even BETTER than the one you had in the beginning...

the frame is larger, more beautiful, more detailed, and more substantial
than the Grand dream frame that seemed so perfect before.

At the end of my presentation, I shared this: 
Although I have grieved and released my former dream and my former life,
though I have learned so much that has allowed me to understand why much of it happened 
and why it ended the way it did,
and though I am ready for and excited about the new life that lies in front of me now...

I have NO IDEA yet what my NEXT dream will be!

I truly don't. I have ideas, I have some things I am going to pursue and see how they 'pan out',
but I don't have a huge vision and goal in mind. YET.

But I know that I WILL have another Dream. It's just not time yet.

I know without doubt that my new dream will grow from my true passion
for finding simple ways to make spaces and environments beautiful and enjoyable,
and from my desire to share that with others to enrich their lives.

Whether it becomes creating sets for an entertainment giant,
or creating displays for a well-known retailer,
or opening a store of my own or starting another vintage show,
or simply continuing with my consulting and writing and speaking,
I know that the 'big picture' will come into focus soon.

I'm just going to keep on taking one step forward – 
or at the very least, on those days when it's SO hard to be starting completely over at 51 – 
I'll just keep FACING forward. Because even that is progress.

A masterpiece is made one brush stroke at a time
 
And then the perfect frame is found.

I will never lose faith again – not in me, not in good, not in God.
And not in the fact that I am here to share my unique gifts and abilities and vision with the world – 
however it is framed, my dream is one that the world needs. 
And so is YOURS!
So I find myself smiling a bit wryly as I share this unusual post on my blog...

This blog is where I have shared ideas, information, and inspiration that is all about how things LOOK. 
Your store, your displays, your brand image. 
And for many years, I focused on exactly that in my own life: how it all looked from the outside. 

This journey I am on has taught me to deal with the reality of how it really looks – inside and out. 
It has taught me to be authentic, and to follow my own advice and 'Tell My Own Story'. 
As I continue to write and speak and consult with retail businesses, I will stress this to my clients. 
Open your eyes, see the situation for what it truly is, and then get to work. 
Re-define your business, and be authentic. 

The canvas of your dream may be 'framed' in a brick and mortar store, 
or an online boutique, or a space in a vintage mall or show. 
No one else is you, no one else offers what you do the way you do. 
Tell Your Own Story. Create your dream. The world needs you, and your dream!
_______________________________________________________

I find myself smiling a bit wryly as I share this unusual post on my blog...
homewardFOUND is where I share ideas about 
re-thinking, re-imagining and re-defining 'found objects' into décor. 

Now it's my turn to re-think, re-imagine, re-define my life and my dream...
maybe it's your time for that, too.
 
so I thought that sharing this post here was appropriate...


The same principles apply to a dream as to found decor:
* Use what you have NOW - Look around you and see what's been overlooked that you can use.
* Work from your strengths, purpose, and passion - Use the skill set you have!
* Stay true to yourself and your style - Be Authentic.

I might just make my own frame out of reclaimed lumber 
and paint over a canvas from the thrift store 
as a visual reminder to myself that we can always make things new... 
even our dreams. Even our lives.

4.02.2013

Garden House Makeover!

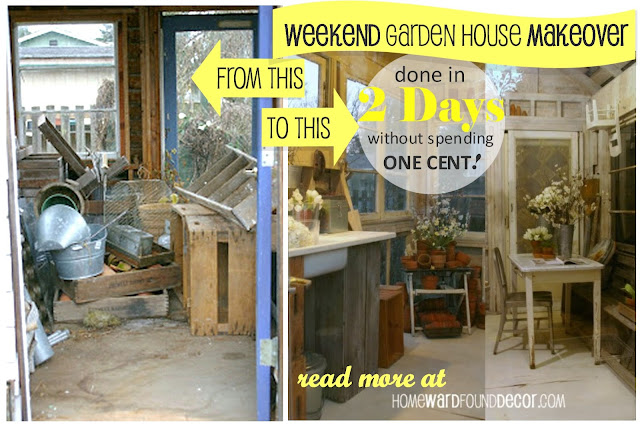
Yes, i REALLY did do this makeover in two days!
i think if that you see it and realize how absolutely possible it IS,
then you can take on a Spring Cleanup Project like this one, too!

here's what happened last winter (2012):
it was january. in seattle. COLD. rainy. gray. depressing.
i was ACHING for spring.
 and when i looked out into the backyard of the sweet little cottage i was renting,
there was a little garden house (potting shed, she shed, garden shed)
that the talented owner had made from salvage.
and it was full of junk. 
some of the junk was the house owners, and had been there for years.

some of the junk was mine, and had been dumped there the month before when i moved in.
the space was totally unusable.
but i knew that with a good cleaning job,
it could be a FABULOUSly usable space - and a stylist's DREAM!

so i asked myself these questions:
* what junk that is thrown in there can be used in a new way for storage or decor?
* what junk/stuff that i have in storage or in the garage can be used in there?
[and let me tell you, i had a LOT]

on Friday, i gathered up all the stuff i was going to use, and sat it outside the garden house.
i was ready to begin the project on Saturday morning
and DETERMINED to have it done by Sunday afternoon.

a lofty goal, especially considering that it looked like THIS inside on Friday:
Saturday morning, i began by emptying out the garden house...
which made it look a LITTLE bit less awful:

the old screen door that i had was hung on the INSIDE of the back doorway
[with the glass door swinging open to the right, outside of the garden house,
this was the only way to make a screen door work there.
and i had one, so i wanted to use it.]

after that, i grabbed two partial gallon cans of white paint left from painting furniture,
and watered them down to a 50/50 mix.
i used that to paint all of the window edges and door trim and doors, and floor.
there was about a half can of the whitewash left, so i added more water
and used that really thin mix to wash all of the walls and beams.
the wood was SO dry that it literally sucked up all of the paint/whitewash!
i sat one small heater inside the garden house, just to be sure it would dry.
and left the heater on overnight with the doors closed.
[NOTE: this was a very safe contractor's heater on a sturdy base, not a household heater.]

on Sunday morning, i started moving in the furniture...
on the left side of the entry door:
one tall old crate [that had been in the garden house] and
two of my own large wood crates, stacked on their sides
formed the supports for my enamel kitchen sink
[been hauling that around for about ten years...]
there was no running water, but the sink and it's attached counters worked great for potting plants.
had i stayed there, i would have run the garden hose through the wall and into the sink.

a pegrack made from old fence boards and ceramic pegs for electric fences
was hung over the sink for storage.
and an old aluminum light pendant was hung above it all
[attached to a heavy-duty construction extension cord, that ran to an exterior plug on the house]
in the back corner, an old wooden chair that i 'rescued' from a dumpster
[and have subsequently used for years in retail store & seminar stage displays]
holds my medium and large terra cotta plant pots in unusual ways:
there's a metal industrial bread pan on the floor holding pots,
and there's a metal industrial muffin-top pan sitting across the arms of the chair holding pots.
a few others sit on the chair seat under the muffin-top pan.

all of the tiniest pots sit up on a beam between the studs.
[i saw that idea at Christiansen's, one of my fave nurseries]

on the right side of the entry door:
there had been a long wood park bench inside the garden house (the owner's),
and i placed it under the large window. over the window, i hung another one of the pegracks.
it's not shown in the photo below, but i later hung a large white lace bedspread from those hooks
to block out the VERY ugly view of the neighbor's yard. it still let the light in, which was perfect.

i sat an old enamel-top table (roadside find!) in front of the bench,
and added one of my metal chairs to the other side.
(the other four matching metal chairs were at a patio table in the backyard)

 above the table, a metal floral chandelier that i have used for YEARS was hung from the rafters.
[you've seen it painted bright green in a past office post!]
the chandy's electrical cord was connected to another heavy-duty contractor's extension cord 
that ran to an exterior plug on the back of the house.
[the cord ran down the fence line to the house]

with all of the major pieces in place, it was time for the details...

here's a photo of the finished interior on Sunday afternoon:
everything that had already been inside the garden house was used.
i added a LOT of my own stuff - furniture, lighting, decor & garden elements.
but i did not spend one single cent on this project!

 here's what i did a day later:

the garden house's exterior didn't really need much work - 
nothing more than a removal of some old hops vines that had grown up the side
and the addition of a 'porch light' under the existing glass window 'awning' over the door.
[the light was a plain metal worklight from Home Depot that i had on hand,
and the cord ran under a board into the extension cord already inside]

i also hung two small metal 'shelves' from IKEA, one under each window,
and loaded them up with some terra cotta pots.
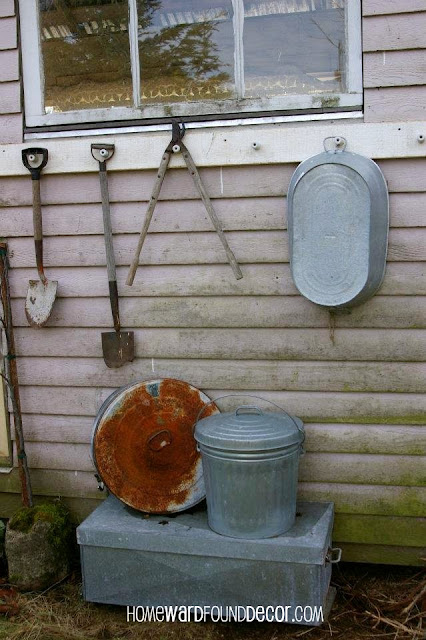
around the side of the garden house, another one of my original peg racks was hung outside
to hold large galvanized buckets and old garden tools.

and later that same day
i got busy shooting photos for upcoming magazine and blog projects:
 ...and more that i'll share in an upcoming post!

Then the NEXT day, THIS happened:

yup... it SNOWED!(pretty, isn't it?)
i don't live in that little cottage in Seattle anymore, 
but i sure have fond memories of this project and the photo session.
thank you, Todd, for the freedom to do this to your place!

so what are YOU doing this coming weekend?
maybe it's time to look at that garden shed or back porch in a new way...
there's a LOT you can accomplish in just two days!

shared online:

cupcakes & crinoline

green willow pond 

jennifer rizzo's fabulously creative fridays