. -->
Showing posts sorted by relevance for query dream. Sort by date Show all posts

7.01.2014

Taking a Break....

 In a world of increasing speed, business AND busy-ness, 
broadcasting our every meal and move and thought on social media,
and occupation with things happening outside of ourselves,
I crave simplicity.

I long for summer days that stretch into forever... 
a season of relaxation unfolding moment by memorable moment,
WITHOUT documenting it in photos or posts.

My heart yearns for a summertime like the one I experienced as a child - 
and if you want to see what that looks like, watch the movie 'Now and Then'.
The girls at the beginning of the film depict exactly the kind of summer vacation that I lived 
as a kid in the late 1960s and early 1970s.
I loved it. I tried to re-create parts of it for my own kids, who grew up in the 1980s.

In this recent post here on HOMEWARDfound,
I shared a bit about how a certain book influenced my summers and my life as a child.

That re-discovered book has stirred creative longings in me again:

To explore the local shops and parks and gardens that call to me as I drive by.

To spend my days off walking and sitting on the beach, 
photographing crashing waves and changing sunlight.

To be inspired to create something just for the pleasure of playing in the moment - 
not as a planned, scheduled, managed activity leading to a blog post.

To invest hours in writing letters to the people I love, 
rather than rely on texts and facebook comments to communicate with them 
in the midst of our busy lives.

To plan and enjoy a monumental birthday party for Mom and family reunion for everyone.

To spend days and nights wandering the magical streets of Disneyland,
seeing it again like an eight year old little girl with a dream in her heart
(and a camera in her hand).

To celebrate that my childhood dreams really ARE coming true 
as I work at the Happiest Place on Earth,
especially now that I have been promoted to member of the Visual Merchandising Team!

To lie in the shade and listen to music and read books that nourish my soul.

Actually, that word perfectly captures what I am craving:  
Nourishment.

I desperately need more than just a 'fast food' mindset when it comes to my creativity.
I need the freedom to immerse myself in an idea, a process, a project
and 'let it flow'...[ why, yes, I DO hear a certain tune when I read that! ]
instead of rushing everything to make it fit a blog post schedule.

There is only one way to satiate my hunger for simplicity and focus - 
and that's to simply STOP. 
Stop running through the equivalent of a drive-through for inspiration and motivation.
Stop worrying about making products and selling them online,
and marketing and promoting and... all of it. It's exhausting.

And now, finally, I'm ready to give myself the gift of summertime again...
I am taking a social media break for the rest of the summer.

I plan to spend the next few months feasting on time in nature, 
time with family and friends, time on a walking path and a bike, 
time in the sunshine, and time investing in my own creativity.

Heaven knows, I have learned that there are no guarantees.
No 'forever'. And sometimes, no 'someday'.

We have only each moment, each day, to LIVE. 

Enjoying every day: that's where I'll  be this summer.

8.29.2013

I'm in the Bloglight!


Welcome to my guests from hometalk and the blogtalk group on facebook -
Thank you, Miriam Illions for featuring me and HOMEWARDfound today!
 hometalk is a FABulous community website where you can share, discuss, learn, and be AWED
by EVERYTHING having to do with creating & keeping houses. It's AMAZING!
I'm Deb and I'd like to welcome you to my blog!
 I'm a retail and home stylist, designer, and published writer.
[more on my 'Start Here' page]

Sweet Miriam Illions had this to say in the Blogtalk post:
"This week, the beautiful & graceful Deb Kennedy of HOMEward Found Decor is in the Bloglight!
Deb's story is inspiring and uplifting. She applies her creativity and fresh perspective 

not only to design & decor, but to all aspects of life. I am honored to feature you in the Bloglight today, Deb!"
[wow! she really makes me sound much better than I am!]

Miriam also asked a few questions to help you get to know me, 
so let's get right to those:

continue reading...

3.25.2023

Easter egg mushrooms!

spring, Easter, just for fun, diy decorating, seasonal, boho style, re-purposed, garden style, up-cycling, painting, nests, mushrooms, mushroom decor, diy mushrooms, Easter egg mushrooms, Easter decor, Easter decorating, faux chocolate bunnies, egg mushrooms,
my last post for  March Mushroom Madness  
wraps up with this creation... just in time for Easter!
why not decorate for spring with mushrooms, along with the bunnies and eggs?
ah, but these are no ordinary mushrooms - these are made from eggs!
you can use REAL eggshells, as i did, or simple plastic eggs to get this whimsical result.

(i know, eggs are really pricy right now! i always save the shells to use in my garden,
but i'm always happy to turn 'trash' into 'treasure' via crafting!)

 continue reading to see how easy they are to create...

6.30.2022

Miss Dot goes to the county fair!

summer,just for fun,entertaining,glamping,DIY,diy decorating,vintage,vintage style, outdoors,trailers,campers,vintage trailer,vintage camper,Shasta ReIssue,Shasta trailer, lemon decor,Lemon Drop Divas,glamping decor,yellow decor,lemon decor.
the past four posts have shared some of the decor i created
for a recent 'county fair' themed camping/glamping event.

and though most of the photos i took of trailers DIDN'T turn out :(
i have a few of ours and a few shots from the event
to share as inspiration for you when you host events or go 'glamping'!

continue reading so Miss Dot can show herself (and her COUSINS!) off...

4.07.2022

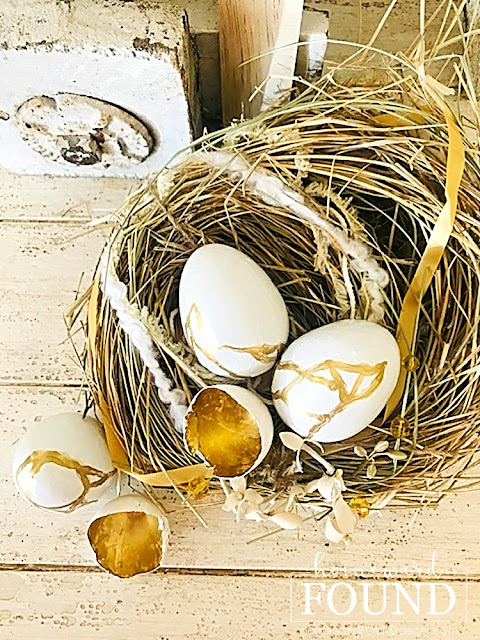
faux painted 'kintsugi' easter eggs

spring,Easter,painting,DIY,diy decorating,decorating,faux finish,tutorial,home decor,spring home decor,spring decorating,easter eggs,painted easter eggs,easter, passover,faux paint treatments,kintsugi,faux kintsugi,nests.
last fall, when i created my faux painted 'kintsugi' pumpkins,
i knew they were just a 'practice project'...
because i always envisioned that paint treatment on eggs, for Easter.

honestly, i couldn't be happier with the results!

this is a simple paint treatment with elegant results,
one that can be applied to any type of egg - paper, ceramic, wood, glass, or real eggs.

continue reading for my easy tutorial...

2.04.2014

I'm Stuck On You, Valentine!

I have a PRIZED collection of Mary Engelbreit Home Companion Magazines
[EVERY issue!] and turn to them often for seasonal inspiration.
Mary is such a champion for independent artists, small businesses, and creative spirits,
filling the pages of her lovely publication with color, fun, and 'Breit Ideas'...
Like so many others, I miss this magazine - but I do understand why she discontinued it.

Recently, I was thumbing through past winter issues of MEHC,
and saw a really cute and simple craft idea on the pages.
Since it's something I have already done myself, I thought I'd share it with you.


Before I drafted this post, I messaged Miss Mary on facebook,
and asked her permission to show a few pages of her marvelous magazine in my blog post -
and she replied 'That would be great, Deb! Thanks for asking first!'
SO.... with permission from 'The Queen of Everything', I shall proceed!

Here are the pages I saw in the February/March 2005 issue of MEHC Magazine
... when I saw them, I immediately thought of THIS little creation of mine:
I made this tiny 'foofoo faux food'TM ice cream sundae pincushion a long time ago.
I MAY have even been inspired back then by this very article in Mary's magazine!
.
Inspired all over again, I made use of some stuff that I had on hand:
red sweater scraps, leftover trimming, polyfil stuffing, and some miscellaneous containers,
and created a few MORE pincushions:

An errant cupcake wrapper and an ironstone creamer are perfect pincushion bases,
and my Original Sweet Sweater Snowmen are pulling double-duty as happy pincushions!
[PS: I still have a FEW of them left - for sale now in the HWf SHOP ]
I unearthed several of those 'tomato' ('strawberry'????) pincushions, too,
and popped them into other containers just for fun.

How 'Fast, Cheap & EASY'TM is this?!!!

As the article in Mary's magazine suggests,
this would be a simple craft project and great gift idea for Valentine's Day!

My quick collection of pincushions now populates the wall shelves in my office...
Joined by a pair of sweater-covered pillows and a cableknit throw on the sofa,
it's a happy corner with easily changed Seasonal Style!

[oh, and that 'D' on the shelf? It's a lil' something I just whipped up, using
a pressboard letter, some old giftwrap, and two round pieces from a place card kit.]
Does it look like something specific? Like maybe MOUSE EARS? IT IS!
I'm celebrating... because my lifelong dream came true last Friday afternoon...

I now work for the Walt Disney Company!!! 
____________________________________________

I'd like to offer my deepest thanks and gratitude to Mary Engelbreit,
for her permission to show the pages from her treasured MEHC Magazine!
This woman has a heart of gold, and I admire her so...
Connect with Miss Mary on her 
website, blog, and facebook page!

OhMiGosh...have MERCY!

Miss Mary shared my blog post on her own facebook page today!


shared online:
 
Cupcakes & Crinoline | Project Inspire{d}


4.10.2014

It's a Small, Small World!

 Guess where I am this morning???
 I'm at the 'It's A Small World' attraction at Disneyland!
( 3:30 AM PDT report time! )

Disney Cast Members, characters, and special guests 
are gathering at Disney Parks around the world 
to celebrate the 50th Anniversary of the 'It's A Small World' attraction 
with a live sing-a-long of the sweet theme song on a live Good Morning America broadcast.

Edited to add:
 

I was on the train that pulled into the It's A Small World attraction facade 
during the GMA segment - 
back row, second car, and you couldn't see any of our faces on television!

But that's okay, because the point is that I was THERE to participate,
and I loved every moment of it! What a dream!!!!

 
I became an official Disney Cast Member just over a month ago, 
after waiting all of my life to do so....
The timing couldn't be more perfect!

My grandfather was an electrician who helped to install the Small World attraction at Disneyland, 
and I could not be happier to be able to participate in honoring him 
and his part in the history of this attraction today.

Thank you, Grandpa Ward, for this gift 
that has touched every generation of our family...

"It's a world of laughter, a world of tears.
It's a world of hopes and a world of fears.
There's so much that we share,
That it's time we're aware
It's a small world after all.

It's a small world after all.
It's a small, small world.

There is just one moon and one golden sun.
And a smile means friendship to everyone.
Though the mountains divide,
And the oceans are wide
It's a small world after all.

It's a small world after all.
It's a small, small world!" 

.

1.09.2016

Valentine's Day Sweet Tooth!

Valentines Day window display

Deb's got a sweet tooth in more ways than one, let me tell ya...
today I was searching for something on my retail visual design blog
and found a 'blast from the past' old post sharing my Valentine's Day decor.
... and since we're already gearing up for Happy Hearts Day decor,

I thought you might just want to see it!

That was my little craftsman Cottage's kitchen window shown above, 
loaded with candy dishes heaping full of yummy tidbits 
(that I'll never really eat, truth be told....my weakness is chocolate
and a few trompe loeil treats.
One of them was inspired by THIS photo
from a past issue of Mary Engelbreit's Home Companion Magazine ...
stacked ribbon cake decor
I gathered up some round cardboard containers, metal tins, fabric, ribbons, and froufrou,
and got to work making my own versions of this 'stacked wedding cake' idea.
(I know, I know, this is not WORK. Let's call it a 'Creative Exercise' then, OK?)

I came up with two of them:

original valentines day decorvalentines day decorating
It's simply a cake pedestal with boxes, tins, and even a ceramic coffee cup
stacked up in layers and embellished with ribbons, flowers, 
and even my own REAL wedding cake topper!

 I shared a similar 'stacked wedding cake'-style idea here on HWf a few years ago:
repurposing white dishes

Here are just a few more ideas for making your Valentine's Day sweet as can be....
heart-shaped candy boxes valentines day decorvalentines day decor
More clear vases, domes, and candy dishes were loaded with 
pink and red candies from the Dollar Tree, an old heart pin made from buttons,
a 'cupcake' pincushion in a mug, and red marble hearts in a heart-shaped box...
it all added whimsy and charm to that little window in front of the sink
but took no time at all to create!

The truth was that although my Cottage kitchen was a retro dream,

the view out that window was utterly hideous
it looked directly at the garage of the house next door. UGH.
(you can see it right there in the background of the top photo!)
So I always created cute little vignettes in the window to look at instead!

.
Want even more Valentine's Day inspiration?
 

See my '30 Days to Valentine's Day Countdown' posts from 2013!
View my Pinterest board: February Hearts


pssssssst..... I'm on Instagram, too!

4.21.2022

a new sweet sweater 'shroom for spring!

spring,flowers,sweaters,Sweet Sweater Originals,Sweet Sweater 'Shrooms,DIY,diy decorating,decorating,trash to treasure,re-purposed,up-cycling,tutorial,seasonal,boho style,sweater mushroom,mushrooms,spring florals,spring home decor,home decor.
last fall, i created some Sweet Sweater 'Shrooms,
using ceramic bowls and vases covered with sweater scraps.

then i found something that caused me to create a new 'take' on the 'shroom idea,
with a nod to spring...
i am really happy with the results, and the process isn't hard at all.
I hope it inspires you to give it a try!


continue reading to see how it started, and how it ends up!

5.12.2014

DIY Kitchen Cabinet - to - Shelf Makeover

This time of year, it seems everyone talks about 'Spring Cleaning'.
Well, we all KNOW that 'cleaning' leads to 'makeover' projects, right??

That happened in the kitchen of my former dream house...
 
Stuck in the early 90's, it was really ready for a makeover.
The oak cabinets were ugly and basically non-functional: 
narrow, hard to get access to the back of the corner cabs, 
and the doors were hung to open backward!
Not to mention they were made of orange-stained oak, 
and there was a weird paint job on the kitchen walls. 
One day, I started emptying them to clean and re-organize...
and I was frustrated beyond belief with how little they held.
[ Let's just say I was a bit VERBAL in my frustration, shall we?]

The husband heard my grumbling, walked in, surveyed the mess, and asked
"Ya' want me to just yank those things down and build you some shelves?"
 
In record time, those suckers were off the walls and out the door!
[ NOTE: I do not demolish things. 
No swinging hammers and flying wood like on HGTV and TLC shows.
Those scenes REALLY make me mad, to tell the truth. ]
We removed the cabinets from the wall, hauled them out to the workshop,
then removed the doors from them. 

Those doors became the new shelves for the kitchen, 
and the sides of one corner cabinet were ripped into strips
 to create the brackets to hold the shelves on the wall.
The rest of the cabs were hung on a wall in the shop for storage.

Painted white, the new shelves were ready to go up within a day - 
AFTER the walls were painted.
A fresh tan paint color on the entire kitchen (walls AND ceiling) 
 unified the spaces that had been split by the overhead beam and 'bay' area on the window side. 
Unseen in the photos, a new track light was installed on the backside of the beam. 
White paint on the window trim made it seem much larger and more open than the previous wood tone. 

[BTW, the rest of the plan was to paint the lower cabinets white, unifying the whole kitchen. 
I never got that far before we had to move.]
The new wood shelf brackets were screwed into the studs, 
the shelves screwed onto the brackets, and the project was done.
Then I noticed that the shelves weren't spaced quite the way I had wanted...
but I didn't say a word. 
This was a vast - and FAST - improvement, so I was just grateful to have it done!

 I filled up those shelves and the counter space below them with functional and beautiful elements - 
and those shelves held over TWICE the amount of kitchenware than the cabinets ever had!!
Best part? This project cost us nothing but time:
We had the paint (our whole house was painted that color), 
we had the screws and sand paper and tools, 
and we used the old cabinet wood for the new shelves. 

It turned out so well, we ended up doing exactly the same thing in the laundry room, too.
But of course, I don't have photos of that. :(

 Don't be deterred from making your rooms function and look better
just because you think it will cost money.... it might not cost a cent!
My next post will have a fun re-purposing idea for your bedroom decor

More Spring decor inspiration on Pinterest!

shared online:
Cupcakes & Crinoline | Project Inspire{d}