. -->

hello! don't miss all of my sidebar content - click 'view web version' on your screen!

Showing posts sorted by date for query halloween. Sort by relevance Show all posts

9.14.2020

paper 'paint chip' pumpkins

fall, fall decor, fall home decor, pumpkins, papercrafts, fall pumpkin decor, paint chip crafts, paint chip pumpkins, crafting, fall crafts, orange decor, diy, diy home decor, diy fall decor, Halloween decor
these happy pumpkins sprang into my head one night,
and i couldn't wait to get into my studio the next day to try them out!

last spring, i shared a few projects that are based on paint chips.
although the first project - hearts - was made from real paint chips (from a client's decor project)
i then came up with a way to make my OWN paint 'chips': paint them on paper!

not only is it a perfect way to get the right colors for a specific use,
it also assures that i always have as many as i need if a project expands
(frequently!) or needs a do-over (sometimes!).

.
continue reading for details on making your own painted paint chip paper
AND the things i've made with them this year!

9.03.2020

why 'seasonal' decorating?

winter, spring, summer, fall, autumn, holiday, seasonal, decorating, home decor, diy,  diy decorating, seasonal decor, room makeover, restyled, decorating on the cheap
i get that question a lot: "why do you change your home decor with the season?"

it's not such a foreign concept, really. most people do this at certain points in the year -
Halloween, Christmas, Fourth of July, Easter.
they bring out decor elements that are specific to those holidays to enhance their enjoyment.
i grew up with a Mom who did that, making holidays special.

decorating for winter, spring, summer, and autumn is a similar approach...
simple, subtle changes in color and accessories can make a dramatic difference
in how a room feels, and how i live in it.

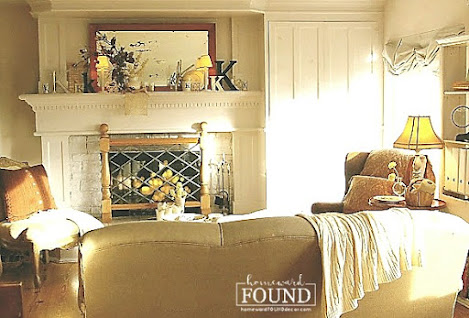
for example, the room shown above... it's filled with warm neutral hues and soft textures,
the perfect place to cozy up on a rainy fall day.
but i wouldn't want to live in it like that during a hot summer!
with a few simple changes, the mood shifts and the room feels appropriate to the season.
 
every season brings a new design scheme, refreshing the space and me with new energy. 
and when i say 'new design scheme', i'm not talking totally redecorating a room.
i'm not advocating spending a bundle - of money OR time - several times a year.
easy changes - swapping out colorful accessories and bringing in touches of nature - 
are my main methods for bringing the beauty of a new season indoors.

it doesn't take a lot of money or effort to get results like this - just imagination!
continue reading to see the room above change through the seasons of a year...

8.27.2020

ping pong paddle painted cacti

art, boho style, DIY, diy decorating, garden, garden art, junk makeover, outdoors, re-purposing, summer, thrifted, trash to treasure, up-cycling, painting, painted, wood crafts, cactus, cacti, faux painting
i sometimes see something online that inspires me, 
and i take the idea a bit further...
add or subtract or just let it jump-start my imagination,
and end up creating my own new version of something.

i thought i'd share this view of a past project with you today...
it was inspired by someone else's project, i took it further with my own idea,
and i shared the BACK side of it last fall.
(to be honest, i like this side the best!)

continue reading to see all of the prickly details of my faux cacti!

1.20.2020

happy Galentine's day!

Valentine's Day isn't ALL about hearts and roses and romantic love.
it's also a great time to share the love with your girl friends - especially the single ones ;) 
(and who needs roses when you have rose', amiright?!)

the idea for our party decor started with a pink paint chip from the hardware store.
i had a few on hand after helping a client select paint colors for her retail shop,
and with them, this party theme rapidly became 'Paint the Town Pink!'

continue reading to see some fun ideas for a themed GALentine's dessert party...

10.30.2017

happy halloween...wine...whatever!

whatever you're dressing up as (including as yourself),
wherever you're going (including to a comfy chair at home)
and whatever treats you prefer (including WINE!),
i hope you and yours have a happy and SAFE Halloween!

12.21.2016

Orange You Glad You're Here?!

While much of our home decor this Christmas is in neutral tones
(ivory, cream, tan, rusty brown, bronze, copper, and gold),
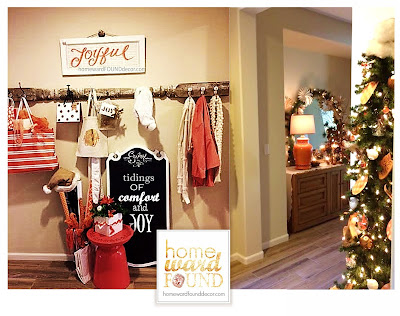
we decided to leave the bright orange decor already in the entryway.
(click to see more about the Joyful sign)

This happy hue brightens that small, dark space right up!

The addition of a tall, skinny tree in the corner added some light,

and a chance to create a fun, lighthearted feeling...
yet very different than the fun tropical tree decor that we created at the old house!

Continue Reading to see what we did... 


11.01.2016

Fall Into the Holidays...

Thanksgiving before Christmas, right?

well...... for some people, that only applies to the calendar!
There are some pretty strong opinions about whether or not to decorate for Christmas BEFORE Thanksgiving... 
almost as strong as opinions about the upcoming election!

As for me, I don't 'do' my house for Christmas until after Thanksgiving.
[ I also don't shop on Black Friday. I decorate! ]
I know, it's so subversive.... 


continue reading to see how I incorporate BOTH holidays in my decor!

10.06.2016

Off the Wall?

Last spring, after moving into the new house,
Mom and I went shopping at the Down Home Spring Sale,
held at the home of Don & Peggy Arbenz.
Several years ago, I wrote about their GORGEOUS antique store in Orange, CA - 
they have since closed the store, but sell at shows and at their own events.

I really love their style,
(I've posted about some of their store's Fall and Halloween displays)
and just knew that we would find some things at their sale
that could be incorporated into our home... and we did!

One of the (many) treasures that came home with us was 
HALF of a tall, weathered wood porch post!
(It had been split lengthwise and has a totally flat back)
As soon as we saw it, we envisioned it as a coat rack in our entry hall:
Okay, well.... to be honest, we pictured it hung vertically... on another wall...

But the more we looked at it, the more we realized that 
this position limited the capacity for holding things -
including decorative things that change with the season.
( You see where I'm going with this, right?! )
So in the end, we moved the position from vertically beside the door 
to horizontally behind the door
(the door would be on the adjacent wall to the left of this photo)

Once hung in place, 
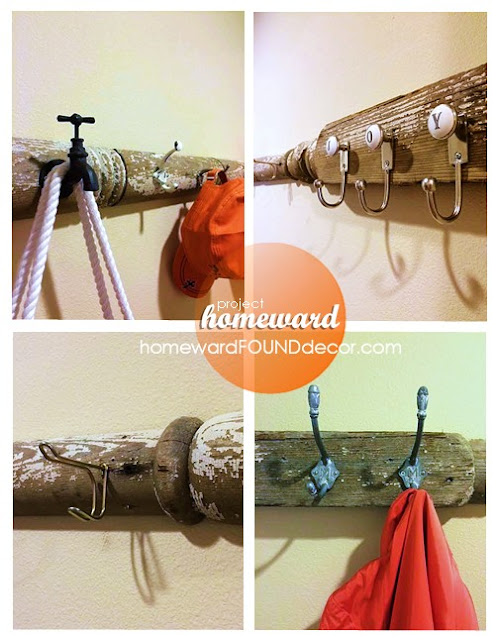
we gathered up a variety of interesting metal hooks from all over the place, 
and screwed them into the wood:
Top Row: 'faucet' hook - etsy . 'JOY' hooks - World Market
Bottom Row: vintage hook - ReStore, WA . silver metal hooks - Hobby Lobby

Find more coat hooks at World Market . HobbyLobby . 

It's a terrific drop zone right inside the door, along with being nice to look at!
The look and content will change with each season, 
making this as much an art gallery as it is a coat rack 

I'm working on a rustic 'Welcome' sign to hang above it, 
and you can see that one of my refreshed chalkboards ended up here, too!

2.10.2016

the Language of Love

 Contrary to just about everything I share here on homewardFOUNDdecor, 
the truly important things in life aren't decorating or crafting.
The decorating and crafting have always been - for me, anyway  
the way I show people that I love them...

The kids' rooms were always cute and fun and bright and happy, with handpainted furniture and murals that expressed their own style. The house was always clean (ish!) and decorated because I wanted my family to be proud of where they lived. The birthdays and special days of the year were greeted with simple decorations and fun food at the breakfast table (like pink milk and pancakes on Valentine's Day). The 'big' holidays like Halloween, Christmas, and Easter were celebrated with fun traditions and decorating.

ALL of those efforts on my part resulted not just in happy moments and lasting memories, but in a deeper meaning that leads my now-adult offspring to do the same things for their own kids.
This has become a 'language of love' for our whole family,
and nothing could make me happier.

My Mom started it all when I was a girl, and I added to it... as have my kids. It's not about money - because we've never had a lot of that - but about using what you have, being creative, and investing time and effort into doing things for those you love. For me, the BEST gifts ever were the handwritten, handpainted, handdrawn cards made for me  by my children and grandchildren.

Sometimes, the simplest things can mean the most.

 There's another 'hand made' gift that is the very best one I ever received:

Valentine's Day 2015 came in the midst of some very hard days.

My Dad was fighting the battle of his life - FOR his life - against cancer.
He was weak, and tired, and spent a lot of time in his comfy chair downstairs. He wasn't going out of the house anymore, so I asked him if I could find a card for him to give to my Mom on Valentine's Day... he said yes, and I did. (I ended up overwhelmed by tears in the card department of the local CVS store, on the phone with my little sister to give me the strength to find a card expressing the love of a dying man for his wife of 35 years...) I gave him the card, he signed it, and gave it to her a few days later. 
She loved it. She still reads it from time to time.

And then, when I awoke on Valentine's Day, I found little notes taped to my bedroom door, my office door, my bathroom mirror, and my laptop:


... little love notes for me, from my Dad. 

He had written them on scrap paper and come upstairs to tape them where I would find them.

Handwritten love notes from my Daddy...
there isn't anything more precious to me now,
no other Valentine that could mean more than these.


Just a few short weeks later, on Easter morning, my Dad passed away.

I moved those notes to the back of my bedroom door, and I see them every single day. They are a constant reminder of his love, and of the effort it took him to climb the stairs to put them there for me. 
He gave me all he had to give... his love. And it is more than enough.

The language of love is time. It's effort. It's thoughtfulness.

Maybe to you, it's a cupcake, or a card, or a perfect door wreath and mantel. Maybe it's a date, or a diamond, or chocolate and champagne. We all want to be shown love in the way that makes us feel special and loved, and to show love to those who are special to us.
For me, it's the little things done with a caring heart that mean the most

 Whatever you do to show your love this year on Valentine's Day,
may it be from the heart.
Even if it's simple post-it notes... because you just never know.

 .

10.25.2015

It's Not Too Late to Get Your SPOOK On!

Looking for last minute Halloween decor ideas?
(it's okay!)
Have no fear! I have a TREAT for you in my archives:
a bunch of my trademark 'Fast, Cheap & Easy' TM ideas...

just click on the 'read more' link!

8.01.2015

Original Sweet Sweater Pumpkin Tutorial

Better Homes & Gardens Magazine, fall, original designs, pumpkins, re-purposing, sweaters, Sweet Sweater Pumpkins, thrifted, tutorial, original designs, Sweet Sweater Originals, HOMEWARDfound Decor
mySweet Sweater PumpkinsTM
are popular every fall!
my free no-sew tutorial for THE ORIGINAL sweater pumpkin
helps you make your own versions of this classic fall decor accent!

this is an easy craft project, and eco-friendly way to decorate for fall,
because they're made out of recycled materials and totally no-sew.

i designed my original product in 2007, and it appeared on my Hummadeedledee blog,
then began selling them at vintage shows and stores in 2009,

and they have been published in magazines and on blogs, FB, and Pinterest ever since - 
appearing here on homewardFOUND first in 2012,
and in Better Homes & Garden's Halloween Special issue in 2013! 

continue reading for tutorial:

11.05.2014

The Holiday Tree: for Every Season

Let me tell you a story...

Monday, I was trying to come up with an idea for a post for today.
I had NUTHIN' - no how, no where. The well was DRY, my friends.
I was, frankly, 'too tired to be inspired'!!!
I posted on my facebook page and asked my HOMEees there to chime in, 
sharing their best tips for getting their creative MoJo back... and I got some great replies!

Carol took a very practical and restful tact:
'Take a day off from being creative... 
I find house cleaning to be very therapeutic and lets my brain rest.'
 
I joke that I only clean so I can decorate, 
but the truth is that cleaning is for me a bit like 'priming the canvas' is for a painter. 
It starts the creative engine running so ideas can flow!

Emily offered a virtual hug and a wide perspective:
'
Awww... we've all been there! I usually just take a break and/or head outside.'
 
Great advice - because, really, is it ever possible to head outside into the beauty of nature
(where ever you are) 
and NOT be inspired?! I don't think so. 

Lilliam spoke words of a sage:
'
Take a moment to just sit still, in silence and the inspiration for the right Idea will come to you. 
.Still.'

Oh, Lil, I try. I really DO. I'm just not a 'still' girl. 
I can walk on the beach for hours/miles. I can sit and read for hours.
But just sitting.... doing nothing.... waiting..... I just can't do it.
I hear the Jeopardy theme song every time I try!! 
(I CAN lie still for a massage, though!!)

So, after I read these words of wisdom, I decided to take a break.
I headed downstairs to the kitchen, to grab a fresh glass of ice water and then head outdoors...
and on the way into the kitchen, I walked past something.
I see it every day - in my peripheral vision.
I KNOW it's there, but it never really 'registers', if you know what I mean. It's just.... there.

But at THAT moment, I stopped.
I backed up a few steps and looked at it. For a good long while.
And while I did, I remembered something important.
That's when I KNEW that I had the content for this blog post!
So I ran upstairs, grabbed the camera, and went back down lickety-split
to snap a few images.

Aaaaaaand here we are.... today.

Do you want to know what I remembered?
That this small, inexpensive, simple decor element is something that I grew up with.
I remember it well from throughout my childhood.
And when I had my own children, I replicated it for them.
Now that THEY have children, they have replicated it, as well!

It's what we call 'The HOLIDAY Tree'.
(And it's not a Christmas tree by another name!)

It's a little tree that is decorated every season, for every holiday.

The idea is SO simple: It's a branch.
 As in, a branch off the tree in the yard or the nearby forest
or even purchased at the local craft store.
Not a BIG branch, just a lil' branch. Two feet tall or so.
It sits in a pot or planter or tin or box...
held in place by rocks or plaster of paris.

And there's pretty 'stuff' on the branches... 
little stuff, not heavy stuff:

We've used silly things like happy meal toys and action figures for Halloween,
vintage ornaments and mini candy canes at Christmas, 
bright plastic eggs for Easter, woven paper hearts for Valentine's Day, miniature flags in Summer,
everyone's favorite personal treasures for their birthday week, 
and some multi-colored plastic mini lights that look like the M&M characters.
 

Small things all, but the important thing was that every month there was a day 
when we all worked together to create & find fun things to decorate the Holiday Tree with.

I still have those colored plastic M&M light covers, BTW ;)

Mom uses Dollar Tree garlands and tiny ornaments 
and in this photo, she even used a felt coaster owl!
Anything goes.

The tree always sat somewhere we'd pass by it every day, 
so that the enjoyment was constant...

When I was a kid, the Holiday Tree sat on the HiFi (yes, I am OLD!) in the living room.
When my kids were young, our Holiday Tree sat on top of a cabinet on the stair landing or in the family room.

Right now, my Mom's Holiday tree is sitting on her buffet,  next to the kitchen door - which is where I saw it on Monday.
It's been in the room all along, decorated differently each season... but until Monday, 
I had completely forgotten about how much this tradition is a part of me. A part of my family.
A huge part of why decorating for every season is what I do. 


Now that I remember, I am so thankful for the simple ways 
that my Mom taught me about creativity. 
They've stayed with me... and my kids and grandkids. It's 'Generational Creativity'!


shared online:


Practically Functional | Creativity Unleashed

10.31.2014

Happy Halloween!

 Sometimes, great decorating is the result of restraint.
Without much ado or effort, these simple white pumpkins have Halloween holiday spirit
and all I did was tie two (STUNNING) plastic masks onto them.

No carving, no paint, no hours of effort and mess were involved....
just a simple one-step 'Fast, Cheap & Easy' TM decor detail that REALLY makes an impact.
This is a perfect solution for those of you who haven't decorated yet
with just HOURS to go before the Trick-or-Treater Invasion!

I paid just one dollar EACH for those masks at a local flea market,
but you can still find great ones at local party supply stores.
Wishing you all a very Happy & SAFE Halloween!
I'll be handing out treats at Disneyland tonight :)

shared online:
Practically Functional | Creativity Unleashed

10.29.2014

Happy HalloWEEK! Part 2: A Skeleton Crew...

When I walked into Roger's Gardens 'Hauntingly Beautiful' Halloween BOOtique this fall
and saw THIS decor element, I laughed out loud.
Last year, their decor made me think of the Haunted Mansion at Disneyland.
THIS year, it makes me think of Pirates of the Caribbean!
(Yes, I am an unabashed Disney Kid!)

If you've ever looked at cheap plastic skeletons 
and thought there is NO way those will EVER look good,
think again....
 because used as an overhead 'trellis' for climbing ivy, these old bones have full-bodied style!

The skeletons hang from the ceiling and dangle down at the edges of rooms & doorways,
creating arches overhead.
Faux ivy twines through and around them, looking ever so creepy.

I could also see using REAL ivy - DEAD, brown, shriveled ivy - for this project.
Or maybe BLACK faux ivy - with gray spanish moss dangling down!
 (Sorry, bad pic - but I love his face!)
This is a great decor idea for a front porch, entry hall, or over the dining table.
Just think of all of the 'helping hands' you'd have around!

See ALL of my Halloween posts here
Find Roger's Gardens here

10.22.2014

Painted Paper Lanterns

I saw this idea at Roger's Gardens Hauntingly Beautiful Halloween BOOtique...

Take accordion-style tissue paper lanterns, fans, and other decorative accessories
( like the ones you can get CHEAP from Oriental Trading Company )
and paint the edges BEFORE you open them!

TIP: paint using a soft brush (not spray), then open immediately.
If you don't, the paint may stick the whole shebang together!


Paint black on the edges of white or cream, 
for a dramatic contrast.

Paint glittery silver or gold on the edges of black or white,
for elegant sparkle.

Tissue paper shapes can be really gorgeous decor...
I found a bunch of old tissue paper 'parasols' in a thrift store years ago,
and used them to fill in an empty overhead space at a show:

 Find More HOMEWARDfound Inspiration for Every Season of the Year:

10.04.2014

Haunted Mannequin

Once again, the master visual stylists at Roger's Gardens in Corona del Mar, CA
have outdone themselves with this years' Halloween decor...
the theme is 'Haunted Elegance', and this Haunted Mannequin is a perfect example.
She's elegant and scary and vintage-looking
AND 
she has secrets!

I thought there were some ideas here that could easily be used to create your own mannequin
for Halloween decor in your home...

The mannequin herself is a simple black cloth figure on a black wood stand - 
you can find those new or simply paint an existing mannequin form black.

Her first secret is her clothes. They aren't clothes at all.
They are TABLECLOTHS!
Yep.
See that cabinet behind her? It's holding damask and netting linens for sale.
The visual crew used it as fabric to create her wardrobe.
(It's kind of a 'Project Haunted Runway' thing going on there)

And there's another secret to be shared:
Her skirt has an underlayer to give it shape.
It's not a petticoat or a hoop. It's more a SKELETON of a hoop - 
created with
(drum roll, please)
WIRE TOMATO CAGES!

( I LOVE using tomato cages as a decor element! See more here!) 

Cut open on one side and then bent and connected together, 
the wire tomato cages are partially wrapped with cloth tape (like medical tape) to hold them together - 
and it looks very musty and old.
Then the layers of fabric are added, tied on, pinned,
bustled and flounced to give her Edwardian-era gothic fashion style...
open in front to allow a peek at the underskirt framework.
A sash of black satin holds the 'skirt' on and is finished with a sparkling pin.

On her back, a swath of the netting tablecloth is gathered up to form a cowl collar on top,
and then fall like a cape behind her.
Her bodice is expertly adorned with bones.
Not an actual 'skeleton' showing her ribs, this effect is more artful and suggestive.
More bones on her shoulders give the effect of epaulets.

Bones can be found at the Dollar Tree or party supply store...
and no, they won't look like these!
However, after a wash of thinned light gray paint
and then some 'antiquing' with a dark gray paint wiped on,
you'll get an old, decrepit look to them.

...and then there's her jewelry!

This stunning necklace was created by combining multiple sparkling rhinestone 
pins, brooches, earrings, belt buckles, and necklace pendants.
The assemblage is pinned right onto the mannequin form, 
but you could hang a real assembled necklace on one, too.

I just love how the designers there come up with fun new ways to use materials
that we see EVERYWHERE for Halloween...
I mean, other stores put tablecloths on tables, for goodness sake.
But at Roger's Gardens, they elevate the everyday to ecstasy!

shared online:


Practically Functional | Creativity Unleashed

Yesterday on Tuesday | Project Inspire{d}

9.06.2014

Wine Not???

Last Fall, I shared a simple way to spook up a chandelier with black netting.
Then last Spring, I shared photos of a crystal chandelier turned into a water fountain.
Both ideas were created by the incredibly talented visual team at a nearby home and garden store, 
Roger's Gardens.

Well, they've gone and done it AGAIN!

I went over to check out their famous Halloween House displays this year (post to come!)
and saw this fun embellishment of a chandelier...
It's simply ropes of chandelier crystals (with metal clips) epoxied to the bottoms of
wine and champagne glasses,  letting them dangle precariously in the air:
Talk about SPIRITED decor ;)

Want to see more of the ways this visual team uses their crystal chandelier props?
chandelier fountain
wicked chandelier

visit the Roger's Gardens website

shared online:

Practically Functional | Creativity Unleashed

Cupcakes & Crinoline | Project Inspire{d}