. -->

5.14.2014

Beyond the Garden Gate...

In my last post, I shared that I don't demolish things in a remodel project.
And if I am anywhere near a project, I don't let other people do it, either...

A wood gate to the backyard at my parent's house had seen better days,
and was on the 'Honey-Do' list for replacement.
My Dad was going to remove it, cut it up, and put it in a dumpster.

Ahhhhhhhh..... NO.
Enter Deb and her decidedly 'different' point of view.
After he took it off the posts and removed the hardware,
I took it. Right out from under his nose. I carted it off.

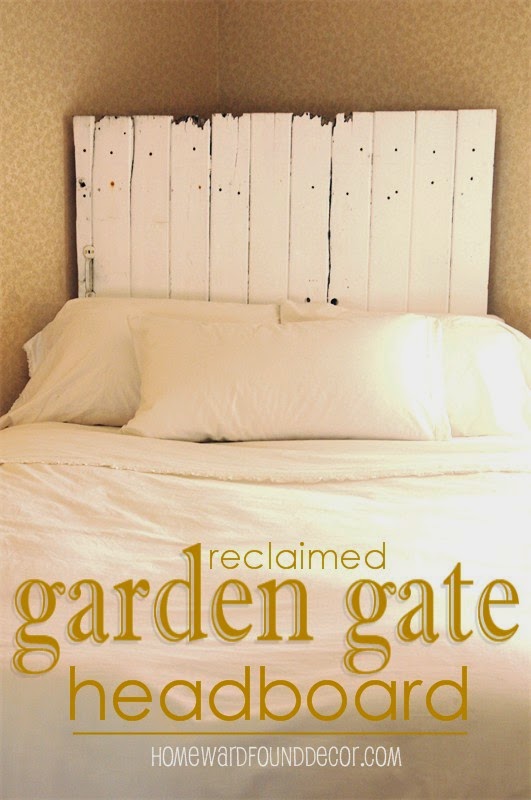
... and cleaned it off, and found a way to use it exactly as it was:
as a headboard!

All I did after cleaning was to lean it against the wall behind the bed.
That's it.
[ This was a 'Fast, Cheap (FREE!) & Easy' decorating project, to be sure ]

I love the worn, weathered finish of the wood
and I also love knowing that my kids ran through that gate in years past.

I already know that in the future, I'll be making this into a big huge square table - 
probably with big huge fence posts as legs.
I might also hang it on a wall as the backdrop for a fabulous found object.
But for now, in the limited space I have here,
it serves to add some beachy outdoor style to my room.
And it didn't end up in a dumpster.

Dad built a whole new gate, then Mom & I painted it.
 It's gonna' last awhile... but in 20 years, I'll bet I have THIS one, too ;)
(no, sadly, i won't... my sweet Dad went home to heaven in 2015 and Mom sold the house.)

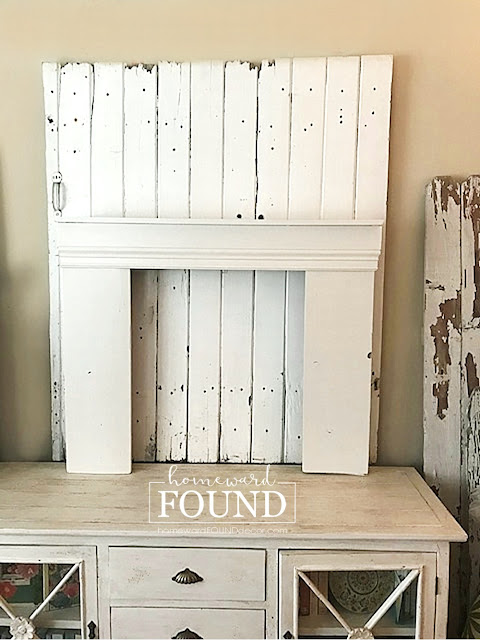
btw, i used this same wood gate in another project in 2020 -
it's the backdrop of a faux mantel and fireplace! - check it out here!

Want MORE ideas for using fences and gates as home decor?
Check out THIS POST and THIS POST!

shared online:

Creative Country Mom's Garden | Home Sweet Garden Party


5.12.2014

DIY Kitchen Cabinet - to - Shelf Makeover

This time of year, it seems everyone talks about 'Spring Cleaning'.
Well, we all KNOW that 'cleaning' leads to 'makeover' projects, right??

That happened in the kitchen of my former dream house...
 
Stuck in the early 90's, it was really ready for a makeover.
The oak cabinets were ugly and basically non-functional: 
narrow, hard to get access to the back of the corner cabs, 
and the doors were hung to open backward!
Not to mention they were made of orange-stained oak, 
and there was a weird paint job on the kitchen walls. 
One day, I started emptying them to clean and re-organize...
and I was frustrated beyond belief with how little they held.
[ Let's just say I was a bit VERBAL in my frustration, shall we?]

The husband heard my grumbling, walked in, surveyed the mess, and asked
"Ya' want me to just yank those things down and build you some shelves?"
 
In record time, those suckers were off the walls and out the door!
[ NOTE: I do not demolish things. 
No swinging hammers and flying wood like on HGTV and TLC shows.
Those scenes REALLY make me mad, to tell the truth. ]
We removed the cabinets from the wall, hauled them out to the workshop,
then removed the doors from them. 

Those doors became the new shelves for the kitchen, 
and the sides of one corner cabinet were ripped into strips
 to create the brackets to hold the shelves on the wall.
The rest of the cabs were hung on a wall in the shop for storage.

Painted white, the new shelves were ready to go up within a day - 
AFTER the walls were painted.
A fresh tan paint color on the entire kitchen (walls AND ceiling) 
 unified the spaces that had been split by the overhead beam and 'bay' area on the window side. 
Unseen in the photos, a new track light was installed on the backside of the beam. 
White paint on the window trim made it seem much larger and more open than the previous wood tone. 

[BTW, the rest of the plan was to paint the lower cabinets white, unifying the whole kitchen. 
I never got that far before we had to move.]
The new wood shelf brackets were screwed into the studs, 
the shelves screwed onto the brackets, and the project was done.
Then I noticed that the shelves weren't spaced quite the way I had wanted...
but I didn't say a word. 
This was a vast - and FAST - improvement, so I was just grateful to have it done!

 I filled up those shelves and the counter space below them with functional and beautiful elements - 
and those shelves held over TWICE the amount of kitchenware than the cabinets ever had!!
Best part? This project cost us nothing but time:
We had the paint (our whole house was painted that color), 
we had the screws and sand paper and tools, 
and we used the old cabinet wood for the new shelves. 

It turned out so well, we ended up doing exactly the same thing in the laundry room, too.
But of course, I don't have photos of that. :(

 Don't be deterred from making your rooms function and look better
just because you think it will cost money.... it might not cost a cent!
My next post will have a fun re-purposing idea for your bedroom decor

More Spring decor inspiration on Pinterest!

shared online:
Cupcakes & Crinoline | Project Inspire{d}

5.08.2014

Mother's Day Breakfast at Tiffany's

In my last post, I said 'not everyone can afford to buy a gem from the jewelers for Mom'...
However, we can create a sparkling setting inspired by Tiffany & Co. Jewelers for Mom!

This Mother's Day tablescape was inspired by something very dear to me:
a gift from a very special friend.
Sweet Fran gave me the only Tiffany blue box I've ever received...
you can read more about that on my personal blog if you'd like to.

That special blue box and my Mom's love of the color aqua inspired me
to create a lovely setting for a Mother's Day brunch to share with you.
And what else can I call it but
'Breakfast at Tiffany's'?!
.
The combination of Tiffany blue (pale Robin's Egg), white, and sparkling crystals & rhinestones
shines against the contrast of a deep green vine wall in the garden.
My own Tiffany Blue Box serves as the main focal point, 
and layered vintage linens bring to mind white clouds against a blue sky.

The blue painted bench is something I recently created...
you'll see the 'how-to' for it in an upcoming Summer post! 

A mix of fresh and silk flowers spill from the Tiffany Blue Box, 
on a white ceramic pedestal topped with a plate to add height to the tablescape.

[ I bought that urn/pedestal for five bucks to make a Snowman on...
when that Snowman didn't sell, I took it off and kept the base.
It comes in handy for so many uses, I'm keeping it!]

The aqua glass candle holders are my Mom's, 
and I bling-ed them up for this setting by simply draping sparkling crystals on them -
two are necklaces, one is a tree ornament. 
Placing the votive in a glass votive cup inside these vessels keeps the heat away from the jewelry, 
and also makes the glass holders easier to keep clean.

White dinnerware on a lace-patterned resin charger
is simply topped with a take-home gift of an aqua blue container of loose-leaf tea.
Pale blue linen napkins and silver flatware finish the look,
along with some European-style wine glasses 
that pay homage to Mom's royal position with their embossed crowns:
[ Stella Rosa logo glasses from the San Antonio Winery in Los Angeles ]

 Napkins tuck into the coffee / tea cup handle, 
along with a stirring spoon tied with a pretty ribbon.

The napkin holders in the second image above are plastic cookie cutters.
Yes, really!

I found a baggie of these swirly blue designs at the thrift store for a dollar...
And you know I love using cookie cutters for MUCH more than making cookies!

I tucked them into a pretty white planter to add more color to this scene, 
and also tied a few to blue ribbons along with crystals, and suspended them from the vine wall.
If there had been a chandelier overhead, I would have hung them from it... with more crystals.


Of course, the gifts for Mom are color-coordinated to the setting!
Pale blue ribbons, tissue and boxes pair with crisp white containers
and become part of the decor.
[ You don't need REAL Tiffany Blue Boxes, you know...
spray paint white boxes and add lettering with a thin marker for the same effect! ]

 The boxes hold lovely little sentimental presents...
the necklace was made by Rita Reade of Mammabellarte, 
and the china cup belonged to my grandma Rissia when she was a girl.

This fragrant gardenia bloom is in honor of my Grandma Margie Ward.
It was her favorite flower...and the scent makes me stop in my tracks and think of her.

A few more simple ideas in blue...
A ceramic swan planter (that used to be peach - ugh!) holds ice and small bottled beverages.
Vintage bottles make perfect single-bloom vases, and can be taken home by guests.

I hope this setting inspires you to pull together meaningful and beautiful 'everyday' items
[ though I DO realize that a Tiffany & Co. box is NOT an everyday item for most of us! ]
to create a special event for your Mom!

... hopefully, Moms everywhere will be feeling a bit like Holly Golightly:

More May decor inspiration on Pinterest!

5.06.2014

Jewelry Makeovers: Bling It On!

Mother's Day is on the way, and it's time to show Mom the LOVE!
 

But let's get real here, shall we?
Not everyone can afford to head to a jewelry store and buy a sparkling gem for Mom.
It's not about how much you love her, it's about your bank balance
and being the responsible person she raised you to be.

So, how about some ideas for re-imagining baubles from the thrift store or flea market?

A few easy steps to make the old NEW again?
I mean, Mom loved those macaroni noodle necklaces we made in kindergarten, right?
So if she's into jewelry, and hip to vintage and reclaimed style, 
let's make her something with a BIT more sparkle and shine!

This past week, I took some of the stuff that's been cluttering up my jewelry box
and took a good look at it all.
As I did, I started laying various pieces together, thinking about how they could be changed,
and came up with some new jewelry without spending a cent...

[unfortunately, I didn't photograph the 'befores' because it wasn't until I was DONE
that I decided to make this a blog post!]
Project 1: a multistrand necklace.
I had three various-sized and length silver metal chain necklaces (dollar tree, years ago)
one ultra-long chain with multi-colored resin beads (thrift store, $2.00)
and one chain with big loops and pink plastic beads. Yes, plastic.  
I don't know why I held onto that pink one - but I am glad I did!
It became the base for the new piece....

I just opened a few of the large links, and slipped a link from the other necklaces into them:
The bejeweled chain was folded in thirds, then attached,
and the silver chains were spiral-wrapped around the others, then attached.
It's chunky, it's fun, 
and it perfectly matches one of the bright graphic Mickey Mouse tee shirts I wear to work!

[ I have five strands of pearls that I am going to do something similar with, too]
 Project 2: a pieced necklace
This one came about because I truly love the vintage pieces...
I had them listed here in the HOMEWARDfound shop, and they didn't sell.
Which is GOOD, because I really didn't want to part with them!!!

I started by deconstructing the clip-on earrings, removing the backs and clips, 
and also the pin from the back of the brooch.
Then I took another cheap chain I had, one with metallic resin beads, 
and took out the center chain link and removed the bead that had been on it.
Then I connected each of those 'ends' to the floral elements, 
and attached that one bead to the bottom petal of the large flower.
The warm gold-silver tone of the chain picks up the gold accents on the vintage flowers, 
and the beads make it fresh and fun.
It reminds me of stuff from Anthro - without the price tag!

Confession: I cussed a lot while making this one. A LOT.
This was tiny, tiny work.... I made a lot of boo-boos, and it took FOREVER!
But I finally got it, and I LOVE this piece.
Project 3: a found object bracelet
A delicate bracelet (flea market, $5.00) is the perfect place to add miscellaneous charms.
I used what I had, and added some vintage buttons with gold filigree centers,
a leaf from an old earring, a vintage rose charm, 
and what I think is a charm from a school sorority or club.

You could do this with orphaned earrings, special buttons, even rings,
saved by Mom because they are reminders of the past!

[ This piece is for sale in the HOMEWARDfound SHOP. ]

And finally, an idea that I had so much fun with...
It's so SIMPLE and EASY and INEXPENSIVE... you just won't believe it!

Project 4: a magical transformation
No, it's not buying earrings that match your nail polish.
IT'S BETTER!
It's PAINT your jewelry with Nail Polish!!!
The stones in these earrings were originally red.
But as nice as they were (sterling silver, from Sundance) I haven't worn red for a very long time.
But I DO wear PINK!

I grabbed this new bottle of 'Enchanted Kiss' nail polish 
from the Beautifully Disney makeup line
and blobbed some hot pink polish over the red stone in the earrings.

It was like..... MAGIC! ;)
These perfectly match the pink logo on several of my work tee shirts,
along with a hot pink dress that I bought myself for my birthday.

Those earrings I never wore? I wear them every week now!
What are you waiting for?
Go take a peek into your own or Mom's jewelry box,
 hit the thrift stores or a flea market on Saturday,
and you can BLING IT ON for Mother's Day!

shared online:


 Yesterday on Tuesday | Project Inspire{d}

 One Project Closer | Creativity Unleashed

5.05.2014

Cinco de 'Orange Crush' Mayo!

Happy Cinco de Mayo!
This easy to pull together look was inspired by those chairs in the photo above...
the regular metal folding chairs were pretty old and ugly,
until my Mom went at them with a few cans of orange spray paint!
Now they add a juicy orange accent color to her back patio area.

Mom also painted some old baskets and coffee cans orange,
giving me plenty of color in this Orange Crush Cinco de Mayo party setting.
The elements of this design are galvanized metals, burlap, and the color orange.
I rounded up galvie buckets from the garden bar, burlap from my office stash,
and everything orange I could find around the house!

The 'grass' umbrella establishes a south-of-the-border theme,
and the super-easy burlap & paper banner adds a splash of color to the green backdrop.

continue reading to see more ideas!