. -->
Showing posts with label shows. Show all posts

10.12.2013

One LAST Sneak Peek!

 I was very surprised to learn that my Original Sweet Sweater Pumpkins 
have been published in the November issue of Romantic Homes Magazine!

[and no, that red oval announcing my pumpkins' inclusion is NOT on the actual cover!]
I'd like to offer my gratitude to writer Beth Livesay and photographer Susan Frick,
for including my lil' product in this issue.

Now, on to
 that super dooper sneak peek   of my BRAND NEW PRODUCT for the Holiday season
that I promised to share with you today!

 I am thrilled to share these new creations with you...
They were inspired by my pumpkins
and some Christmas decor that my daughter Bethany and I made together [SEVEN years ago]
and a few nudges from my mom... she kept suggesting this idea, and I repeatedly balked at it.
  
"I don't want to be a one-hit wonder and just make things from SWEATERS!"
was my constant argument.
I finally (wisely) got to the point where I realized
"Oh, for Heaven's Sake, Deb... when life hands you sweaters, USE THEM! "

... and I did:
Made with vintage and vintage-inspired components,
 these Original Sweet Sweater Snowmen will warm up any room...
I'll have all of the snowmen, women, and babies shown PLUS a few MORE
[ some are tiny, some are HUGE, and they are all one of a kind! ] 

6.08.2013

Glamping with Style!

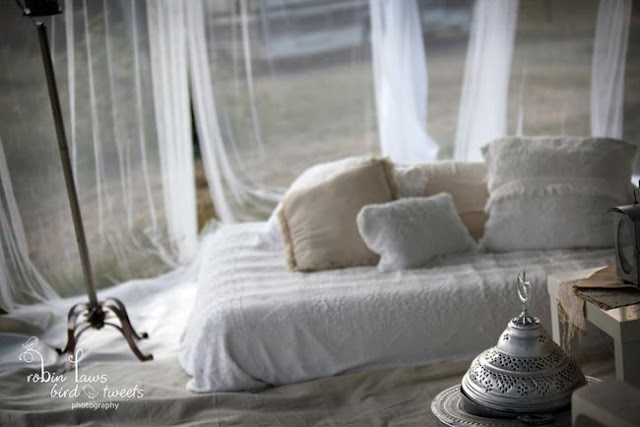
let me tell you about the time I turned a 20' X 20' party tent into a Glamping Tent!
Inspired by bedouin tents and high-end resort cabanas, I pulled simple elements together
and designed a temporary living space that ended up being a true show-stopper.
My late husband and I actually LIVED in this tent for four days,
at the Battle Ground, Washington BarnHouse vintage marketplace event in 2009!
[The other vendors at the show were the ones who dubbed it 'the Taj Ma Tent']

 The floorplan:
The bedchamber is on the top right.
The kitchen area is on the lower right.
The rest is lounge space!

The elements:
Canvas drop cloths, white netting curtains, and white vinyl tarps became walls and floors.
Lightweight / collapsible furnishings are plastic chairs, blow-up beds, and an old door + some sawhorses as a kitchen counter.
Candle lanterns, tap lights, and one killer chandelier provided light in the evenings.
A small metal Oriental coal heater held sections of a firelog to warm up our toes each morning.
A collapsible gas barbecue allowed us to cook our hosts a pretty nice meal, too!

The design:
[btw, those netting curtains looked really stunning when they were hanging loose... as shown below.
But it was so windy, they had to stay tied or they ended up a tangled mess.]
The BEST and most unexpected detail was the giant chandelier hanging from the apex of the tent!
And yes, it DID light up - thanks to a car battery temporary power supply.
During the two days that the BarnHouse Marketplace vintage event was open to the public, 
the meadows were filled with cars and other campers, and thousands of attendees & shoppers.
Many of them thought that the Taj Ma Tent had been created as a resting area for them!
Since we were off in our booth selling our wares, we didn't mind sharing.


Professional photographer Robin Laws took the preceding three photos of the Taj Ma Tent.
The last one appeared on the title page of her article about the BarnHouse event
in the Winter, 2010 issue of Somerset Life Magazine.

Now, it WAS a lot of work setting that baby up. And tearing her down.
But it was fun!

I'm sharing it with you because I think this idea is something anyone can do.
OK, maybe not as overboard as a 20X20... but what about using a 10X10 popup as your base?
Set up your own cabana in your backyard for summer entertaining and relaxing,
or get brave and actually take it to a campground or beach!

I used a 10X10 popup as the base for our tent for two years, and decorated it in a similar fashion...
The walls were canvas drop cloths, and a few shutter panels to let fresh air in. 
The door was mesh curtains. The floor was vinyl and canvas tarps.
Furnishings were a blow up bed, a few crates to hold stuff, and plastic lounge chairs.
No chandelier.
Much simpler. Much faster. But people still took a lot of photos!

Just goes to show that you can scale an idea up or down and make it work for your needs.
Now go be creative and get Glamping!!!

Find Robin Laws Photography here
Sadly, the BarnHouse Marketplace event is no longer in business.

4.22.2013

Happy Earth Day - Every Day!

Those of us who create using reclaimed & recycled materials  
observe Earth Day EVERY day!
It's fun to know that we are not only helping to keep the planet 'green' and healthy,
 but we are preserving parts of history by not sending architectural salvage to the landfill.

shows,DIY,vintage,decorating,style,antiques,inspiration,FREE,home decor,diy decorating,salvaged,trash to treasure,re-purposing,up-cycling,wall art,vintage style,farmhouse style,retreat vintage home,vintage shows,antique shows,show booth design.
As I was arranging the frames for the presentation that I shared about in my post yesterday,
I remembered a similar project that I created, using old window frames.

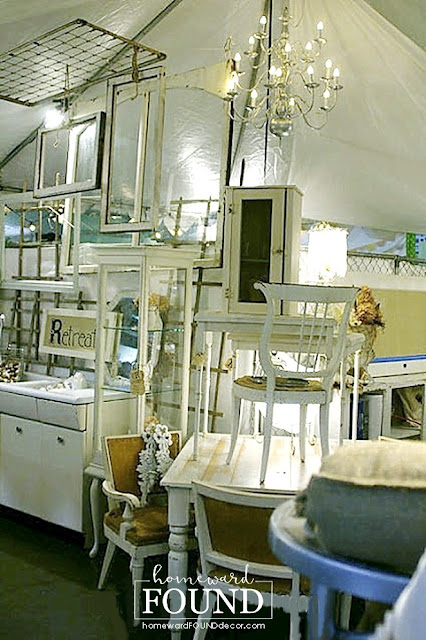
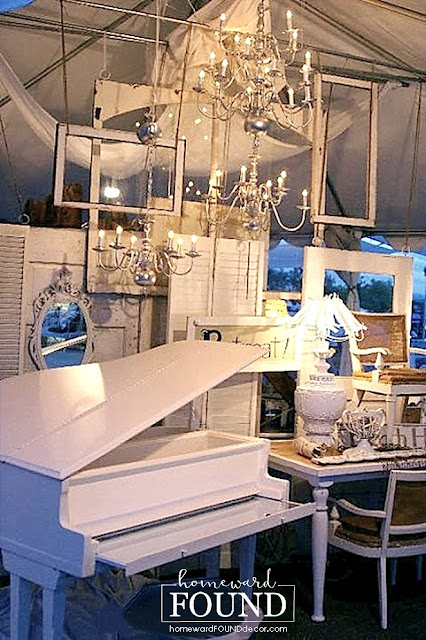
They were used in several arrangements as props inside our Retreat Home booths
at vintage shows in 2010...

Basically, I just hung varied sizes and styles of old window frames
[both with and without glass in them]
at varied heights and levels from the booth frame, using wire,
to create an overhead 3-D composition.


Giant chandeliers completed the look and added sparkle!

You can see in the photos above that the window elements
can be arranged differently in each setting - 
in this case, vendor booths at three different shows - 
and yet the message or theme remains the same.

Windows are also pretty cheap at salvage stores, garage sales, and on Craigslist!

This idea is easily adapted to a 2-D wall arrangement
using old windows, frames, mirrors, shutters, crates, palettes....
any kind of salvage with character.

btw, that 'baby grand piano' in some of the shots above?
it's a bar. and it ended up in a magazine!

photos above taken by and property of Debi Ward Kennedy (me!)
of my RETREAThome (my previous home furnishing & decor business) booths
at the Farm Chicks, Barn House, and UrbanBarn antique / vintage shows in 2010.


many thanks to HOMEBNC for including this post in their 2021 summer decor feature
40+ Old Window Outdoor Decor Ideas

shows,DIY,vintage,decorating,style,antiques,inspiration,FREE,home decor,diy decorating,salvaged,trash to treasure,re-purposing,up-cycling,wall art,vintage style,farmhouse style,retreat vintage home,vintage shows,antique shows,show booth design.

4.18.2013

new uses for metal bread pans

when i was running a business based on turning castoffs into beautiful and functional objects,
it thrilled me to no end to find strange bits and pieces,
 and then use my imagination to reinvent them.

industrial metal bread pans were one of those finds...
i came upon a tilting stack of 75 of them at a barn sale, and bought the lot. 
and then i used them for all KINDS of things:
 
* holding plant pots in my garden house 
as shown in my 'Garden House Makeover Project' post

* as 'drawers' in a salvaged dresser that had none


* displaying giant letter tiles
[tile tutorial here]

* organizing craft supplies, papers and files in my studio/office

* holding canned goods and paper towels in my pantry

* organizing tools by the BBQ

 * and making a spur-of-the-moment moveable herb garden:
this particular creation happened by accident...

i was setting up at a show, moving things all over the booth,
trying to find a place to put one last industrial bread-baking pan.
there was a small metal wheelbarrow frame sitting on the ground, 
waiting for a wood crate to be placed into it.

but i had a better idea....
i placed the metal frame up ON the table 
[on a burlap feedsack so it wouldn't scratch the wood]
and then sat the metal bread pan in the wheelbarrow frame.

it didn't fit perfectly... but it was unique!
i added some potted herbs, handfulls of straw from the ground,
and the vintage jelly jars that i had planned to sit on a tray on the table.

the look was decidedly more interesting than my original plan
and it's a great idea for a move-able herb garden centerpiece:

* line a metal baking pan or oil pan with plastic or foil
(large industrial or small household size, either will work)

* place pots of herbs into each section (they hold a LOT)
you could also plant the herbs in the pan - just add rocks before soil, for drainage.

* sit the pan on something that it's not supposed to go with -
an upside-down round stool, for example. or the silver base of a fancy warming tray.
mix, match, whatever!

it makes for a great conversation piece
and an easy move from table to kitchen counter to backyard, 
for watering and sun exposure.
______________________________________________

any way you slice it, that's a lot of different uses from just one item -
and that's what 'found' decor is all about!

4.16.2013

Decor, All Bottled Up!

 when i say 'found' materials, people look at me funny.

 what i mean by that is stuff that you find in a field, or on a curb, 
or at a yard sale or thrift store, or in your own garage or barn.
stuff that most people don't even SEE.

i crawled under a table at a yard sale to reach for the tattered corner of a dirty cardboard box.
no one else had even given the box a glance.
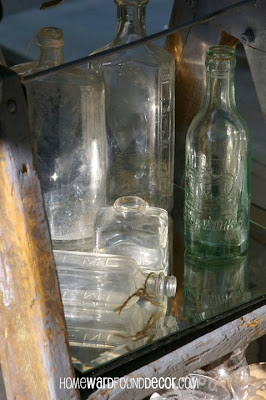
i opened it to discover these cool old medicine bottles!

i didn't need to do much to them to use them as decor...
after a careful washing to preserve the original labels,
they were corralled on a round silver tray to show them off.
the two bottles that didn't have lids are serving a flower vases, holding happy daisies.

this is a collection of miscellaneous old bottles that i found in thrift shops.
some were very detailed, and some were rather plain.

i embellished them 
using my stash of vintage trims, jewelry, and papers.
the jewelry hung on them, but some of it could also be removed to wear.


 [some of these photos were featured in 
Romantic Homes Magazine, February, 2013
in the mention of homewardFOUND on page 12
]

i took the embellished bottles to a show, and some of them sold. some didn't.
which is fine, it just gave me the chance to do something ELSE with them:

so i painted them.
with white gloss enamel appliance spray paint.
and then i popped a few daisies & chamomile into them
and sat them on a silver tray.

i paid one dollar for that dirty box of brown medicine bottles.
and between one and three dollars for each of the clear bottles.
the silver trays cost me five bucks each.

i sold the first set for $35, and the second set for $45 
at the BarnHouse antique show. in the first hour.

here's the moral of this story:

these items were basically discards, with no inherent value to anyone.
all it took was an eye for using them in a new way
for them to have value and worth. 
THAT is what 'found' decor is all about. smile.
it doesn't take OLD stuff, either...
what about a six-pack of empty glass Coca Cola bottles for a patio table?
or maybe old glass baby bottles for a shower?
little glass yogurt containers for a brunch?
paint 'em. put 'em on a tray. fill 'em with posies.

you'll have some fresh spring decor all bottled up!

4.15.2013

Don't Fence Me In!

i love using garden elements for decor.
watering cans, terra cotta pots, garden tools, birdbaths, fences...
especially fences.

over the years i've used old garden fencing in a multitude of ways...
i actually hauled a dozen vintage white wood fence sections around for ten years!

here are a few ideas to get YOU started!
* a section of fence as a backdrop in a vignette
it can be hung on the wall, or just leaned up there.

paired with a large garden urn, a large vase filled with lilac blooms,
and terra cotta pots that are stacked and tipped over, filled with various objects
[like balls of string and glass lamp globes and garden hand tools and seed packets]
keeps the whole 'garden' theme going...

another section of fencing was hung up higher and to the right, 
and another small section lies on its side below that...
the two pieces are visually connected  by adding some white wire garden fencing between them.
[this large arrangement was the focal point behind the cash register
during the spring vintage show on our farm in 2010.]

* fence pickets used as signs
i simply separate the pickets, and hand-paint them!
[that's also one of my headboard signs!]

* fencing as lumber supply: tables
 [the fence pickets have been separated from the fence structure before using as lumber]

another idea, shown below, is a little more complicated:
follow the white arrow in the photo, and you'll see
* fencing turned into a window awning

 some of the fencing i had hauled around for a decade was used in the making of it...
and that awning was used in four locations over five years!

* hung as shown above ^ in our antique store booth

*sitting on top of a metal tent frame in our show booth


* hung in my store on the farm (twice - two stores, two farms)

...and NOW it has been shrunk down in size,
and hangs over a bed in a young girl's bedroom!

fencing also works beautifully as:
*wainscot (lower wall treatment)
* headboards
* backs of benches
*shutters (hung vertically)
oh, yeah.... and in the garden!

have you ever used garden fencing as decor in your home?

*note: credit for the construction of the fence awning and tables shown above
goes to my late husband. he was very talented!*

shared online:

The Everyday Home Blog | Home{work} Wednesday
[thank you for the mention, Suzi at Worthing Court!]

cupcakes & crinoline | project inspire{d}