. -->
Showing posts sorted by date for query halloween. Sort by relevance Show all posts

10.04.2014

Haunted Mannequin

Once again, the master visual stylists at Roger's Gardens in Corona del Mar, CA
have outdone themselves with this years' Halloween decor...
the theme is 'Haunted Elegance', and this Haunted Mannequin is a perfect example.
She's elegant and scary and vintage-looking
AND 
she has secrets!

I thought there were some ideas here that could easily be used to create your own mannequin
for Halloween decor in your home...

The mannequin herself is a simple black cloth figure on a black wood stand - 
you can find those new or simply paint an existing mannequin form black.

Her first secret is her clothes. They aren't clothes at all.
They are TABLECLOTHS!
Yep.
See that cabinet behind her? It's holding damask and netting linens for sale.
The visual crew used it as fabric to create her wardrobe.
(It's kind of a 'Project Haunted Runway' thing going on there)

And there's another secret to be shared:
Her skirt has an underlayer to give it shape.
It's not a petticoat or a hoop. It's more a SKELETON of a hoop - 
created with
(drum roll, please)
WIRE TOMATO CAGES!

( I LOVE using tomato cages as a decor element! See more here!) 

Cut open on one side and then bent and connected together, 
the wire tomato cages are partially wrapped with cloth tape (like medical tape) to hold them together - 
and it looks very musty and old.
Then the layers of fabric are added, tied on, pinned,
bustled and flounced to give her Edwardian-era gothic fashion style...
open in front to allow a peek at the underskirt framework.
A sash of black satin holds the 'skirt' on and is finished with a sparkling pin.

On her back, a swath of the netting tablecloth is gathered up to form a cowl collar on top,
and then fall like a cape behind her.
Her bodice is expertly adorned with bones.
Not an actual 'skeleton' showing her ribs, this effect is more artful and suggestive.
More bones on her shoulders give the effect of epaulets.

Bones can be found at the Dollar Tree or party supply store...
and no, they won't look like these!
However, after a wash of thinned light gray paint
and then some 'antiquing' with a dark gray paint wiped on,
you'll get an old, decrepit look to them.

...and then there's her jewelry!

This stunning necklace was created by combining multiple sparkling rhinestone 
pins, brooches, earrings, belt buckles, and necklace pendants.
The assemblage is pinned right onto the mannequin form, 
but you could hang a real assembled necklace on one, too.

I just love how the designers there come up with fun new ways to use materials
that we see EVERYWHERE for Halloween...
I mean, other stores put tablecloths on tables, for goodness sake.
But at Roger's Gardens, they elevate the everyday to ecstasy!

shared online:


Practically Functional | Creativity Unleashed

Yesterday on Tuesday | Project Inspire{d}

9.06.2014

Wine Not???

Last Fall, I shared a simple way to spook up a chandelier with black netting.
Then last Spring, I shared photos of a crystal chandelier turned into a water fountain.
Both ideas were created by the incredibly talented visual team at a nearby home and garden store, 
Roger's Gardens.

Well, they've gone and done it AGAIN!

I went over to check out their famous Halloween House displays this year (post to come!)
and saw this fun embellishment of a chandelier...
It's simply ropes of chandelier crystals (with metal clips) epoxied to the bottoms of
wine and champagne glasses,  letting them dangle precariously in the air:
Talk about SPIRITED decor ;)

Want to see more of the ways this visual team uses their crystal chandelier props?
chandelier fountain
wicked chandelier

visit the Roger's Gardens website

shared online:

Practically Functional | Creativity Unleashed

Cupcakes & Crinoline | Project Inspire{d}

2.06.2014

Tin Can 'Painted Pails'

Last fall, I shared a project that was a 'flashback' to something I had made long ago:
[ like, ah, WAY back in the NINETIES! LOL ]
Painted tin cans - I call them little 'Painted Pails'. 

I just found more photos of that product that I created for different seasons ;)
and since 'tin can crafts' seem to be THE hot trend right now,  
I figure why not share more inspiration?!

The photo above shows the Valentine version,
where the wire handles were bent into a heart shape.

The labels evolved from the very first Painted Pails I made in the Spring of 1995,
which looked like garden seed packets and fruit pie filling labels:

I also made versions of Painted Pails for Holiday | Winter:


The Happy Snowman versions had wire handles bent into 'top hat' shapes,
and also stackable snowmen made from several sizes of cans.

I made Painted Pails in Spring, for Easter:

... and the wire handles were bent into 'floppy ear' shapes.

and of course, there were the Pumpkin Painted Pails
 that I shared last fall in my Tin Can Painted Pail Post
 click for my TUTORIAL!...

I also made Painted Pails that looked like crayons. And Leprechauns. And Firecrackers.
But I really don't think more photos are needed for you to get the general idea.
If I were to guess as to how many tin cans I painted back then,
over a five year period that I was selling them at street fairs and in my tiny store,
I'd have to say it was about 50 cans a week. Yes, really!

I tell ya', I was pretty sick of painted tin cans by the time I was done!!!

The various holiday versions of these came about because every holiday,
I would go overboard to create a fun breakfast table setting for my four young children...

Balloons, streamers, napkins, and centerpiece would decorate the dining room.
The food would even match the holiday: 
pink milk and pancakes for Valentine's Day, green for St. Patrick's Day, orange for Halloween.
 I didn't spend a lot (I bought most of the stuff at thrift shops)
but it was so much fun to decorate the table after they had gone to bed,
and then watch them get all excited the next morning!

And at each place setting, they'd find a Painted Pail -
filled to the brim with art supplies and candy and a little stuffed animal.
It was just a simple thing I could do to make them happy.
For me, that is always the best part of crafting & decorating...

shared online:

One Project Closer | Creativity Unleashed
 

Cupcakes & Crinoline | Project Inspire{d}

10.30.2013

Halloween Tricks and Treats!

'BeWitched', my very own 'Great Pumpkin' creation, and I would like to wish you

Happy Halloween!

Tonight, after the cute little trick or treaters have been tucked into bed,
the ghosts and ghouls here on our street will gather for a dessert party!

Some very simple ideas and materials were pulled together in about two hours
to create this fun party decor...
One roll of orange wrapping paper forms a backdrop AND the center stripe on the table.
found at Marshalls for $2.99

[ disclaimer: the 'happy Halloween' writing was added in my photo editing program - 
it's NOT printed on the paper on the wall ]

One package of vintage-look crepe paper fringed garland frames the center stripe on the table
and forms a short swag above.
found at Salvation Army for $1.99. NEW!

The large plastic chargers (and other containers) await the food...
found at Walmart for $2.49
A gathering of apothecary jars (from elsewhere in the house) is filled with decor items
like plastic eyeballs, spiders and candycorn from WalMart.
The last snippet of the fringed garland tucks inside one jar.

You could fill yours with candy for guests to actually EAT...
but we have so many goodies, we didn't need candy!

continue reading to see MORE easy party decor ideas!

10.24.2013

8 'Black Magic' Halloween Ideas!

 As Halloween Eve creeps ever closer, don't forget about the simple SCARY touches you can add
to everyday items in your home!

The black chandelier above has a center that resembles a cage -
so I treated it like one, and filled it with some drippy spanish moss and one solitary black crow.
I wrapped the faux candles in black glossy paper,
and used clear low-wattage nightlight bulbs for a sinister glow.

Click here for another idea for embellishing your chandeliers!
These two photos show an elegant carved wood white mirror that has been spookified:
A length of black sheer fabric is tucked between the wall and the mirror,
with one end of the fabric hanging down below it and one end tucked into a 'hood' shape at the top....
shrouding the mirror in mystery...

 more ideas for spooky black decor:

Bewitched Mirror Trick


Glass Globe Crystal Ball

Mad Science

Big Black Spiders

10.21.2013

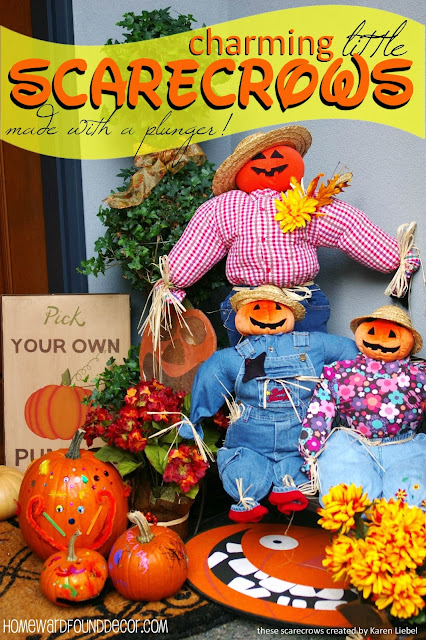
Charming Little Scarecrows

 A VERY unusual element makes these charming little scarecrows 
a 'Fast, Cheap & Easy' project... and you won't believe what it is!

Years ago, my friend Karen made the scarecrows in the image above
for the porch decor at one of our client's Seattle area homes.
A few years later, I made a similar little scarecrow, 
and came up with my 'crazy but ingenious' plan for his support system...
a standard rubber bathroom plunger.
yeah, really!

I DO suggest that you get a NEW plunger from a home supply store for this!
['reduce reuse recycle' has its limits, you know?!]

This illustration shows the process - 
Look at it from the BOTTOM UP !
Basically, you are building the scarecrow OVER the handle/post of the plunger,
which is stuck to the floor of your entryway, porch, etc.
Generally when I hear a description like that, I nod my head and go 'oh, I GET it!'
but I know not everyone is like that...
so here are some basic 'how to' steps to follow if you need them:

#1: First you stick the plunger to the floor - in your entryway, on your porch, wherever.
It won't stick to concrete, though, unless the concrete is really smooth.
If you have an extra doormat, flip it over and expose the rubbery side - the plunger will stick to that!

This method will make small scarecrows...
but you can stick the plunger onto taller items to make the scarecrows appear taller:
a five-gallon paint bucket wrapped in burlap, a metal milk can, anything that the plunger will stick to!

#2: Take a pair of child's pants - jeans, cords, overalls - and do one of two things:

If you want the scarecrow to sit down, put a hole in the crotch
so that the plunger's handle will go through the pants.

If you want the scarecrow to stand up, just slip one leg of the pants over the plunger handle.
[You'll need to 'scrunch' the pants down a bit once stuffed,
 to allow the shirt & head to fit on the handle, too.]

Close the ends of the pantlegs with a rubber band, and cover with raffia.
Then stuff the pants - I use plastic grocery bags or trash bags.
Stuff them REALLY full, making the pants as firm as possible  - not squishy.

#3. Place a wire clothes hanger inside a long-sleeved child's tee shirt or sweater
then place the shirt over the top of the plunger handle,
with the handle coming up through the neck of the shirt.

Close the ends of the sleeves with rubber bands, and cover with raffia.
Tuck the bottom of the shirt into the pants - use straight or safety pins to hold them together.
Add a raffia 'belt' in the pant belt loops if you'd like.
Then stuff the shirt with more plastic grocery or trash bags - 
again, stuffing it VERY full so that it is firm and not squishy.

Bend the top loop of the hanger in the shirt up straight, 
and DUCT TAPE it onto the plunger handle - this will help to hold the shirt and pants upright.
Leave about 4 inches of the handle at the top for the pumpkin head to fit onto.

#4. Get a lightweight 'FUNKIN' pumpkin, a plastic pumpkin pail, 
a plush pumpkin, or even a Sweater Pumpkin!
Put a hole in the center of the bottom of it. 
Then slide the pumpkin onto the plunger handle and snug it down to the neck of the shirt.

*** The pumpkin has to be lightweight - if it's heavy, it will cause the stick to lean over ***
You can add stuffed socks or shoes to the ends of the pant legs,
a stuffed pair of mittens to the ends of the shirt sleeves, 
and a hat to the top of the pumpkin if you wish.

You could also use children's Halloween costumes for this project!
Try some from the thrift store, or maybe even use the costumes that your kids have worn in past years!
[If , like me, you kept them because they were just too darned cute to part with. 
Yeah, I was that mom ;) My daughters have 'the Costume Box' now]

Just think how darling your front porch would be 
with a gathering of little costumed 'Trick or Treater' Scarecrows!


10.15.2013

That's Scary, Baby!

 I saw this incredibly CREEPY idea at the Roger's Gardens 'Night Gallery' Halloween House...
another stellar and original visual effect created by the RG visual team!

It's simply baby doll heads, painted in ghostly gray tones,
swathed in gauze or netting, 
and then plopped into glass canister jars.

Displayed en masse on dark shelves, they create a 'library' of ghoulish frights:
You could even use tiny doll heads in baby food jars, for a miniature version!

10.08.2013

Wicked Easy Chandelier

I love great decorating ideas.
I REALLY love huge visual impact that comes from SIMPLE, easy methods...

I saw this idea at the Roger's Gardens 'Night Gallery' Halloween House displays,
and it perfectly fits my 'Fast, Cheap and Easy' TM decorating mantra.
 Take your shabby chic decor into the realm of the undead with one simple move:
drape lengths of netting from your crystal chandelier!

Buy this inexpensive yardage and then cut it into long strips @ 18 inches wide,
so that it will puddle on the floor way down below the chandelier.
You can use black, as shown here, for a ghoulish effect,
OR use white for a ghostly effect.
[ TIP: IKEA sells 90" long white netting curtain panels 
in sets of two for $5! CHEAP!]

If you added flickering bulbs to the chandelier, it would be even more wicked
over your dining table, in your entry, in the powder room, or even outside in your garden...

Either way, it's a sure-fire trick to get BIG effects without spending big bucks... which is always a treat!
View more of the AMAZING visual effects and displays on the Roger's Gardens blog


9.18.2013

Madre de Dio de Los Muertos!

Having spent more than 35 years as a retail display designer and stylist,
I have a great appreciation for this art of merchandising products - when it is done right.

And let me tell you, I live five miles from one of the BEST visual merchandising teams in the WORLD!
The geniuses at Roger's Gardens came up with this AWESOME idea,
and so for my first HALLOWEEN post, I just had to share it:
Paint Dia de Los Muertos [ 'Day of the Dead'] elements onto classical statuary.
MIND. BLOWN.
[I'm not sure, but those two on the bottom could be
Janet and Rocky from the Rocky Horror Picture Show.... smile]

These statues punctuate one of the SIX rooms in the 2013 Halloween House - 
a warren of six rooms on the grounds of the nursery that is transformed each fall
into a wonderland of scary delights.
This year, the theme is 'Night Gallery', and everything reflects a haunted museum/art gallery.
Ghoulishly clever!

Yes, you COULD do this!
Every time I walk into a thrift store, there's some errant knick-knack on a shelf
that looks like Marie Antoinette or Caesar or George Washington...
[usually they are concealing an AVON bath oil bottle, but whatever! They'll work!]
Paint them with flat white paint and then get busy adding dio de los muertes (Day of the Dead) motifs using paint pens, felt markers, poster paint, craft paint
....and those stale old 'busts' will be history. or... 'busted'. 
Take your pick! And have fun!

I have more photos of other brilliant ideas that they came up with, 
which translate into things for you to try at home... 
and I'll try to break them down into easy steps to get a similar look
without having a lifetime of experience in visual effects... stay tuned!

Photo credit: Debi Ward Kennedy . Photos of Rogers' Gardens displays

8.29.2013

I'm in the Bloglight!


Welcome to my guests from hometalk and the blogtalk group on facebook -
Thank you, Miriam Illions for featuring me and HOMEWARDfound today!
 hometalk is a FABulous community website where you can share, discuss, learn, and be AWED
by EVERYTHING having to do with creating & keeping houses. It's AMAZING!
I'm Deb and I'd like to welcome you to my blog!
 I'm a retail and home stylist, designer, and published writer.
[more on my 'Start Here' page]

Sweet Miriam Illions had this to say in the Blogtalk post:
"This week, the beautiful & graceful Deb Kennedy of HOMEward Found Decor is in the Bloglight!
Deb's story is inspiring and uplifting. She applies her creativity and fresh perspective 

not only to design & decor, but to all aspects of life. I am honored to feature you in the Bloglight today, Deb!"
[wow! she really makes me sound much better than I am!]

Miriam also asked a few questions to help you get to know me, 
so let's get right to those:

continue reading...

8.19.2013

'as seen in BHG!'

 A few weeks ago, I received a very nice message from LuLu Tapp,
owner and photographer extraordinaire from DustyLu Interiors & Photography in Los Angeles.
She let me know that my little pumpkins were going to appear
in the feature on her lovely home
in the Better Homes & Gardens Halloween Tricks & Treats 2013!

After I picked myself up off the floor, I thanked her. Profusely!
And I've been on the lookout for the issue ever since.

Monday, she messaged me "Hey Deb!!! Its out its out!!! On newsstands now!!!Woot woot!"
At nearly the same time, a friend sent me the cover shot shown above,
then another friend sent me an interior image that includes my 2012 Harvest pumpkins:
This is one of Lulu's photos of her gorgeous home from the magazine... LOVE!

Being able to use the words 'As Seen in BHG' is just a dream come true -
I am so very thankful for the opportunity.
I originated this design, and have been making and selling them for many years,
and it's nice to finally be 'noticed' this way.

I saw a comment that Lulu made on Instagram and it made me do backflips:
"Better Homes and Gardens editor was flipping over the pumpkins and botanicals  -
I think she wanted to take them!!! Lolol"

Lulu discovered my original Sweet Sweater Pumpkins last fall, at Kymberley Fraser's store 'A Beautiful Mess'.
They looked like this in her display:

Thank you again, Kymberley, for your support!