. -->
Showing posts sorted by date for query dream. Sort by relevance Show all posts

3.25.2023

Easter egg mushrooms!

spring, Easter, just for fun, diy decorating, seasonal, boho style, re-purposed, garden style, up-cycling, painting, nests, mushrooms, mushroom decor, diy mushrooms, Easter egg mushrooms, Easter decor, Easter decorating, faux chocolate bunnies, egg mushrooms,
my last post for  March Mushroom Madness  
wraps up with this creation... just in time for Easter!
why not decorate for spring with mushrooms, along with the bunnies and eggs?
ah, but these are no ordinary mushrooms - these are made from eggs!
you can use REAL eggshells, as i did, or simple plastic eggs to get this whimsical result.

(i know, eggs are really pricy right now! i always save the shells to use in my garden,
but i'm always happy to turn 'trash' into 'treasure' via crafting!)

 continue reading to see how easy they are to create...

1.30.2023

'gilded' hearts

Valentine's Day,hearts,winter,painting,tutorial,DIY,diy decorating,crafting,dollar store crafts,re-purposed,makeover,faux finish,home decor,winter home decor, Valentine's decorating,diy Valentine's Day decor,paint tricks,faux finish paint tutorial.
i guess i'm just different.
while the majority of people i see on social media are rushing to Target
for the release of new items every season and holiday,
i'm over here digging thru bins in my garage and studio
to find things i can revitalize and reuse to decorate my home.

case in point: these painted hearts.

i had an idea rolling around in my head to try to replicate gold leaf,
so i pulled these out and found two ways to try out my idea.
it cost me nothing at all! i had everything i needed on hand already.
and i didn't need any more storage space to keep a new project in!
(can you imagine if i kept every.last.project. i have ever made???
i'd have far more bins and boxes and shelves filled than i already do.
i'd have spent a lot more money, too!)

continue reading to see how i got these effects...

6.30.2022

Miss Dot goes to the county fair!

summer,just for fun,entertaining,glamping,DIY,diy decorating,vintage,vintage style, outdoors,trailers,campers,vintage trailer,vintage camper,Shasta ReIssue,Shasta trailer, lemon decor,Lemon Drop Divas,glamping decor,yellow decor,lemon decor.
the past four posts have shared some of the decor i created
for a recent 'county fair' themed camping/glamping event.

and though most of the photos i took of trailers DIDN'T turn out :(
i have a few of ours and a few shots from the event
to share as inspiration for you when you host events or go 'glamping'!

continue reading so Miss Dot can show herself (and her COUSINS!) off...

4.21.2022

a new sweet sweater 'shroom for spring!

spring,flowers,sweaters,Sweet Sweater Originals,Sweet Sweater 'Shrooms,DIY,diy decorating,decorating,trash to treasure,re-purposed,up-cycling,tutorial,seasonal,boho style,sweater mushroom,mushrooms,spring florals,spring home decor,home decor.
last fall, i created some Sweet Sweater 'Shrooms,
using ceramic bowls and vases covered with sweater scraps.

then i found something that caused me to create a new 'take' on the 'shroom idea,
with a nod to spring...
i am really happy with the results, and the process isn't hard at all.
I hope it inspires you to give it a try!


continue reading to see how it started, and how it ends up!

4.07.2022

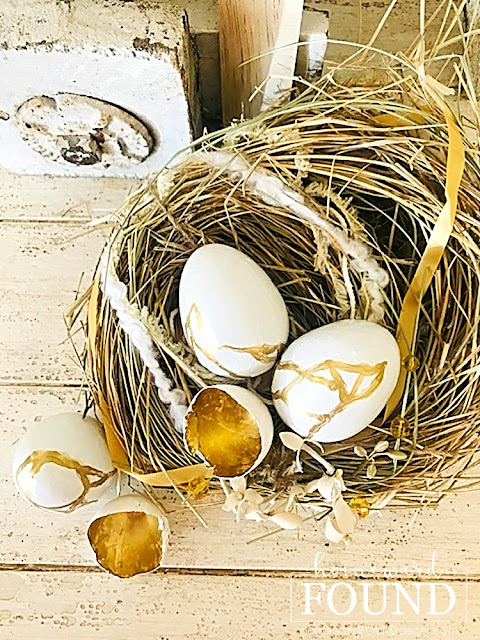
faux painted 'kintsugi' easter eggs

spring,Easter,painting,DIY,diy decorating,decorating,faux finish,tutorial,home decor,spring home decor,spring decorating,easter eggs,painted easter eggs,easter, passover,faux paint treatments,kintsugi,faux kintsugi,nests.
last fall, when i created my faux painted 'kintsugi' pumpkins,
i knew they were just a 'practice project'...
because i always envisioned that paint treatment on eggs, for Easter.

honestly, i couldn't be happier with the results!

this is a simple paint treatment with elegant results,
one that can be applied to any type of egg - paper, ceramic, wood, glass, or real eggs.

continue reading for my easy tutorial...

10.01.2018

creatively speaking...

.
for the past few months, i have posted a quote on social media every Sunday.
the quotes are always about creativity, 
these words of wisdom have been helpful to me while wrestling with some facets of my own creativity...

you see, a while back, i lost my joy in creating. 

oh there was still the undertaking of projects and posting about them online, 
but really it was pretty much just a lot of going through the motions 
and hoping that my mojo would return.
nothing about my creative process was easy or flowing or remotely satisfying.
add in the pressure of keeping up with what's happening on social media,
and the result was complete overwhelm and a shutdown of the creative cycle.

something had to change.
i began to journal and read and spend time in nature, getting away from screens 
that were filled with the results of other people's imagination and creativity, 
taking time to consider what my aching heart was trying to teach me.

and then... an epiphany....
(continue reading)

1.08.2018

Simple Winter Table

winter, for me, is all about sparkle and texture.
rough with smooth, crystal with wood, tarnished silver with crisp white.
mixing it up wherever i can brings a warmth and comfort to the 'bareness' of rooms
after the holiday overload is gone...

my winter color / texture palette this year is
white, crystal, rough wood, and glowing copper.

the simple tablesetting here shows yet ANOTHER way that i use an everyday item:
my standard white ceramic dishes.
you've seen them oh, about a million times here on the blog - 
i do that purposefully, to show you how
a very BASIC item can be re-imagined and presented in fresh ways each season.

continue reading for more details!

10.15.2016

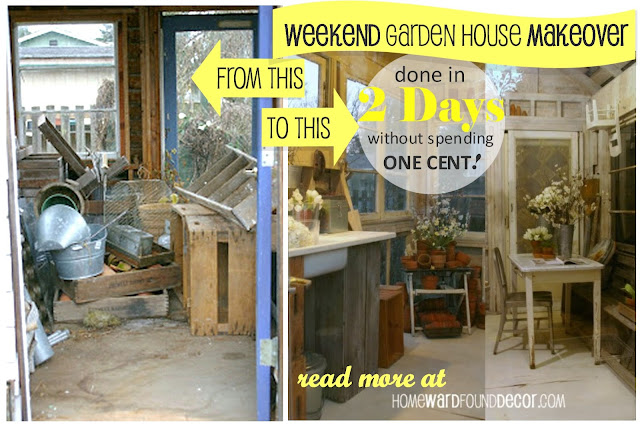
Garden House ReVisited

The photo above is what it looked like after my whirlwind two-day flurry of activity.

This is what it looked like BEFORE I got started:
See the entire transformation - that took place in one weekend - here.
It's always fun to see how spaces change over time...
Two days ago, my friend Todd shared this photo on social media:
He's decorating this tiny space for some fall picnics and enjoyment...
and yes, that's the same garden house!

You see, Todd built that garden house many years ago. 
He owns the house and the yard that it sits in.

I lived in that little bungalow for a few short months back in 2011,
after life collapsed and I had to leave my dream farmhouse & life on an island.

Todd allowed me to make over his little garden house, and I am forever grateful to him for that. 
Not only was a lot of fun and a creative gold mine -
giving me content for my blog here and many great photos - 
but it was a distraction from stressful situations at a time in my life when I really needed it. 
It gave me space and time to think. 

And now, he lives in that bungalow and enjoys that garden.
Seeing Todd out there decorating and loving that sweet little space just makes my heart happy. 
My screen door is still there, some of those tiny pots on the wall are mine, and those white shelf units were mine, too - 
though I used them in the laundry area of the house, not where they are now. 
But I LOVE them in this location!

I love that Todd was a generous friend who saw my sorrow,
and helped to turn it into a measure of joy by letting me create in this special space.
It is a gift I will never forget.

3.16.2016

Plan B. No, Really.....

...welcome back to the continuing story (saga?!) of 'project HOMEWARD' !

You've seen this image of the plot plan, site plan, and floor plan of our new house in a past post:
I have an image file that's been filling up with photos of the build in progress,
from bare dirt to complete house and everything in between
(I'll create a slideshow and share it when it's all done!)
but with our walk through and delivery date just TWO WEEKS AWAY,
I thought I'd share a bit of the detail about our new house...
 This is our floor plan...
'Plan B', according to the builder's schematic: Lot 101. Plan 1-B.

(some of the options are noted there; more about them in the future...
and let me tell ya', selecting all of those options is daunting - but FUN!)

The house is wonderful and spacious,
 and there's one particular thing we love most: NO STAIRS!
There are days when we literally drag our poor selves up three levels to the bedrooms in the current house, groaning and wincing in pain, and we don't like that reminder that we are old. Not one bit.
So this one-level house is a dream! 

The layout of the house is more than perfect for the two of us and our lifestyle...
it's the SECOND reason we both fell in love with it.

(along with the 'no stairs' thing!)

There are two bedrooms located at the front of the house, 
and two more bedrooms (including the Master) located at the back.
This gives us both privacy and space for our own activities, offices, etc.
in addition to the main living spaces that we'll share.
The rooms at the front of the house will be my bedroom and 'sitting room/office'
where I run my business (and BLOG!), 
while Mom gets the luxurious master suite at the back.
The room is so huge that she plans to put her desk/office in there, as well.

The 'guest room' is also going to serve as our craft room...
We'll set up the sewing machine there, have the closet for storage, 
and I am going to build at least one work table on wheels
that can fit over the bed, but easily move out of the way for guests.
That way, it's not a room that is used only once a month... it's used a LOT!

We thought about making the laundry room 'multi purpose' and putting the craft table there,
but there's already gonna' be enough going on in that room on a daily basis.
The guest room is a more workable plan.
(We also have a workbench for the garage for heavy-duty projects.)

For us, this use of the space just makes sense.
We're re-thinking not just how our existing  furnishings and decor  will be re-used,
but also how the house's square footage can best be utilized for our every day life.

Even if you've lived in your house for YEARS, you can do this...

look at the space with a fresh eye and stop letting past use determine future use.


Is your big dining room a catch-all for junk, but never used as an eating space - 

while your tiny den is the gathering place during meals to watch TV?
Switch 'Em! 

Move the comfy sofas and the TV into the bigger room,
add a huge coffee table at a higher height, and eat in comfort while you watch the game.
Put the dining room table and chairs in the tiny den for homework or games.

Why NOT? There are no 'room police' who will report you.
There are no 'home decor rules' which CAN'T be broken
(even though hundreds of internet articles SAY there are)...

it's YOUR house. Use the space the way YOU want to!
Make your OWN Plan B!


Our other Fave Features in the new house?

*The laundry room is IN THE HOUSE, not the garage!
After 36 years of schlepping laundry to and from the garage, my Mom is THRILLED about this! 
*Speaking of garages.... it's a 3 car garage! BOTH of our cars will fit inside
(which is something that hasn't happened at either of our homes.... EVER....)
plus a one-car garage space that will house shelving for storage of all the party stuff. 
*There is a covered loggia / patio off the dining room,
which expands our entertaining space. Did I mention we LOVE throwing parties?!
*The main living spaces are big, wide, and open with lots of sunlight.
No more tiny kitchen shut off from the party!
*The kitchen has more than THREE TIMES the counter space and storage
as the one my Mom has had for the past 36 years (which was built in 1972).
She's excited about her 'Party-Planning Headquarters'!
*Off the kitchen, there's a hallway. In the hallway, there's a spot for a WINE BAR!
(We will be located in wine country, after all...
and having lots of parties. Did I mention that?)

There's a lot more to love, and you'll be hearing about that in my upcoming posts.
Next Post? Our choices for the surfaces!
(They are installing the flooring right now, as I type this, and we hope to see it TOMORROW!)

2.25.2016

Sorting. Packing. Shopping? uh oh.

Project HOMEWARD  - our new house - continues to move forward, 
with lots of visible progress on the job site and also with our packing.
oh, Lord, the PACKING. Mom's been in this house 36 YEARS. I feel like this photo most days.

I promised you that I'd show you the FIRST thing we purchased for the new house...
Be patient... there's a story there!

I am totally into vintage industrial style. LOOOOVE it.
One day about seven years ago, I got a huge vintage scale FREE on Craigslist.
please don't hate me. she nearly broke my arms carrying her, if that helps!
She lived in my little seasonal store for awhile, and then we moved her into my kitchen:
Four years ago, I left my dream home and my island, and came back to SoCal.
 I've admired industrial style decor from afar since then,
because it's just not something I can do while living in my parent's home.

Well......... that's changing!
Mom has been watching HGTV's Fixer*Upper with me. And it's rubbing off on her!
Like so many of you, we love JoJo's style. 
It's very much like my own, and Mom has seen how I decorate my houses over the years...
 but honestly, when it comes to making design choices for the new house, 
Mom is amazing me by broadening her views to include a more industrial, farmhouse style!
We won't have a house that looks like Joanna decorated it, 
but similar components - like the white cabs and wood flooring and stainless appliances
and vintage accessories that tell OUR story - will certainly be part of it.
Shiplap? Maybe ;)

so...
Back in January, we were at a flea market (Trading Post 1908 here in Southern California)
and as we perused the vendor booths, we saw a few scales for sale...
we found a scale that was actually exactly like the one on Joanna's kitchen counter.
But we kept walking. I wasn't 'feeling it' and Mom wasn't, either.
We knew we WANTED a scale for our {{huge}} new kitchen island,
but it had to be the right scale and look.

Then we headed toward the last booth at the show
and all of a sudden Mom started walking faster.
She was makin' a beeline toward something, and I just tried to keep up.

She went to the far back corner of the booth and stopped, and then I saw it...
and I gasped. Really. Because I knew it was perfect. And so did Mom.
It was sitting there holding a ceramic bowl of bright yellow lemons
and had us at hello:

We can just picture it in our kitchen, 
holding a stack of vintage cookbooks and a jar of cookie cutters, 
or a terra cotta pot of basil - or a bowl of lemons.

Honestly, it's a smaller twin of the one that I used to have!

And the BEST part? the story.
 That's what homewardFOUNDdecor - and project homeward - is all about:
Telling our own stories through the way we decorate and celebrate!

Like what you see in my photos?

1.09.2016

Valentine's Day Sweet Tooth!

Valentines Day window display

Deb's got a sweet tooth in more ways than one, let me tell ya...
today I was searching for something on my retail visual design blog
and found a 'blast from the past' old post sharing my Valentine's Day decor.
... and since we're already gearing up for Happy Hearts Day decor,

I thought you might just want to see it!

That was my little craftsman Cottage's kitchen window shown above, 
loaded with candy dishes heaping full of yummy tidbits 
(that I'll never really eat, truth be told....my weakness is chocolate
and a few trompe loeil treats.
One of them was inspired by THIS photo
from a past issue of Mary Engelbreit's Home Companion Magazine ...
stacked ribbon cake decor
I gathered up some round cardboard containers, metal tins, fabric, ribbons, and froufrou,
and got to work making my own versions of this 'stacked wedding cake' idea.
(I know, I know, this is not WORK. Let's call it a 'Creative Exercise' then, OK?)

I came up with two of them:

original valentines day decorvalentines day decorating
It's simply a cake pedestal with boxes, tins, and even a ceramic coffee cup
stacked up in layers and embellished with ribbons, flowers, 
and even my own REAL wedding cake topper!

 I shared a similar 'stacked wedding cake'-style idea here on HWf a few years ago:
repurposing white dishes

Here are just a few more ideas for making your Valentine's Day sweet as can be....
heart-shaped candy boxes valentines day decorvalentines day decor
More clear vases, domes, and candy dishes were loaded with 
pink and red candies from the Dollar Tree, an old heart pin made from buttons,
a 'cupcake' pincushion in a mug, and red marble hearts in a heart-shaped box...
it all added whimsy and charm to that little window in front of the sink
but took no time at all to create!

The truth was that although my Cottage kitchen was a retro dream,

the view out that window was utterly hideous
it looked directly at the garage of the house next door. UGH.
(you can see it right there in the background of the top photo!)
So I always created cute little vignettes in the window to look at instead!

.
Want even more Valentine's Day inspiration?
 

See my '30 Days to Valentine's Day Countdown' posts from 2013!
View my Pinterest board: February Hearts


pssssssst..... I'm on Instagram, too!

9.17.2014

Autumn's Golden Light

 
I was searching for a certain image the other day,
and in the process I came across some old photos that just say 'AUTUMN' to me.

The golden glowing light captured in them is my FAVORITE thing about fall...
the way the light turns more amber and deep, especially in late afternoon.
It's my favorite time of day!


Since my last two posts have been about fall decorating 
as inspired by displays at vintage shows,
I thought I'd wrap that up with a post showing images of one of MY old booths at a show.
Enjoy!


 From the glowing woods to glistening golds,
luxe velvet and satin fabric details to simple paper and leather,
I think this embodies that certain color of autumn light that I so love.
There's not a typical tree leaf in sight here, but the decor speaks to the pleasures of fall.

Yes, decor can be inspired by something as simple as the color of light 
that pours through your windows during a certain season or time of day!
Let the color of a summer blue sky or a winter snow be the touchpoint for your decor,

and you'll have created an ambience that speaks to your soul.

PS: It's not about spending money.
All of the items shown in the above photos were made or 'fixed up' 
using reclaimed and repurposed materials that were found or thrifted.
Though the look is 'luxe', the cost was miniscule.
 
Someone else took photos of my booth at that show, too...
and they ended up in Where Women Create magazine a few years later.
Where Women Create's Summer 2012 issue 
featured a story on Judy Watkins and her Remnants of the Past Antique Show,  
with beautiful photos of the show by Jenny Malott.
I am so very grateful to Jenny, Judy, and Jo Packham of WWC 
that they chose several images of my booth displays to include in the story:

Right Page: my Retreat booth & products
(looks familiar, huh?
yes, Jenny took EXACTLY the same shot that I did!)

Right Page, lower left corner: detail of Retreat booth display
Right Page: Baby Grand Piano Bar,
created with my late husband Bob Kennedy for our business, 'Retreat', in 2009
This piece truly was one of his greatest designs...
details of the piano bar:
 * exterior and interior covered with vintage player piano & sheet music
* interior re-purposed as a wine storage unit, liquor bottle & glass storage, 
and keyboard replaced with a pull-out mirrored tray for serving.

shared online:
.

Practically Functional | Creativity Unleashed

 .
There's a lot more to that story....

9.02.2014

Welcome, Fall! Wait.... WHAT????!

Yeah, it's FALL, Y'all.... and I'm just not ready for summer to end!
Before we jump into ideas and inspiration for Autumn decorating here at homewardFOUND,
I thought I'd share what I was up to over my two-month 'break' from social media.
Yes, friends, I'm going to answer the eternal September question
that we all remember (fondly??) from those first-day-of-school assignments:

'What did you do on your summer vacation?' 

You had to either write about it or stand up in front of the class and talk about it.
(How many of you, like me, immediately thought 'KILL.ME.NOW.' when the teacher informed you
that you had to speak instead of write because she knew you LOVED writing??
Fortunately, I finally overcame my fear of public speaking!)

Just as I planned, I spent my 'summer vacation' doing things I love:
walking at the beach, going to flea markets and vintage shows and thrift stores,
reading books from the library, swimming in the pool, sitting on the porch swing,
seeing friends and family, and of course working at the Happiest Place on Earth!

 But the BIG thing, the ONE thing that made this summer totally awesome was that
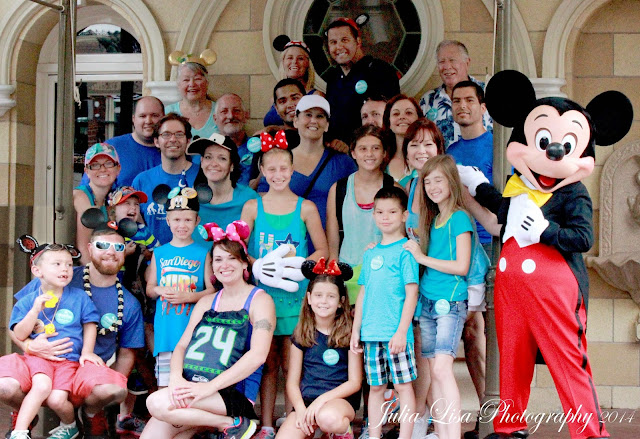
We had a Family Reunion!
Four generations of my family - my parents, siblings, our kids AND my grandkids -
gathered in California to celebrate my Mom's 70th Birthday
and to celebrate that we are one AWESOME family - 
not 'despite' the difficulties we have faced, but in part BECAUSE of those challenges.
Love is stronger than anything - even distance that spans the continent.


26 of us spent five days together at my parent's home,
splashing in the pool, making a lot of noise, talking, laughing, 
and eating SO much good food... 
(my brother brought 100 pounds of fresh fish and King Crab with him from Alaska,
and that fish fry dinner was utterly decadent!)

It was such a joy to be in the same place with all four of my 'kids' and their families,
including my four grandchildren, 
enjoying the smiles and hugs and stories and laughter.
It's a bona fide miracle, folks,
and I could not feel more blessed to have had this time with them.

And then, on the last day....
We went to Disneyland!


We posed with my BOSS! (and isn't he the CUTEST boss ever?!) 


We posed by the Castle!


and we posed in front of the attraction that is VERY important to our family,
'It's A Small World'

We have family ties to the history of this wonderful place:
My Mom's Dad and brother, my Uncle Don, were electricians
who helped build many of the attractions at Disneyland...
Grandpa Ward worked on It's A Small World, Tiki Room, and Great Moments with Mr. Lincoln.
Uncle Don Ward worked on the Haunted Mansion and Pirates of the Caribbean.

All of my life, I have had such pride that they worked to bring Walt's dream to life,
to make the magic real
(that's a HUGE part of why I have always wanted to work there!)
and since the day my first grandson was born,
I have dreamed of riding the little boats of It's A Small World with my grandchildren.
Just like my grandpa rode it with me when I was a Little Debby.

I got that wish ;) That weekend was the best part of my summer!

I created the graphic that you see at the top of this post, 
and had it made into buttons at PureButtons.com.
My sweet friend Julia Chow, who is my fellow cast member at Disneyland,
captured our dream of a day in photos.
(See more of her fabulous work on her Julia Lisa Photography facebook page)


OK, now it's YOUR turn...
"What did YOU do on YOUR summer vacation?"
Leave a comment and share!

I promise I won't make you stand up in front of anyone :)

7.01.2014

Taking a Break....

 In a world of increasing speed, business AND busy-ness, 
broadcasting our every meal and move and thought on social media,
and occupation with things happening outside of ourselves,
I crave simplicity.

I long for summer days that stretch into forever... 
a season of relaxation unfolding moment by memorable moment,
WITHOUT documenting it in photos or posts.

My heart yearns for a summertime like the one I experienced as a child - 
and if you want to see what that looks like, watch the movie 'Now and Then'.
The girls at the beginning of the film depict exactly the kind of summer vacation that I lived 
as a kid in the late 1960s and early 1970s.
I loved it. I tried to re-create parts of it for my own kids, who grew up in the 1980s.

In this recent post here on HOMEWARDfound,
I shared a bit about how a certain book influenced my summers and my life as a child.

That re-discovered book has stirred creative longings in me again:

To explore the local shops and parks and gardens that call to me as I drive by.

To spend my days off walking and sitting on the beach, 
photographing crashing waves and changing sunlight.

To be inspired to create something just for the pleasure of playing in the moment - 
not as a planned, scheduled, managed activity leading to a blog post.

To invest hours in writing letters to the people I love, 
rather than rely on texts and facebook comments to communicate with them 
in the midst of our busy lives.

To plan and enjoy a monumental birthday party for Mom and family reunion for everyone.

To spend days and nights wandering the magical streets of Disneyland,
seeing it again like an eight year old little girl with a dream in her heart
(and a camera in her hand).

To celebrate that my childhood dreams really ARE coming true 
as I work at the Happiest Place on Earth,
especially now that I have been promoted to member of the Visual Merchandising Team!

To lie in the shade and listen to music and read books that nourish my soul.

Actually, that word perfectly captures what I am craving:  
Nourishment.

I desperately need more than just a 'fast food' mindset when it comes to my creativity.
I need the freedom to immerse myself in an idea, a process, a project
and 'let it flow'...[ why, yes, I DO hear a certain tune when I read that! ]
instead of rushing everything to make it fit a blog post schedule.

There is only one way to satiate my hunger for simplicity and focus - 
and that's to simply STOP. 
Stop running through the equivalent of a drive-through for inspiration and motivation.
Stop worrying about making products and selling them online,
and marketing and promoting and... all of it. It's exhausting.

And now, finally, I'm ready to give myself the gift of summertime again...
I am taking a social media break for the rest of the summer.

I plan to spend the next few months feasting on time in nature, 
time with family and friends, time on a walking path and a bike, 
time in the sunshine, and time investing in my own creativity.

Heaven knows, I have learned that there are no guarantees.
No 'forever'. And sometimes, no 'someday'.

We have only each moment, each day, to LIVE. 

Enjoying every day: that's where I'll  be this summer.

5.12.2014

DIY Kitchen Cabinet - to - Shelf Makeover

This time of year, it seems everyone talks about 'Spring Cleaning'.
Well, we all KNOW that 'cleaning' leads to 'makeover' projects, right??

That happened in the kitchen of my former dream house...
 
Stuck in the early 90's, it was really ready for a makeover.
The oak cabinets were ugly and basically non-functional: 
narrow, hard to get access to the back of the corner cabs, 
and the doors were hung to open backward!
Not to mention they were made of orange-stained oak, 
and there was a weird paint job on the kitchen walls. 
One day, I started emptying them to clean and re-organize...
and I was frustrated beyond belief with how little they held.
[ Let's just say I was a bit VERBAL in my frustration, shall we?]

The husband heard my grumbling, walked in, surveyed the mess, and asked
"Ya' want me to just yank those things down and build you some shelves?"
 
In record time, those suckers were off the walls and out the door!
[ NOTE: I do not demolish things. 
No swinging hammers and flying wood like on HGTV and TLC shows.
Those scenes REALLY make me mad, to tell the truth. ]
We removed the cabinets from the wall, hauled them out to the workshop,
then removed the doors from them. 

Those doors became the new shelves for the kitchen, 
and the sides of one corner cabinet were ripped into strips
 to create the brackets to hold the shelves on the wall.
The rest of the cabs were hung on a wall in the shop for storage.

Painted white, the new shelves were ready to go up within a day - 
AFTER the walls were painted.
A fresh tan paint color on the entire kitchen (walls AND ceiling) 
 unified the spaces that had been split by the overhead beam and 'bay' area on the window side. 
Unseen in the photos, a new track light was installed on the backside of the beam. 
White paint on the window trim made it seem much larger and more open than the previous wood tone. 

[BTW, the rest of the plan was to paint the lower cabinets white, unifying the whole kitchen. 
I never got that far before we had to move.]
The new wood shelf brackets were screwed into the studs, 
the shelves screwed onto the brackets, and the project was done.
Then I noticed that the shelves weren't spaced quite the way I had wanted...
but I didn't say a word. 
This was a vast - and FAST - improvement, so I was just grateful to have it done!

 I filled up those shelves and the counter space below them with functional and beautiful elements - 
and those shelves held over TWICE the amount of kitchenware than the cabinets ever had!!
Best part? This project cost us nothing but time:
We had the paint (our whole house was painted that color), 
we had the screws and sand paper and tools, 
and we used the old cabinet wood for the new shelves. 

It turned out so well, we ended up doing exactly the same thing in the laundry room, too.
But of course, I don't have photos of that. :(

 Don't be deterred from making your rooms function and look better
just because you think it will cost money.... it might not cost a cent!
My next post will have a fun re-purposing idea for your bedroom decor

More Spring decor inspiration on Pinterest!

shared online:
Cupcakes & Crinoline | Project Inspire{d}