. -->

9.20.2013

That's a - DOOR - able!

Imagine my surprise when I was scrolling down my facebook newsfeed Friday night,
and suddenly saw a VERY familiar image - one of mine, as shown above!
That photo appeared in this post on HOMEWARDfound last fall.

It seems that Miss Donna, of Funky Junk Interiors fame, included one of my decor ideas
in her 'DIY Old Door Rockstars' roundup for her link party this week:
[can I just ask the question.... this IS about old DOORS, right? 
Not like the 'rockstars' are all old? just wonderin'.....!!]

Well, I am thrilled and honored to have had my 'door turned into wall art' included!
Thank you so much, Donna ;) 

I thought I'd hustle over here and put together a brand new post
showing some of the things I have done with old doors over the years...

I shared this photo in this post last fall,
where I hung an old plank door sideways as a background for industrial pieces.
In this photo, I used a paint pen to draw a 'Mom's Diner' logo on a windowed door,
then placed it in one of the displays in my Petite Retreat seasonal store.

Now, that old white door shown in the first photo in this post?
It ended up becoming a tabletop, with old carved fence posts for legs:

Another old door became another tabletop, married to legs from a ruined Eastlake dining table:
That was the kind of brilliant stuff my late husband created, for our business 'Retreat'.
Our whole business was built around creating new furnishings and decor 
from reclaimed, salvaged, and upcycled materials.

But I bet you wanna' know about the red door on the LEFT up there, don't you?

I still have no idea WHY, but he called that original design his 'Butler's Table'.
[there was NO butler at our house... there WAS a maid, tho.
And you know who it was, right? I'm just sayin'...]

He married old doors with HALF of a table - 
dropleaf, demilune, split-top, anything.
He'd come up with the most amazing combinations - like these:


and I would paint them in various aged and faux finishes.
When you opened the drop-leaf ones, you'd see this:
...the table provided a work or eating surface, and then folded back flat 
for a perfect fit in an entryway, a small kitchen, or a bedroom.
Like I said, brilliant ideas!

There's so much you can do with old doors...
go check out Donna's link party to see more!

Primitive Pumpkins

Most people know that I have a 'thing' for pumpkins
evidenced by my connection with my Original Sweet Sweater Pumpkin creations...
but not many people know WHY I like pumpkins.
.
Cinderella is partly to blame... 
that magical coach made from a pumpkin captured my imagination as a child. 
I'm a Disney kid who grew up miles from the park, members of my family were involved in building it, 
and I just love a good fairy tale! Cindy was always my favorite Disney Princess.

The REAL reason I love pumpkins, however, is my grandpa.
I was the first redhead in our family, and apparently that captivated him.
For the first fifteen years of my life, he lovingly called me his 'Little Pumpkin Eater'
in his soft, gentle voice and with a twinkle in his eyes.

We lost him on the night I went to my first formal dance in high school, when I was 15,
and I'd give anything to hear him call me that again.

Since he can't, I collect pumpkins to remind me of him...
at one point, I had over a hundred pumpkins. [yes, I can say 'hoarder'!]
I've since learned that it's the QUALITY not the QUANTITY that matters,
and I make and keep and buy only the best pumpkins now.

Speaking of 'the BEST pumpkins'.... just look at these darling prim pumpkins!

My sweet friend Angela makes them, and I LOVE them. 

I just had to share them with you as one of the 'Products I Love'.

I adore her choices of various vintage repurposed fabrics
from burlap to feed sacks to muslin, to chenille bedspreads, they are all sublime

Now, I am not a 'primitive' decorator...
but these feed sack pumpkins make me go 'SQUEEEEEEEEEEE!'
They look more industrial than prim to me!
 Just look at these BLUE pumpkins made from a vintage chenille bedspread!
Yes, if your home has blue decor, you should do something original like this for fall!!!
Angie lives in Ohio, and we met in the spring of 2012
when Angie was a vendor in the FOLKbarn at the Springfield Antique Show.
I am so glad we did! She's a single mom with amazing creativity...
and a precocious young daughter nicknamed 'Princess'. I bet she likes Cinderella, too!
 Angie sells her beautiful pumpkins for remarkably reasonable prices,
AND she offers free shipping in the USA.

LARGE $20 - @11" wide and @9" tall including stem

MEDIUM $15 - @7" wide
Set of 1 MINI + 2 TEENIES $20 - @3" and 2" wide

Angie also makes stacks of three in a combo of large, medium, and mini on request,
and her pumpkins also come STAINED or unstained
Angie's pumpkins are limited editions, because of the vintage fabrics she uses.
So the exact pumpkins that you see here may no longer be available...
 To purchase pumpkins like these, please contact Angie directly
 through her facebook page Primitive Folk Artist Lil' Raggedy Angie

9.18.2013

Madre de Dio de Los Muertos!

Having spent more than 35 years as a retail display designer and stylist,
I have a great appreciation for this art of merchandising products - when it is done right.

And let me tell you, I live five miles from one of the BEST visual merchandising teams in the WORLD!
The geniuses at Roger's Gardens came up with this AWESOME idea,
and so for my first HALLOWEEN post, I just had to share it:
Paint Dia de Los Muertos [ 'Day of the Dead'] elements onto classical statuary.
MIND. BLOWN.
[I'm not sure, but those two on the bottom could be
Janet and Rocky from the Rocky Horror Picture Show.... smile]

These statues punctuate one of the SIX rooms in the 2013 Halloween House - 
a warren of six rooms on the grounds of the nursery that is transformed each fall
into a wonderland of scary delights.
This year, the theme is 'Night Gallery', and everything reflects a haunted museum/art gallery.
Ghoulishly clever!

Yes, you COULD do this!
Every time I walk into a thrift store, there's some errant knick-knack on a shelf
that looks like Marie Antoinette or Caesar or George Washington...
[usually they are concealing an AVON bath oil bottle, but whatever! They'll work!]
Paint them with flat white paint and then get busy adding dio de los muertes (Day of the Dead) motifs using paint pens, felt markers, poster paint, craft paint
....and those stale old 'busts' will be history. or... 'busted'. 
Take your pick! And have fun!

I have more photos of other brilliant ideas that they came up with, 
which translate into things for you to try at home... 
and I'll try to break them down into easy steps to get a similar look
without having a lifetime of experience in visual effects... stay tuned!

Photo credit: Debi Ward Kennedy . Photos of Rogers' Gardens displays

9.17.2013

Guest Designer: Amy Thayer

Today I am thrilled to introduce you all to my friend Amy Thayer!
Amy is a very talented stylist and photographer... and writer.. and cook... and mom...
[I think she has a WonderWoman cape in her wardrobe, I really do...]
We met through our work for FOLK Magazine last year,
and she really is as sweet and darling as she looks.

Amy is guest posting today on HOMEWARDfound
to share some of her fall decorating tips with you -  and I know you will LOVE them!

So, please welcome AMY!
It's no secret that Fall is my favorite time of year. I've said many of times that myself and extreme weather are not the best of friends. I tend to "hibernate" during those times. However, when the air begins to crisp and the leaves begin to Fall, I come out of hiding and go on a decorating frenzy. I often get asked, "Where do you get your inspiration to create your Fall vignettes?" Well, I get inspired in lots of places, but I have found that my vignettes really are created by a few simple steps and inspiration is only a very small part. I want to share with you a few of my steps and you, too, can create a stunning Fall vignette or a vignette for any season!

Before I start, I want to say that decorating is an art. You have to work towards it. If you don't love something, keep trying! You will eventually find your groove and style. We don't always get it on the first try either.

  • Step 1: Gather supplies- Use what you have.
You don't need an arsenal of Fall decor cramping your organized life. Walk around your house and pull things that have texture (wood, metal, chippy paint,) empty vessels (jars, baskets, trays, etc,) color appropriate things (pink and green, orange and aqua, black and silver, brown and gold- Don't be afraid to step away from the typical black and orange combo!) Be sure to grab some interesting things for height- you don't want every thing on one level. Use what you have!
Look at items for what they can become, not for what they are.
  •  Step 2: Create a background or backdrop 
This could be a fence, old door, corn fodder, hey bales, brick wall....anything. Your vignette needs it's "canvas" or a place for the eye to stop and focus on your vignette.
fence as backdrop
fence as backdrop
  • Step 3: This is where you start filling in your gathered supplies or your props. 
Create a balanced placement of your props by using my yin-yang method. Now, I call it "mine," but really it's just a simple method of creating balance. The reason we like a vignette or setting is because it's easy for us to look at. If it makes our eyes work because it is cluttered or unbalanced we don't want to look at it- it's too much work for our eyes. (stubborn, lazy little things. Aren't they!)
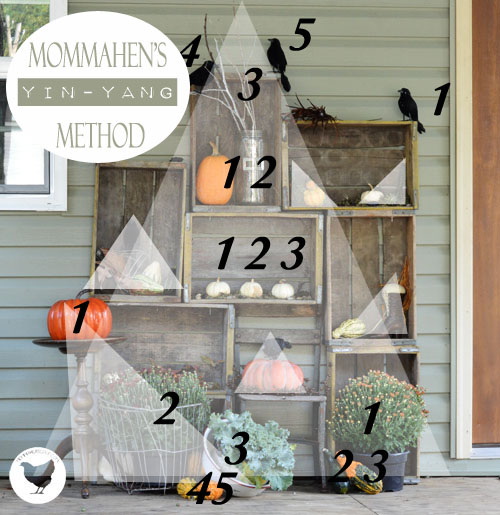
MommaHen's yin-yang method
It's kind of ironic that my above presentation is not exactly yin-yang, but let me break it down for you and describe what you are looking at. Yin-yang is, very simply put, forces working together to create one equal balance. You can achieve this by using triangles and odd numbers. I don't really know the science behind why we appeal to odd numbers, but it's true. 
When in doubt, always use groupings of three or odd numbers.
If you go through the image above you will see that as a whole there are a ton of aspects. The reason it works is because of all the small grouping using my yin-yang method. Notice each of the triangle groupings, meaning they are grouped in the shape of a triangle. Also, notice that the groupings are in groups of odd numbers. 
Try it! Walk around your house. Do you have an even number of groupings in a vignette? Break it down to three or another odd number. Place them in a triangular setting. What do you think? I told you it works!
  • Step 4: Bring in your natural Fall items.
Meaning leaves, pumpkins, gourds, corn, corn husks, anything that is naturally occurring in nature during this season.  This step gives your entire vignette a meaning. It will define your purpose of the vignette.
Fill your vessels, baskets, jars, etc. that you have collected and arranged from previous steps.


  • Step 5: add "creepies"
This is sort of an optional step, but crucial to be authentically MommaHen style. I always stop by my local Dollar Tree and stock up on black crows, spiders, spider webs, and little rubber rats. 
Don't go overboard! Just add a few randomly placed (small bits!) of web and a spider. Crows tend to hang together so have them lurking in or on a pumpkin. This just adds a fun and unexpected aspect.


Now, stand back and look at what you have created. What do you think? 
If there is something that you don't like, move it. Continue to not love it? Remove it! 
Just play with around with your new vignette until it's something you are proud of. Enjoy!

 I want to say a big giant thank you to Deb for having me over to HOMEWARDfound for a visit...
I greatly appreciate it and am so honored. I hope you all enjoy my style, and jump in and get creative!  
I invite you to stop over and visit me on my blog, anytime.
Amy Thayer of mommahenscoop.com


9.14.2013

Take It Outside!

Want some unique decor for your alfresco fall dinner this weekend?
Take a chandelier OUTSIDE!

In this scene, a thrifted brass chandelier has been sprayed silver 
and hangs from the center support of an A-frame wood ladder, 
using a metal shower curtain hook and sturdy wire. 
The chandelier cord has had a plug added,
and a very long extension cord allows the light to be plugged into a socket in the nearby barn.
Frosted night light bulbs add just enough light for ambiance.

The A-frame ladder is flanked by two smaller ladders, 
and sections of old picket fencing are propped up to form a 'house'-shaped backdrop to the setting. 
The openness of the display allows diners to look through to the fields and pastures beyond...
add food, friends, flowers, and music, and you have a lovely pastoral evening!

[The table made from reclaimed fenceboards and the benches crafted from old headboards and chair arms 
were created by Bob Kennedy for Retreat, 2009. Setting by Deb Kennedy.]
_____________________________________________________


Are you looking for fall decor inspiration with PUMPKINS? 

Head over to Funky Junk Interiors' 'Party Junk' link party - it's ALL about DIY Pumpkins!
[three ideas from HOMEWARDfound are on there!]

9.12.2013

Walls of Paper and Wood

I am currently looking for some old wood crates to use in a display at an upcoming artisan show
[more info on THAT coming soon!]
Because I've been focusing on crates, a display I created years ago has been on my mind...
it's something that can be easily replicated in a home,
and I thought you might like to see it!
 This is a 'before' photo of the wall I decorated.
Actually, this is the second photo, because it started out blood RED.
As soon as I could, I painted the whole barn interior WHITE!

Um, yeah, you read that right.... this was inside a horse barn!
We had a small 2-stall barn on the farm, and I decided to turn it into a seasonal store.
After the cleanup and paint, lights were added
[bought at the ReStore for $3 each!]
and the french doors on the left were installed on the inner wall
so that the huge barn door could still slide open & closed on the outer wall.

 So then I decided to add some interest to that big white wall...
and I 'wallpapered' it with strips of vintage piano player music!
[I had a box of fifty rolls, so there was a LOT to work with.]
After the wall was covered, I added extra pieces that curled up and out, to give it texture.
I even hung some of the strips of paper with the roller dowel still attached,
and some from the rafters up above to make the wall seem even taller.
 Then I took a collection of miscellaneous wood crates & boxes
and screwed them to the wall in a free-form configuration.
I didn't measure - I just started at the bottom with the biggest crates, and worked my way up the wall.

I liked it when it was empty, but the whole point was to create areas for product to be displayed...
... and I crammed a LOT of small items into those boxes!
Furnishings and lamps and other accessories were grouped in front of the wall, 
and the whole room came together in a very organic, country, almost 'Anthropologie' display.

I say 'room' but really, it was still just a barn stall!
[that french door you see was set on the inside of the opening, and the dutch barn door opened out]
You could certainly do a treatment like this in a home...
in a wide hallway, office, or guest room.
or in your store, like Peggy did at Down Home Country Antiques in Orange, CA!
[more in this post from last fall]
or, like Roger's Gardens Nursery in Newport Beach, California did above,
create an outdoor wall treatment that will hold your garden supplies and plants.
I could even see this arrangement on the side of a garage leading up to the front door,
with beautiful natural elements displayed every season of the year!

LOL!
I'm editing my post to add that I nearly fell out of my chair laughing
when I clicked into the blog Thursday night to find
an ad for a HORSE BARN below this post!!!!
Adsense, really???
Out of all the content on this blog, THAT one term in one line of this post
is what you come up with as correlated marketing? sigh.....

shared online:

One Project Closer | My Blessed Life