. -->

hello! don't miss all of my sidebar content - click 'view web version' on your screen!

Showing posts with label simple solutions. Show all posts

6.29.2013

Custom Water Bottle Labels

Here's another of my 'Fast, Cheap & Easy'TM decorating ideas -
just in time for your weekend picnic plans!

All you need are your water bottles
and latex balloons in a color and theme that matches your party decor.

Cut off the top round part and the lower round part & neck of the balloon
as shown in the image above
then slide the MIDDLE section of the balloon over the water bottle.
[remove the paper label from the bottle if it will show]

... and just like that, you've got customized labels!

I haven't seen these anywhere else (and I looked)
so I am claiming this as an ORIGINAL idea!


shared online:


funky junk interiors |  new upcycled projects to make #584 (2021)

6.27.2013

Easy Bandana Banner

Party Banners seem to be everywhere...
and while I know that it's not THAT hard to cut and glue or sew burlap or canvas to make one,
there's a SUPER EASY way to get this effect in no time at all...
and you'll be able to use the materials in other ways when you are done using it.
Getting double use out of decor elements? LOVE.

continue reading for my EASY version of a banner, 

made with Bandanas from the Dollar Store!

6.25.2013

It's All Bottled Up!

Don't you just LOVE it when you find something you already have
that you can make use of for your upcoming party or holiday decor? I do!

I was searching through the garage cabinets one day for paint,
and discovered a hoard of vintage soft drink bottles under there!

I knew exactly what I'd use them for: flower vases in a patriotic tablescape...
The vintage Coke and Pepsi graphics on the bottles
coordinate perfectly with the patriotic color scheme in this summer setting by the pool...

I even used some blue blown-glass plant watering bulbs to bring in more color,
because it doesn't always HAVE to be about flowers in your centerpiece.

Click the 'Read More' link for more photos and ideas!

6.06.2013

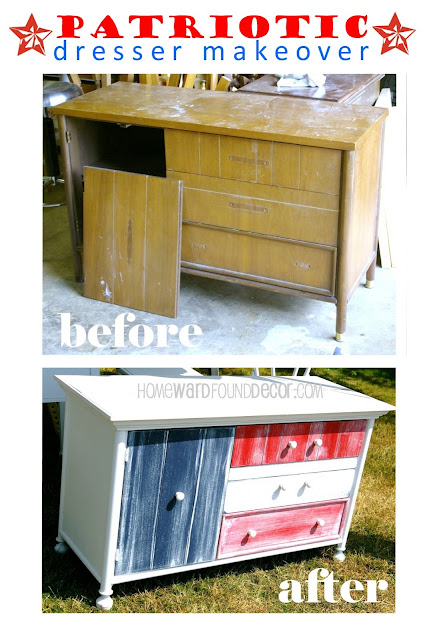
All American Style: Dresser Makeover

Looking for some inspired and LOW COST ideas for your Summer home decor?
Here's what can be done with a little bit of carpentry work and a few coats of paint
to a piece that may start out very UN-inspiring...

The mid-century (1950's) dresser shown in the 'before' photo wasn't too appealing-
except for the fact that it was found for free in the remnants of a friend's garage sale!

Combined with some old boards, new knobs and feet, a little router work, and paint treatments,
the one-of-a-kind piece in the 'after' photo is ready to be a star 
in an an entryway, guest room, family room, or even on a patio for Summertime fun!

* The long tapered legs (very dated look) were chopped off just below the case. 
Then four large ball feet purchased from the hardware store were screwed into place.

 * A new top was added over the existing dresser top, 
made from some old, peely-paint T&G siding pieces, placed side by side. 
The new top measured @ 3" larger all around, to add more dimension to the piece.
* 2" crown moulding was added to make the new top a seamless fit to the old piece.

* Up close, you can see the grooves in the drawer fronts - cut in with a thin router blade to mimic barnwood.
* The entire piece was painted white.
Then, the drawers and cabinet door were all painted dark blue, then more layers of  white and red were applied. 
A dry-brush application of white over the blue and red followed, 
then a careful sanding with fine-grit sandpaper revealed the graduations of color 
and made the grooves stand out on each section.

Best part? The paint was free at the garage sale, too!

* Simple round white ceramic knobs were added to the original drawer pull holes on the piece - 
their quirky offset placement was charming!


The finished piece has no hint of the dated, Danish-inspired design it began with. 
Instead, it displays classic country lines with charming All American Style!

[This project was completed in 2010 by my late husband and I for our business 'Retreat'.
It was purchased and lives in a beach house on Camano Island, WA ]


4.18.2013

new uses for metal bread pans

when i was running a business based on turning castoffs into beautiful and functional objects,
it thrilled me to no end to find strange bits and pieces,
 and then use my imagination to reinvent them.

industrial metal bread pans were one of those finds...
i came upon a tilting stack of 75 of them at a barn sale, and bought the lot. 
and then i used them for all KINDS of things:
 
* holding plant pots in my garden house 
as shown in my 'Garden House Makeover Project' post

* as 'drawers' in a salvaged dresser that had none


* displaying giant letter tiles
[tile tutorial here]

* organizing craft supplies, papers and files in my studio/office

* holding canned goods and paper towels in my pantry

* organizing tools by the BBQ

 * and making a spur-of-the-moment moveable herb garden:
this particular creation happened by accident...

i was setting up at a show, moving things all over the booth,
trying to find a place to put one last industrial bread-baking pan.
there was a small metal wheelbarrow frame sitting on the ground, 
waiting for a wood crate to be placed into it.

but i had a better idea....
i placed the metal frame up ON the table 
[on a burlap feedsack so it wouldn't scratch the wood]
and then sat the metal bread pan in the wheelbarrow frame.

it didn't fit perfectly... but it was unique!
i added some potted herbs, handfulls of straw from the ground,
and the vintage jelly jars that i had planned to sit on a tray on the table.

the look was decidedly more interesting than my original plan
and it's a great idea for a move-able herb garden centerpiece:

* line a metal baking pan or oil pan with plastic or foil
(large industrial or small household size, either will work)

* place pots of herbs into each section (they hold a LOT)
you could also plant the herbs in the pan - just add rocks before soil, for drainage.

* sit the pan on something that it's not supposed to go with -
an upside-down round stool, for example. or the silver base of a fancy warming tray.
mix, match, whatever!

it makes for a great conversation piece
and an easy move from table to kitchen counter to backyard, 
for watering and sun exposure.
______________________________________________

any way you slice it, that's a lot of different uses from just one item -
and that's what 'found' decor is all about!

3.29.2013

Switch It Up!

 one year, on the day before Easter, i awoke with a wild idea.
[which, truly, isn't that unusual]
the family was coming the next day for Easter dinner, and i wanted to do something different.

and no, i'm not talking about making a new dish for the meal.
i'm talking about the place where we'd HAVE the meal. i was ready for a big change!
 this photo shows my lovely seven-foot-long pine dining table in the dining room. 
which is fine, but the sunlight never really reached this part of the house.
 and i wanted a sunny Easter gathering
[since the weather in Seattle was cooperating that year!]

so... i pulled the dining room table out into the living room,
and moved the round farm table from the living room to the dining room...
sadly, while i don't have a photo to show the whole dining table in its new location,
i do have this one with GLORIOUS sunshine pouring in the windows onto the pine. 
it literally glowed with warmth, which was exactly what i wanted!

with two windows facing the front yard (south) and a glass door from the porch (west),
the table was a bright and happy place for our holiday meal.
 the round farm table made a charming addition to the dining room space.
 i pulled a park bench and two garden chairs from the front porch, 
which completed the seating area.
the room offered a more sunny and open look - much like a 'breakfast room',
which is exactly how it was used for months afterward!

[and when the kids showed up on Easter, 
everyone gathered here for pre-dinner drinks and conversation!]

here's a floorplan sketch to show you how it played out:

i left the tables this way all through spring and summer that year, 
and loved the way that we used the space differently.
i used the large dining table as a desk on many days,
since i was able to look out onto the sunny yard and porch awhile working.

remember: it didn't cost me a thing - just some muscle and a little time - 
but the Cottage was renewed and refreshed!

what about YOUR rooms?
is there a switch you can make that will revitalize your space
 and give your rooms a new look and functionality for the season?
give it a try!

[i know, it may be hard to convince your hubby that this is worth doing...
just remind him that it's a free way to redecorate!]

3.08.2013

Last Minute Spring Tablescape

have you ever thought you really had a handle on things, 
were totally prepared and ready for something...
and then all of a sudden you realize there is something very VERY wrong?

 i once FORGOT all about the table decor for a family Easter dinner.

Easter Sunday arrived and the food was in full-swing prep mode. all was well in the kitchen.
and then, i walked into the dining room - and stopped dead in my tracks. 
THE TABLE WAS EMPTY!
i had no decor. no nuthin'. and the family was coming in an hour!

i have no defense. i was just busy, and forgot all about it.

 so after i started breathing again.....
i kicked into 'search and recover' mode.

whatever decor i was going to use had to be toddler-grandson proof. 
he was 16 months old and in that stage of climbing, 
pulling on tablecloths, and grabbing at everything
[it's ok, i didn't mind that he did - 
it's kind of a boy's job to investigate everything at that age!]
i just wanted to eliminate the chance of damage to him - or anything else.


 in the days leading up to that, i had been cleaning out my office
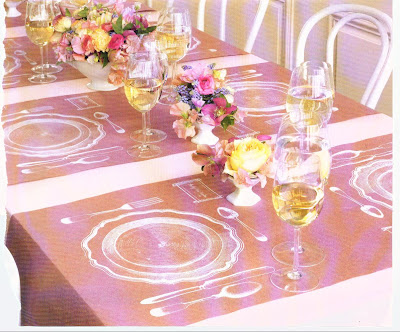
and came across a page that i had saved from a Martha Stewart Living Magazine  
ages before. like.... YEARS before.
i still don't know why it was sitting on the top of a wire filing basket that week, but it was.

and on Easter Sunday, an hour before guests arrived, Deb had a flash of inspiration:
 photograph from Martha Stewart Living Magazine 200?
that photo ^ from Martha's mag saved my hide.


this 'last minute idea' meant that i grabbed some packing tape and scissors, and 
i wrapped the tabletop with white wrapping paper!
 [nothing was hanging over the edges for lil' man to pull on]
if you  want to do this but don't have white wrapping paper,
TURN YOUR WRAPPING PAPER OVER!
almost all of them are white on the back side. 
[no one will know that rudolph or birthday balloons 
are on the side of the paper that faces the table]

i used green felt pens to draw charger and flatware outlines at each place setting, 
along with a drawn-on placecard.
[this is not detailed fine art here, like Martha's -
it's a fast solution half an hour before everyone arrived!]


i popped 3 dozen yellow daffodils (from my birthday the week before)
into 3 cylinder vases wrapped with antique velvet ribbon
and ran them down the center of the table, along with some tea lights in clear glass cups.
[WELL out of a little somebody's reach!]
 
 the china has a light sage green border that matched the linen napkins
and it was a perfect way to add color to the crisp white table setting. 

 the whole look is very simple, contemporary, and un-fussy
and i did it all in thirty minutes!

and incidentally, the photo of that 'last minute' table that you see at the top of this post
is one of my all-time favorite shots of my spring decor!
sometimes the easiest solutions really do make the most impact

for me the important part wasn't the decor, though...
the BEST part was this lil' guy peeking through the daffies at me:

shared online:

Saturday Night Special #178 | Funky Junk Interiors


1.16.2013

More Office Organization Ideas!

 WOW! I can't begin to tell you how much traffic my office organization post
has generated!
it seems EVERYONE is looking for ideas and inspiration
to make their creative spaces work for them...
i want to thank you ALL so very much for coming to visit me from hometalk and pinterest!

I've located MORE ideas & images to share from my archives!

In that post shown above,
you saw images of my neutral color vintage-style office/studio space in dream house C.
the images i found are of farmhouse B, and cottage house A.
[i know that's confusing - i moved a lot! imagine how i felt!]

the great thing about moving a lot is that i discovered many ways 
for the fixtures and accessories that i had 
to work in ALL of those rooms, in ALL of those houses:
the IKEA shelf unit, the tall work table, the old shutters, the shallow IKEA drawers
were workhorses that i could fit into almost every one of my offices.

by using inexpensive paper from dollar tree and target, or thrift stores, 
i could create a whole new look in each room... sometimes in the SAME ROOM
[what can i say? i'm a decorator. stuff HAS to change! that's why i like doing it on the CHEAP!]

here's how my office in house B looked for awhile:


 the dollar store is a terrific place for cheap supplies to spiff up your office!
from wrapping paper and gift bags to file folders, stickers, scrapbook paper and tote bags,
there are a lot of paper and fabric items there that can be used to 
contain, separate, organize, cover, and decorate your office supplies...
it's also the easiest, cheapest way to take a bunch of old things like  boxes, tins, and clipboards
and make them beautifully usable again!

 by coordinating the color and patterns of the components, 
you'll instantly add a visual update AND a cleaner look to your office!
the selection of paper and fabric goods was gathered up at Dollar Tree stores 
[and also from the 'sale'-item aisle endcaps in the stationery department of Target]
the common theme here is black and white glamour, and every item has many uses...
[granted, items shown were not found there this year...
but the selection is always good this time of year]

*shown in the first photo above, i took the wrapping papers from Target 
and covered small boxes with them.
they hold post-it notes, pencils, and other small items on my desk and worktable.

*i also covered the drawers on two slim drawer sections from IKEA (had those already)
my mouse pad, and several composition books for notes - all it takes is a gluestick!

*several pieces of corkboard were covered with scrapbook & wrapping papers
for my inspiration board backgrounds [not shown],
and the waterproofed totes from the Dollar Tree store hold craft supplies, trims, etc.
elsewhere in the office, other black and white accessories add more interest:
*clear jars hold vintage bobbins, bingo cards, and white flowers
*paper-covered shoe boxes stack up to hold craft supplies or project components

of course, you can also use vintage sheet music and book pages
to cover everything in an office to coordinate the decor...
I've done that, too!

let's take a look at a few details from my House B office/studio space 
in a whole new color palette and style :
above is the office/studio in house B
[which was also shown in the black & white decor images in the other post]
only instead of being black and white, now it's filled with cozy neutrals.
it's simply a change of the paper that is covering containers & inspiration boards,
a wardrobe change for the mannequin, new paint on the chandelier,
and a few small accessory switches to make the room look completely different!

things that i really liked about that office:

* it felt bright all the time because of the mirrored closet doors (see in reflection)
and because i put MORE mirrors on the opposite wall.  
light bounced EVERYWHERE
[and in Seattle, you need all the light you can GET]

* this was the first time i had the tall work table and high barstools in an office,
and they worked SO well for me.
i stand up a lot and move around when i am working, making everything more accessible.

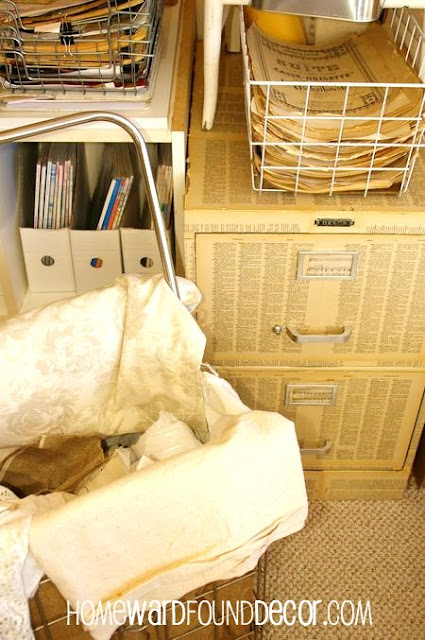
* you can see the dictionary-page-covered file cabinet 
[shown below in an image from the other post]
under the work table. i LOVED this piece!

below is the office/studio in house A
it's one you haven't seen yet...
[though other posts have shown the beautiful huge white mantel in this tiny cottage!]

tiny would be the operative word here - this room was only 11X9.
nevertheless, i fit a LOT of storage in here [used the vertical space!]
and even took the closet doors off so that built-ins could be used in there, too. 

and, okay, you may notice that at the time, i was heavily into chartreuse green. and pink.
[i am not preppy. i swear i didn't know that was 'the uniform' for Lilly Pulitzer fans!]

 but even though now i think i would go bonkers in that room, 
the happy, bright pink and green papers [yes, dollar tree and target!]
really went a long way in coordinating a bunch of haphazard elements in here.
it's REALLY important to reduce the LOOK of clutter as well as the ACTUAL clutter
when your space is only a hundred square feet
 things that i really liked about that office:

* the green damask paper was FLOCKED. uh huh! 
target. that was in 2007 - i think it's all gone now, girls!
it covered pinboards that were nothing more than simple squares cut from 4X8 sheets of rigid insulation! yes, building supplies!

* the glass jars holding colorful crafting supplies... and yes, candy

* the hot pink cards hanging from the wire mobile
tearsheets from O magazine, with encouraging quotes on them.

*
the wonderful enamel-top farm table.
i used that table in dozens of ways for over 18 years!

* did you see the chandelier?! it's green in this room.
it was about twelve colors in the twenty years that i owned it!

i hope these ideas inspire you to see what you can do 
with what you already have on hand and can get inexpensively!

12.28.2012

welcome winter...


it's time to clear out the Christmas decor and freshen our rooms for time spent indoors...
let's cozy them up and make them inviting with stuff you probably already have!
let's greet the new year with a happy home and a happy heart

homewardFOUND is ideas, inspiration, tutorials, tips & tricks 
for easy seasonal decorating using everyday finds...

12.26.2012

Winter Decorating: Glass Lamp Globe 'Snowballs'!

back in a post last fall, i shared a tutorial for my original Glass Globe Pumpkins with you
[thank you for making that post my all-time #1 post, by the way!]

but i use those glass light globes in different ways all year long!

here's what i do with them in the winter:

* take the simple clear glass ones, 
and make them into snowglobes...

* find small figurines at thrift shops or the dollar store
* spray paint them gloss white
* hot glue them inside a shallow white bowl or pedestal
[i like using hot glue  - 
because if i want to change it all later, i can!]
 
*flip the globe upside down with the opening facing up - 
then add some snow flakes or glitter inside.
* then put a bead of hot glue all along the rim of the globe, 
and place the base upside down onto the glass globe's opening.
* trim the edge of the base with vintage trims, ribbon, jewelry if you like.

 * in the globe shown below, i also glued a clear plastic snowflake behind the little angel figure.

You can use glass fishbowls, too!

 ________________________

* nestle them into arrangements of greens and cones,
in urns and buckets and boxes...
put night lights on an extension cord inside them so they'll glow!


You can use a strand of mini-lights for outdoor use, as well...


* another easy way to use these is just to fill up a beautiful urn, bowl, wire basket, or other container.
the sunshine pouring in the windows is enough to light them up
and show off the beautiful patterns in the glass...

my wire urn below was one of my favorite display pieces for these!


 they work inside and out -
try heaping them into a wheelbarrow in the garden
and lit them with mini-lights!


... and no, that's NOT all!
i'll have more ideas for these when SPRING comes!